Installation and deployment of tensorflow 1 and 2
Windows and linux usage is the same, I tested it manually under both win10 and ubuntu2204
This article uses conda’s approach, updated August 17, 2023
Link:tensorflow website
Note: If you get an error or get stuck because of network problems, please cancel and try multiple times, I’m all set to install with the default network environment in here. Most of the time very quickly
I. Basic configuration
1. need to install anaconda
If it’s not installed, follow this tutorial of mine (both windows and linux):
Because notebooks are so easy to use, don't use miniconda, then you won't have a notebook!
Link.anaconda installation
Beginners are recommended to use the cpu version, the gpu configuration is relatively complex, there are many pitfalls
My tutorial here is a straightforward installation including dependencies, no need to compile manually
2. gpu version requires cuda and cudnn
You can install it in the gpu conda environment, and it is recommended to install it in the system environment as well.
cuda11.8,cudnn 8.6
cuda installation (linux)
cuda installation (windows)
cuDNN Installation
3. windows users who want to use linux
You can refer to my illustrated linux installation (detailed)
unbuntu:ubuntu2204 installation
debian: debian 11 12 Install
Second, install tensorflow 1.15 (last cpu version of 1)
Consistent under windows and linux.
Since I’m mainly using 2 now, I’ll just use the cpu version for 1, or I’ll have to lower the cuda version (or multiple versions of cuda side by side).
1.15 is the last version of tensorflow1.
1.install python3.6 environment
conda create -n tensorflow python=3.62. Activate the environment
conda activate tensorflow
3. Install tensorflow1.15
Installation through domestic sources
pip install tensorflow==1.15.0 -i https://pypi.tuna.tsinghua.edu.cn/simple/4. Convenient to use in notebooks
Installation through domestic sources
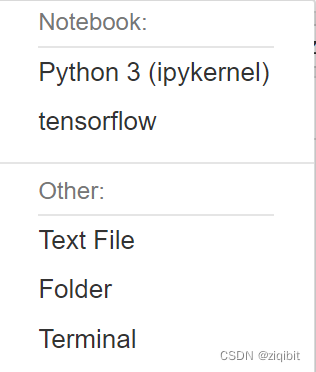
pip install ipykernel -i https://pypi.tuna.tsinghua.edu.cn/simple/python -m ipykernel install --name tensorflow5. After opening the notebook, you can see the tensorflow environment

6. Verification
Just open notebook, type in the following and run it to display the version number
import tensorflow as tf
print(tf.__version__)
III. install tensorflow 2.13.0 (cpu version) (updated July 2023)
At the time of updating this (2023.7), the latest version is 2.13.0, as a demo
Official compatibility given:tensorflow compatibility

1. Install python 3.10 environment (between 3.8-3.11)
Here we use python 3.10.
conda create -n tensorflow2_cpu python=3.10activation environment
conda activate tensorflow2_cpu
2. Install tensorflow2.13.0
pip install tensorflow-cpu==2.13.0 -i https://pypi.tuna.tsinghua.edu.cn/simple/3. Adapt the notebook
pip install ipykernel -i https://pypi.tuna.tsinghua.edu.cn/simple/python -m ipykernel install --name tensorflow2_cpu4. Verification
Just open notebook, type in the following and run it to display the version number
import tensorflow as tf
print(tf.__version__)
IV. install tensorflow 2.13 (gpu version, linux only) (updated July 2023)
After version 2.12, there is no more tensorflow-gpu branch
Since it has been deployed and installed on linux, I didn’t notice the change of the new gpu version, the new version of the gpu version is relatively troublesome for windows users, it is recommended to install wsl2 (linux in the windows subsystem, and then use it as linux, or install the old version of the gpu version)
It is possible to not look at compatibility:Official compatibility site

1. Install python 3.10 environment (between 3.8-3.11)
Here we use python 3.10.
conda create -n tensorflow2_gpu python=3.10activation environment
conda activate tensorflow2_gpu
2. Install cuda and cudnn in your environment.
conda install -c conda-forge cudatoolkit=11.8.0pip install nvidia-cudnn-cu11==8.6.0.163 -i https://pypi.tuna.tsinghua.edu.cn/simple/3. Configure environment variables (automatic activation method)
This way you don’t need to manually configure environment variables in this environment every time.
Creating Configuration Files
mkdir -p $CONDA_PREFIX/etc/conda/activate.dWrite environment variables with the command
echo 'CUDNN_PATH=$(dirname $(python -c "import nvidia.cudnn;print(nvidia.cudnn.__file__)"))' >> $CONDA_PREFIX/etc/conda/activate.d/env_vars.shecho 'export LD_LIBRARY_PATH=$CONDA_PREFIX/lib/:$CUDNN_PATH/lib:$LD_LIBRARY_PATH' >> $CONDA_PREFIX/etc/conda/activate.d/env_vars.shRefresh the environment variables (the above actions are automatically loaded each time you enter the conda environment, the following entry is the first time they are loaded)
source $CONDA_PREFIX/etc/conda/activate.d/env_vars.sh4. Upgrade pip
pip install --upgrade pip -i https://pypi.tuna.tsinghua.edu.cn/simple/5. Install tensorflow2.13
pip install tensorflow==2.13.0 -i https://pypi.tuna.tsinghua.edu.cn/simple/6. Adapt the notebook
Notebook is not recommended for gpu version, it is easy to report errors
pip install ipykernel -i https://pypi.tuna.tsinghua.edu.cn/simple/python -m ipykernel install --name tensorflow2_gpu7. Verify cpu and gpu sections
If the error is reported, refer to the following five, there is a solution
cpu test
python3 -c "import tensorflow as tf; print(tf.reduce_sum(tf.random.normal([1000, 1000])))"gpu test
python3 -c "import tensorflow as tf; print(tf.config.list_physical_devices('GPU'))"V. Other issues and solutions
1. How to use the specified environment
Method 1: write in notebook (easier, but gpu version may be wrong)
Method 2: Enter the specified environment of conda and use the command line
Method III (recommended): Use remote development, install development tools locally, and connect to the command line remotely.
2. cpu optimization using avx2
You may be prompted to turn on avx2 when using it (you can ignore it)
avx2 can accelerate cpu, need cpu support and turn on in bios, turning on avx2 may significantly increase power consumption
3.successful NUMA node read from SysFS had negative value (-1)
The error is reported as follows
successful NUMA node read from SysFS had negative value (-1), but there must be at least one NUMA node, so returning NUMA node zero
Link:Solving numa errors
The solution idea is to specify the gpu, which will not report an error after completion, according to the method linked above, which can effectively solve the problem
4.Cannot dlopen some GPU libraries
Problems with cuddn not loading
If the command line is fine then there is no problem.
