Tensorflow-gpu Nanny Installation Tutorial (Win11, Anaconda3, Python3.9)
- preamble
- Preparation for Tensorflow-gpu version installation
- (a) Check the computer’s video card:
- (ii), Anaconda installation
- (iii) cuda download and installation
- (D), cudnn download and installation
- (v) Configuration of environment variables
- (F), create tensorflow environment
- (VII), test whether Tensorflow-gpu is installed successfully or not
- uninstall and reinstall
preamble
CPUversions andGPUThe differences between the versions are mainlyrunning speed,GPUVersion Running SpeedfasterSo if the computer’s graphics card supportscudaRecommended InstallationgpuVersion.
-
CPU versionNo additional preparation is required.
CPUVersion of the general computer can be installed without additional preparation of the contents of the graphics card, (If installing the CPU version please refer to other tutorials online!) -
GPU VersionYou need to download it in advance.
cudarespond in singingcuDNN。(This article is a tutorial for installing the GPU version.)
Preparation for Tensorflow-gpu version installation
It’s important to say it three times:
pre-installation particular To check your computer’sEnvironment ConfigurationAnd thenconsult (a document etc)Tensorflow-gpu、Python、 cuda 、 cuDNN The version relationship to beOne – one correspondence!
pre-installation particular To check your computer’sEnvironment ConfigurationAnd thenconsult (a document etc)Tensorflow-gpu、Python、 cuda 、 cuDNN The version relationship to beOne – one correspondence!
pre-installation particular To check your computer’sEnvironment ConfigurationAnd thenconsult (a document etc)Tensorflow-gpu、Python、 cuda 、 cuDNN The version relationship to beOne – one correspondence!
Tensorflow-gpu vs. Python, cuda, cuDNN version query
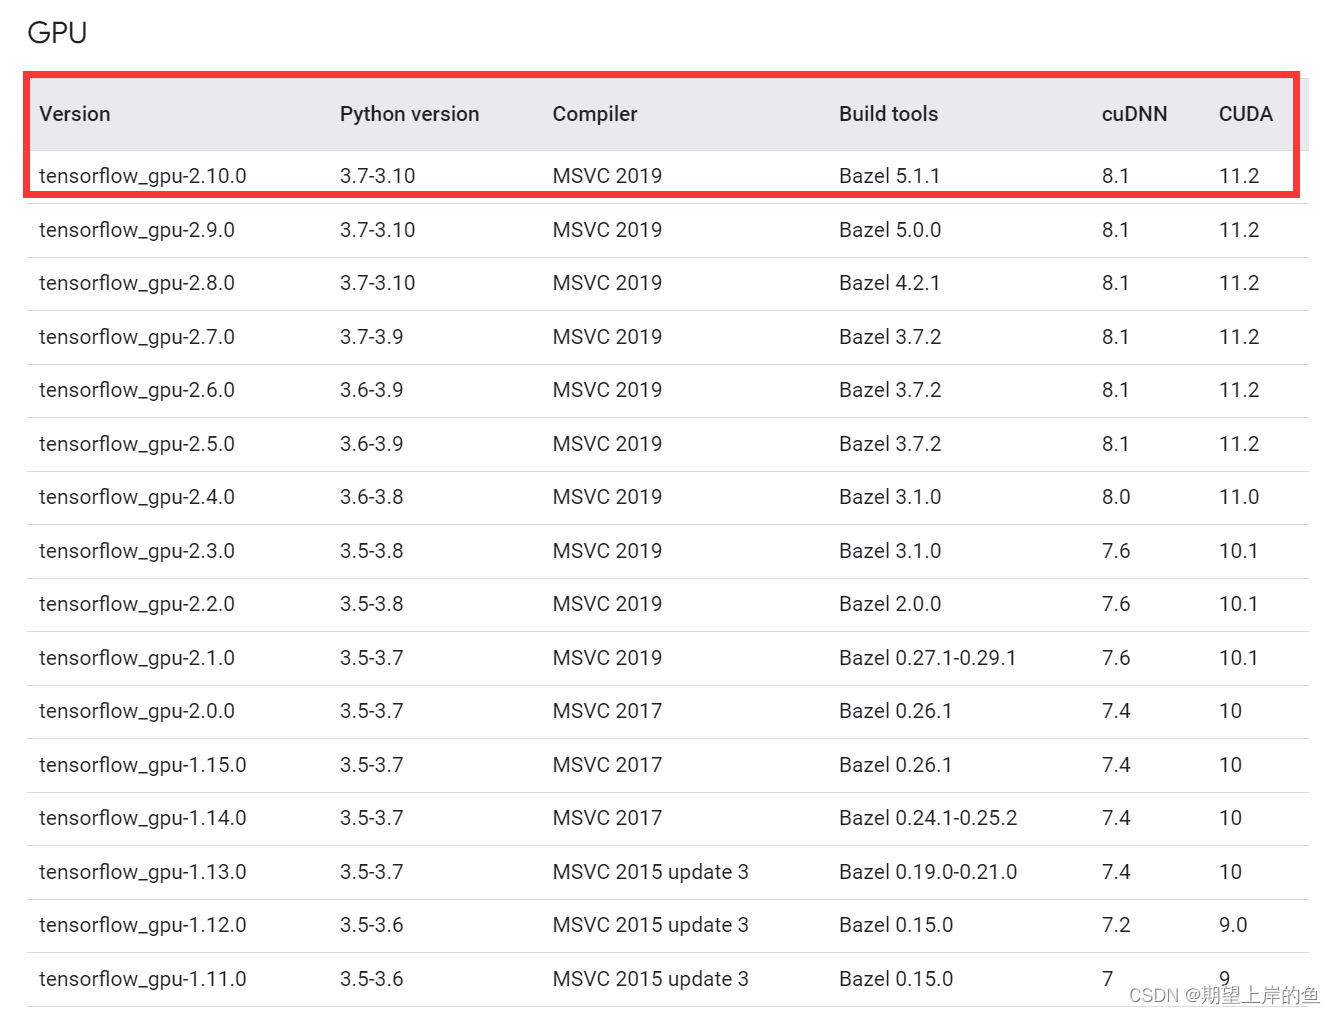
myinstallation environmentFor:
| operating system | display card (computer) | Python |
|---|---|---|
| win11 | NVIDIA GeForce RTX2050 | 3.9.13 |
mytensorflow-gpu installed versionFor:
| tensorflow-gpu | cuda | cuDNN |
|---|---|---|
| tensorflow-gpu 2.7.0 | cuda 11.5.2 | cuDNN 8.3.2 |
Notes: This correspondence of mine is a case of checking the internet for successful installations by others.Don’t combine them yourself.Otherwise, it is easy to install failure, or just follow the official website to check the combination of installation, the installation process is the same!
(a) Check the computer’s video card:
1), right clickthis computer→Right-click to selectmanagerial→device manager→Display Adapter
The main thing to look at is the solo display:GeForce RTX 2050
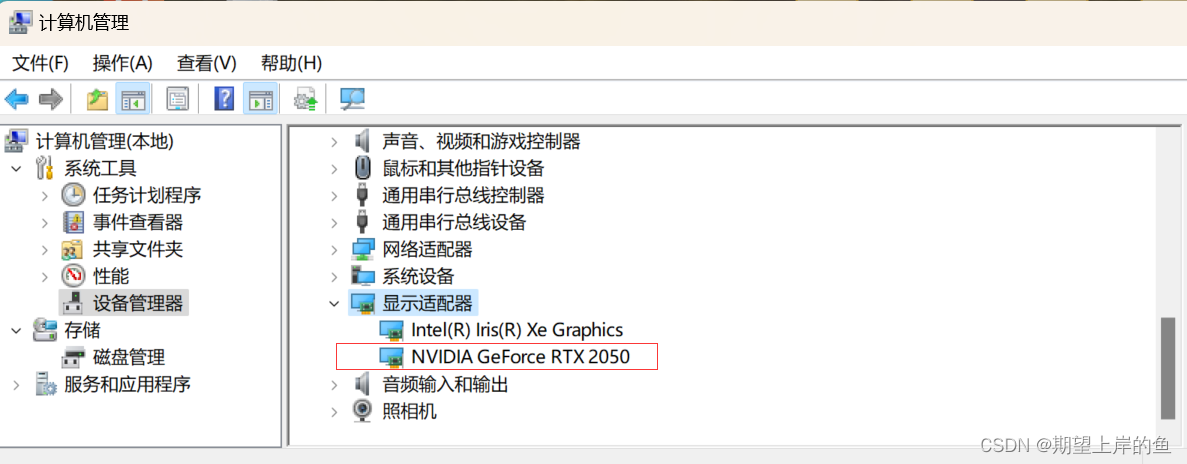
You can see that clicking on it brings up theNVIDIA GeForce ...That’s your computer.display card (computer)Model.
- If there is an occurrence, it means that it is possible to use the
Tensorflow-gpuversion, if you don’t have it you’ll have to honestly install the CPU version. - Then you can go to the NIVIDIA websiteCheck the math of your computer’s graphics card: https://developer.nvidia.com/cuda-gpusRecommendationsArithmetic power >= 3.5Installation.
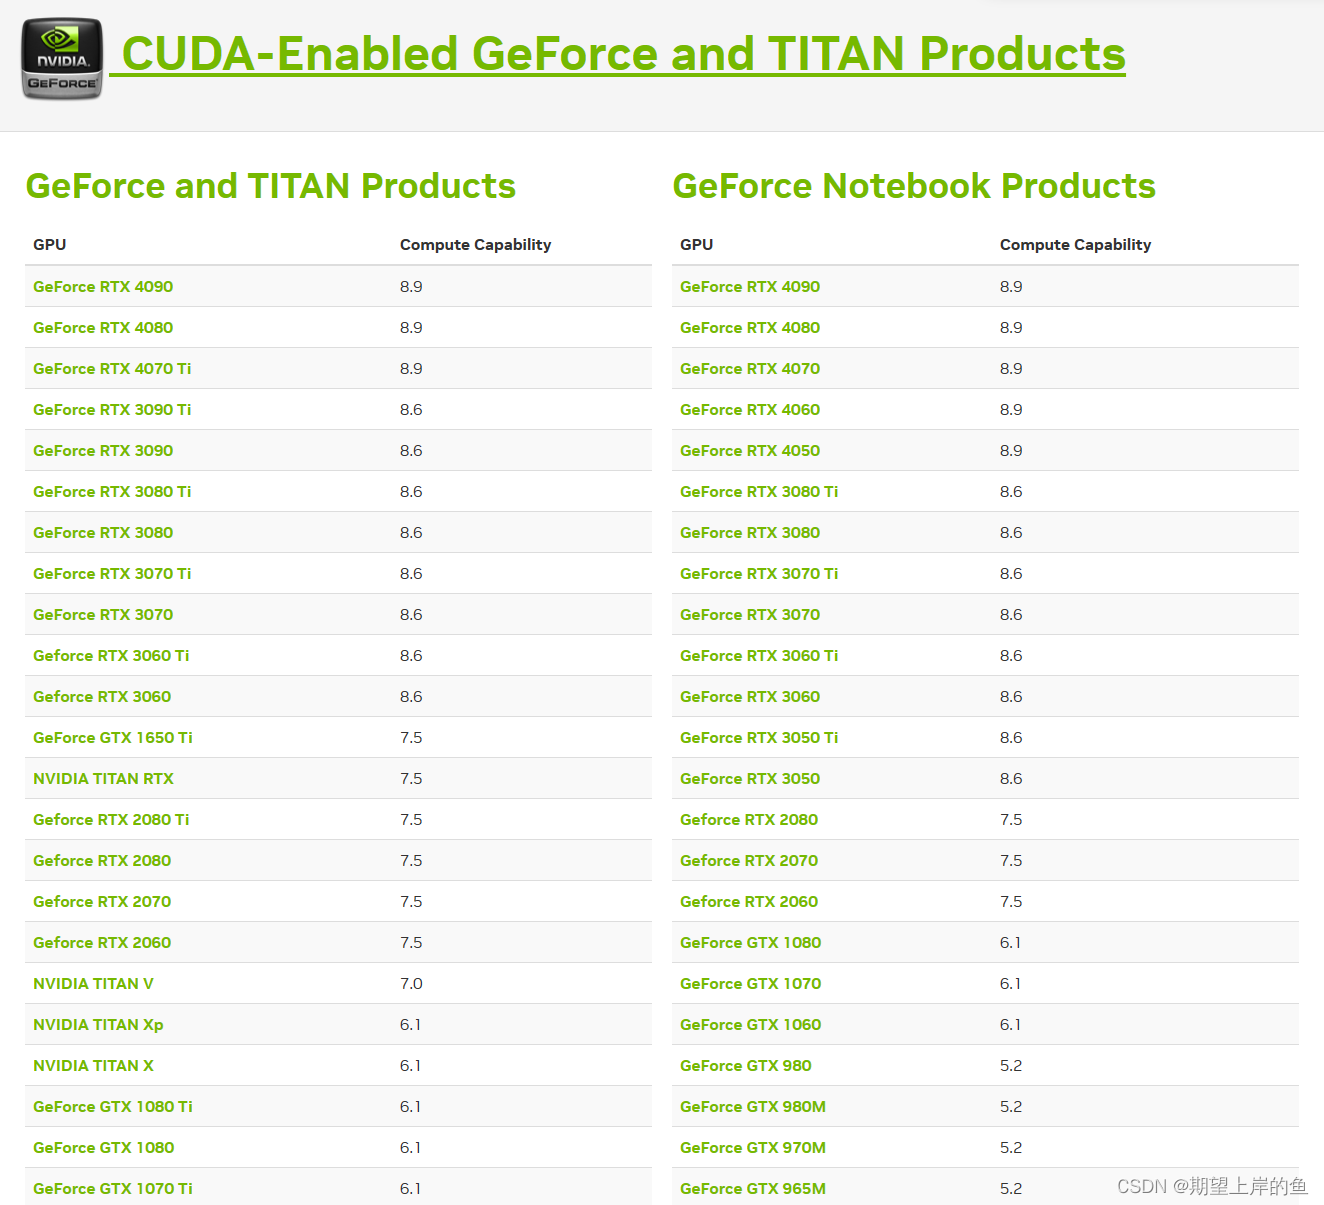
I didn’t look up my model number, and NVIDIA’s graphics cards have generally had enough arithmetic in recent years.
2), right clickdisplay card (computer)→causality→driver, you can check the drivers for the graphics card:
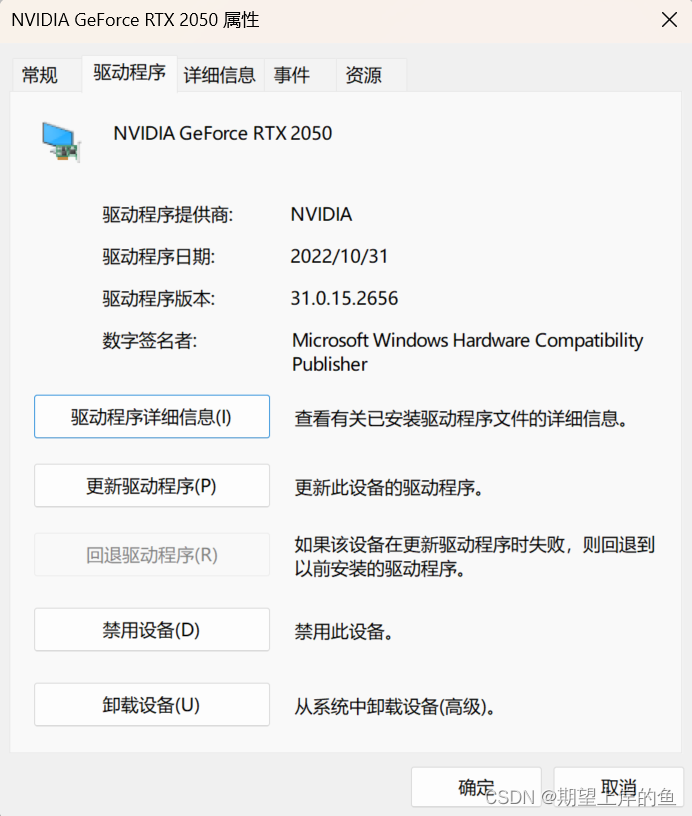
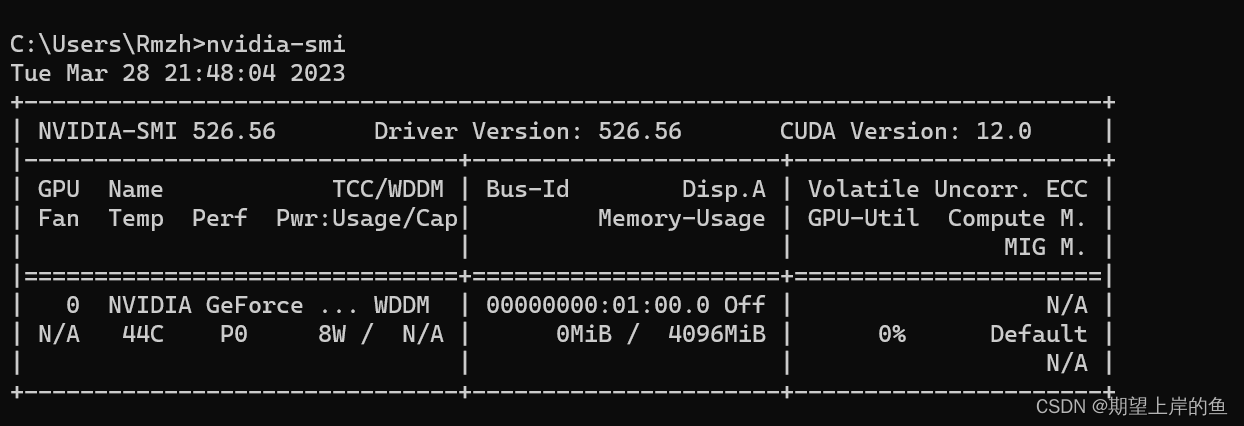
3), check the GPU driver version, that is, we “CUDA Version”, Windows 11 version is generally 12.0 version, the keyboard at the same time to press thewin +rInputcmd, open the command window and type in the command window:
nvidia-smi
(ii), Anaconda installation
mountingtensorflowPre-installedAnaconda. I’m not going to focus on that here either, as I’ve focused on writing about it in detail before: the
Anaconda Installation – Ultra Detailed Version (2023)
AnacondaAfter successful installation, go to the followingtensorflowof the installation!
offsidetensorflowThe installation can becomeThree steps:
cudamountingcuDNNNeural Network Acceleration Library Installation- Configuring Environment Variables
(iii) cuda download and installation
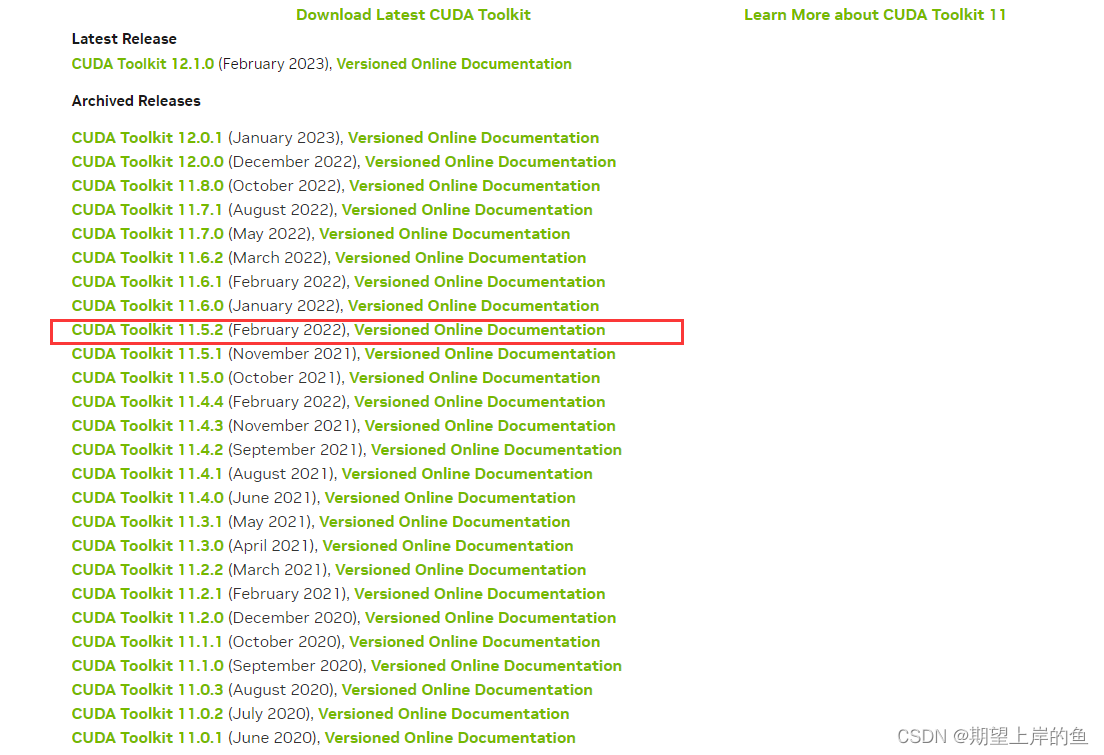
downloadingcudaandcuDNN. Download the corresponding on the official websitecudaandcuDNNThe version can bebe lower thanIt’s up there.CUDAreleases butCannot be higher thanThe version supported by the computer.
- cuda download address:CUDA Toolkit Archive | NVIDIA Developer;
- cudnn download address:cuDNN Archive | NVIDIA Developer。
1), Download:
I downloadedCUDA Toolkit 11.5.2, click on the frontCUDA Toolkit 11.5.2
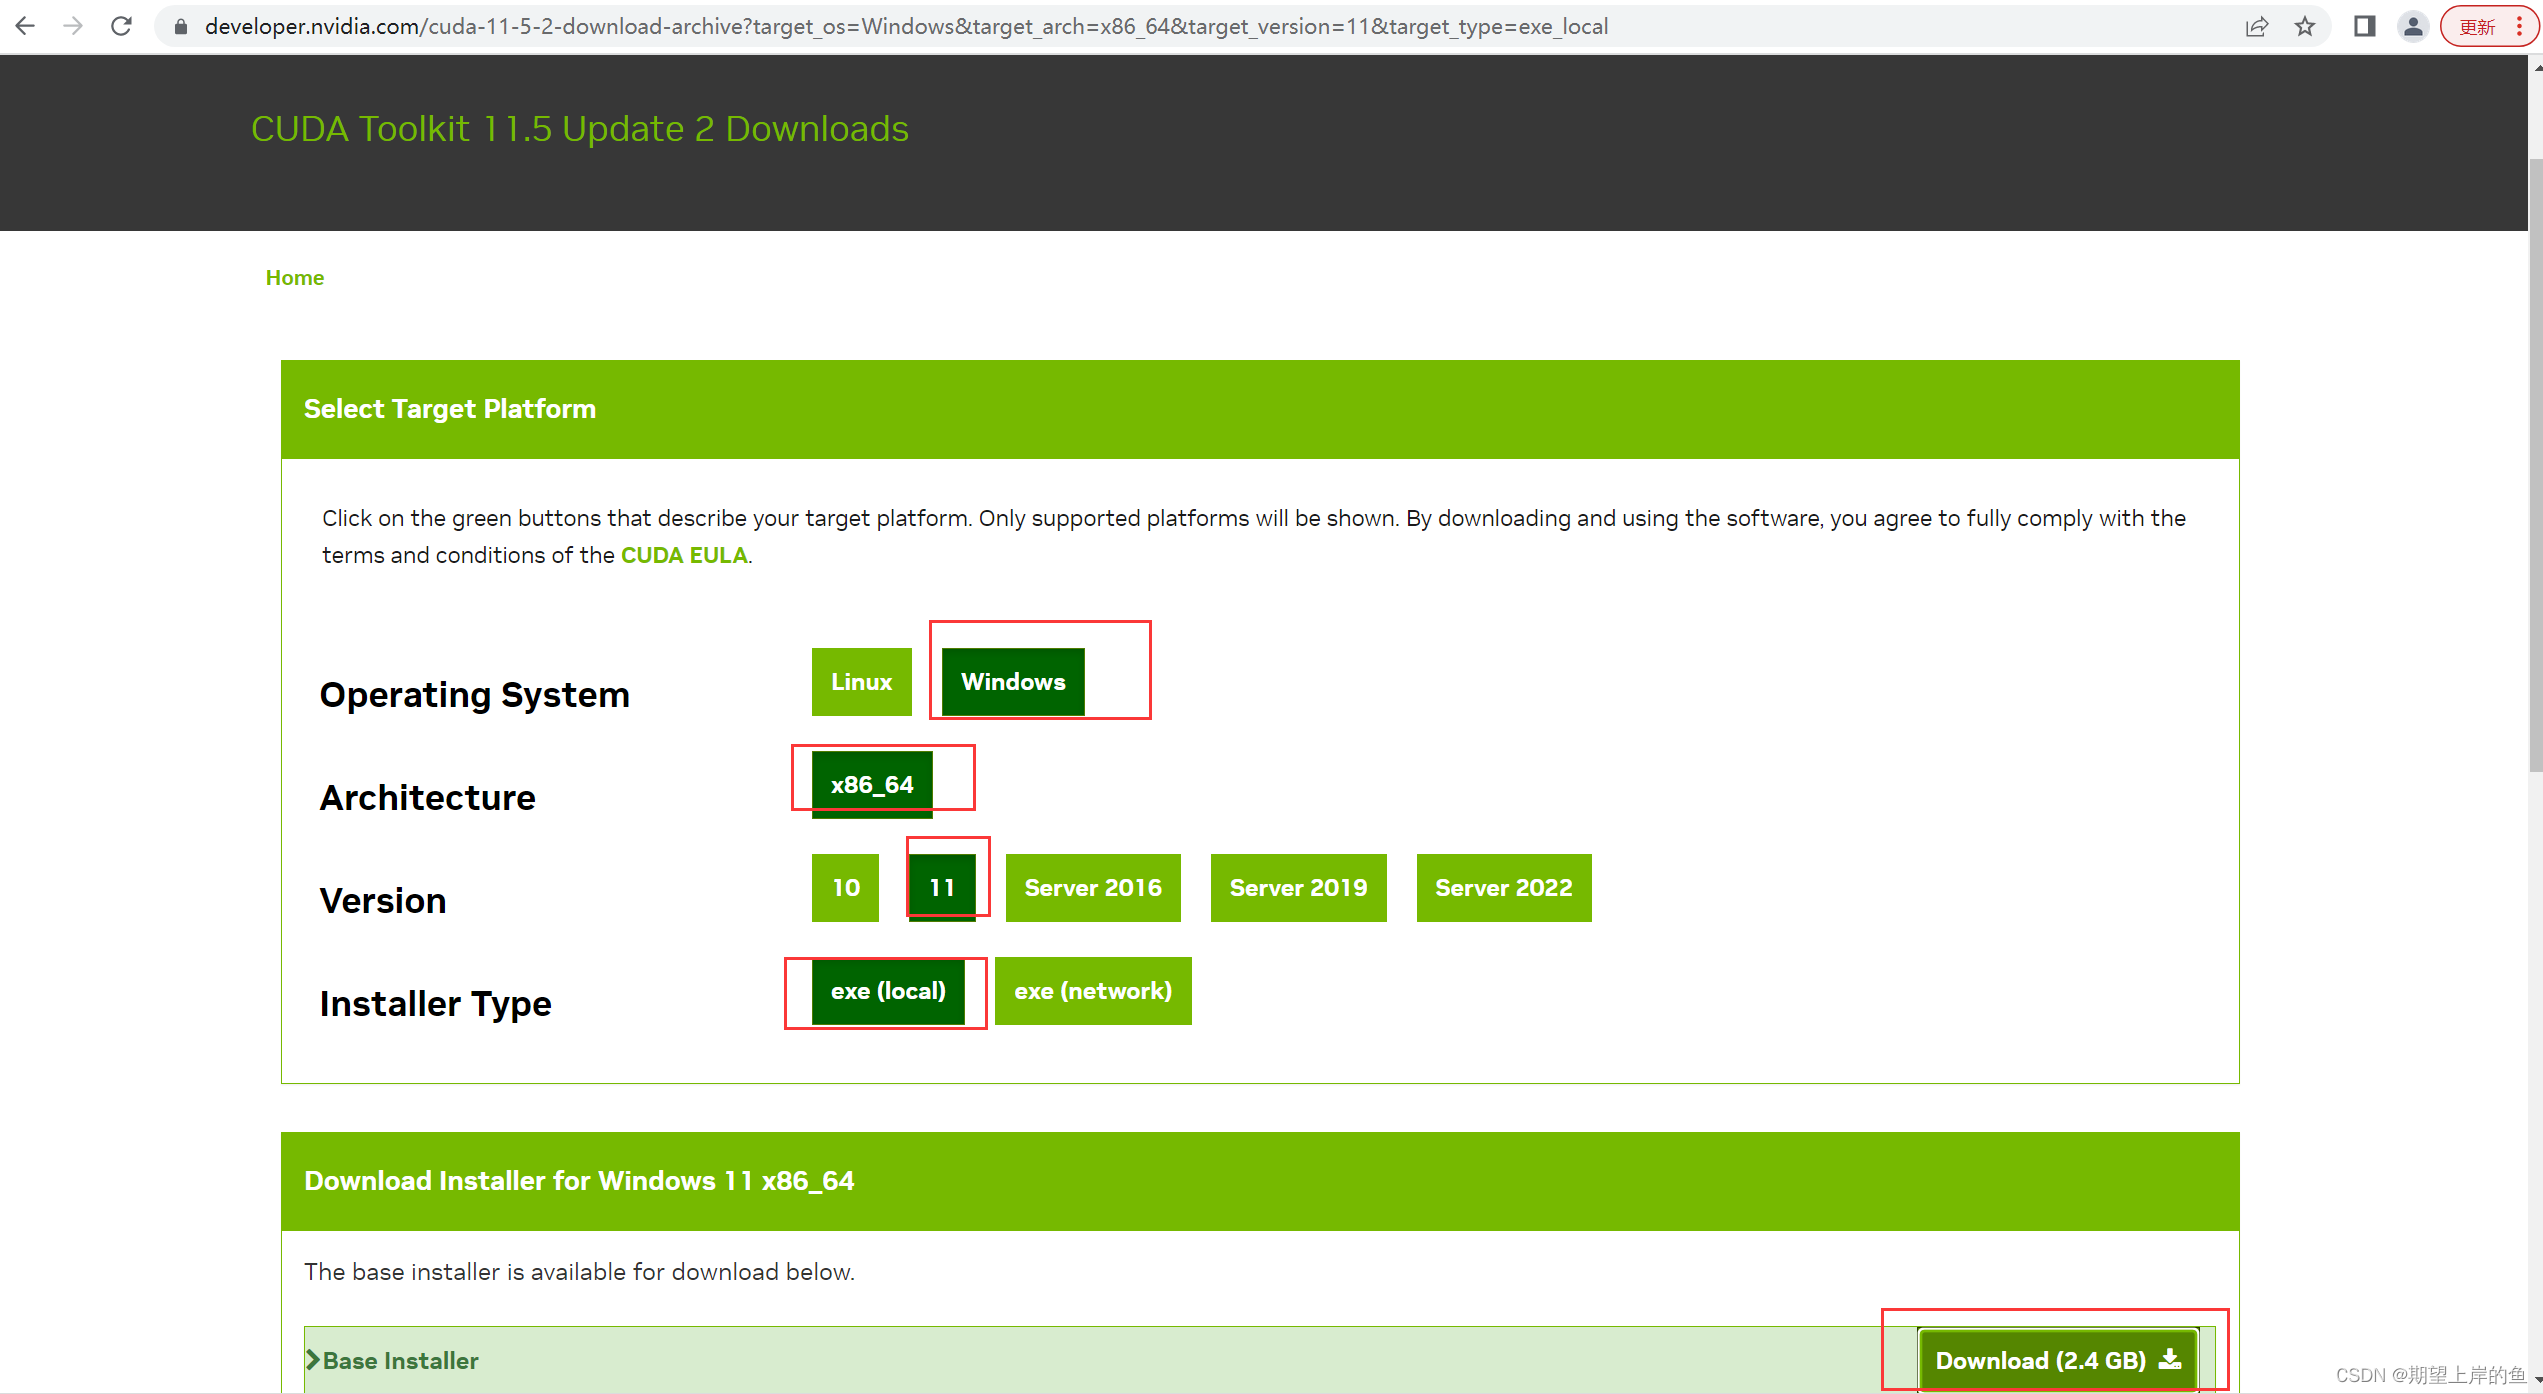
Select the appropriate system, version and other options and click Download to download:
2)、Installation
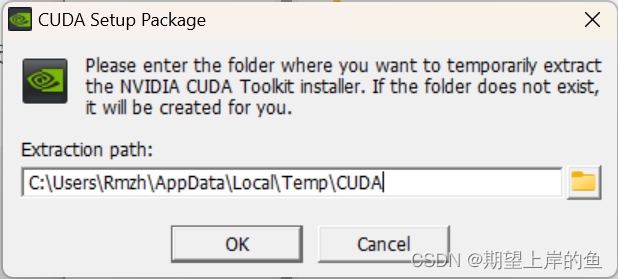
a. Double-click the installation package, at this time, a prompt box will appear, let you select theTemporary decompression location(The contents of this location will beautomatic deletion), hereDefault is fine., click ok.
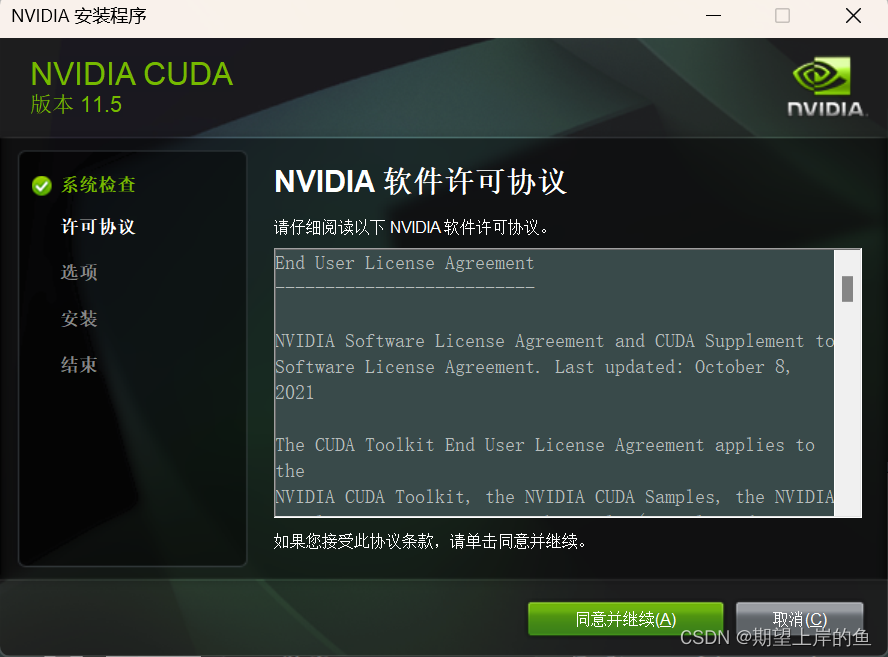
b. Click Agree and Continue:
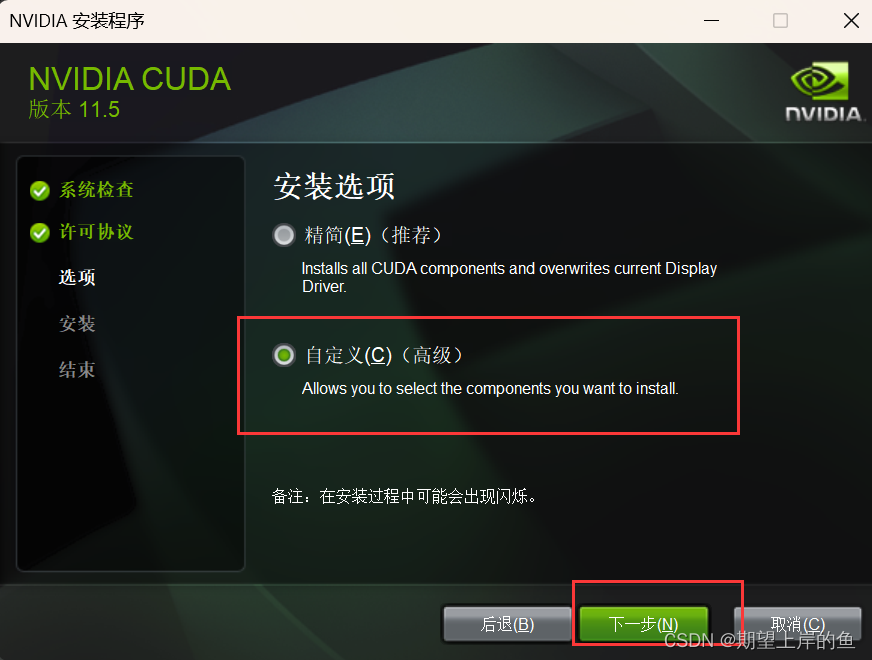
c. After completing the previous step, select Customize, and then tap Next:
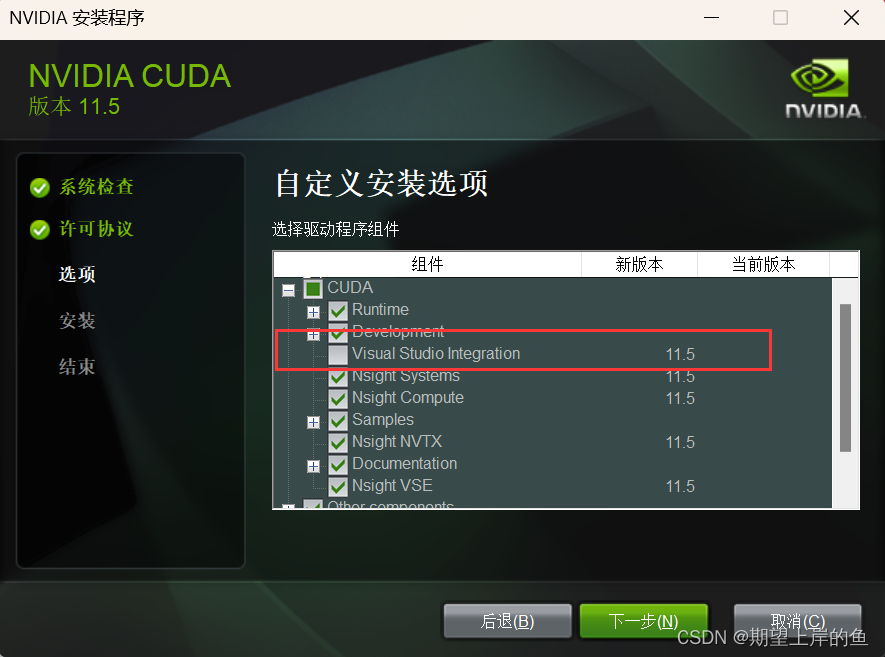
d. Complete the previous step, hereCUDA must be checkedThe following is optional and has no effect on the follow-up.
- In the Component CUDA column, uncheck Visual Studio Integration (since we are not using the Visual Stduio environment, the installation will fail even if it is checked)
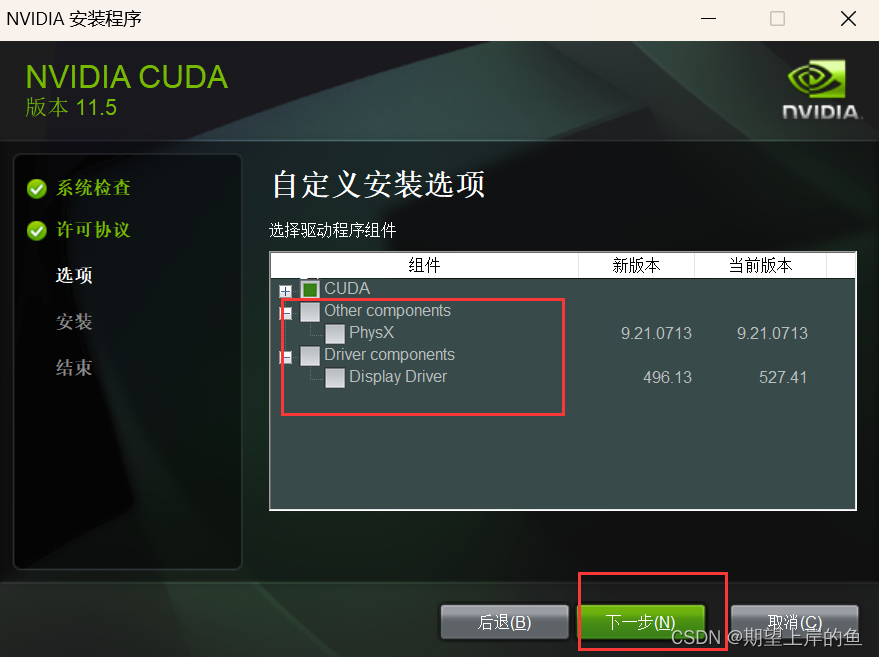
- Compare the new and current versions of the Display Driver in the Driver components section.
- If the current versiongreater thanFor the new version, theUncheckDisplay Driver;
- If the current versionbe lower thanFor newer versions, just leave the default installation information, otherwise the computer will crash or lag, or maybe even blue screen.!!!!
e. This installation location can be changed by yourself. To screenshotrecord (in sports etc)Let’s see where you’ve loaded it.It’s going to be used later.! I chose the default install location.
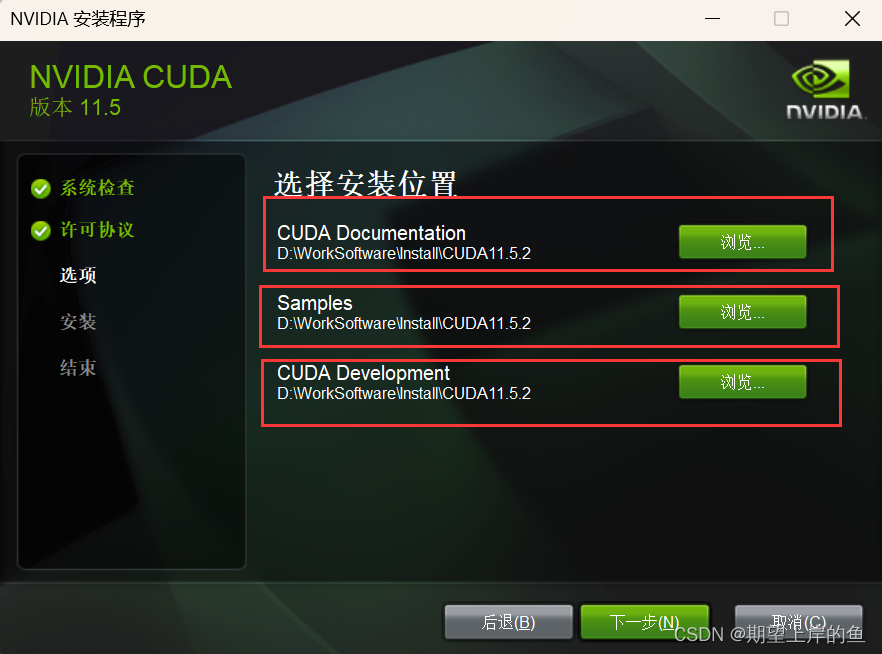
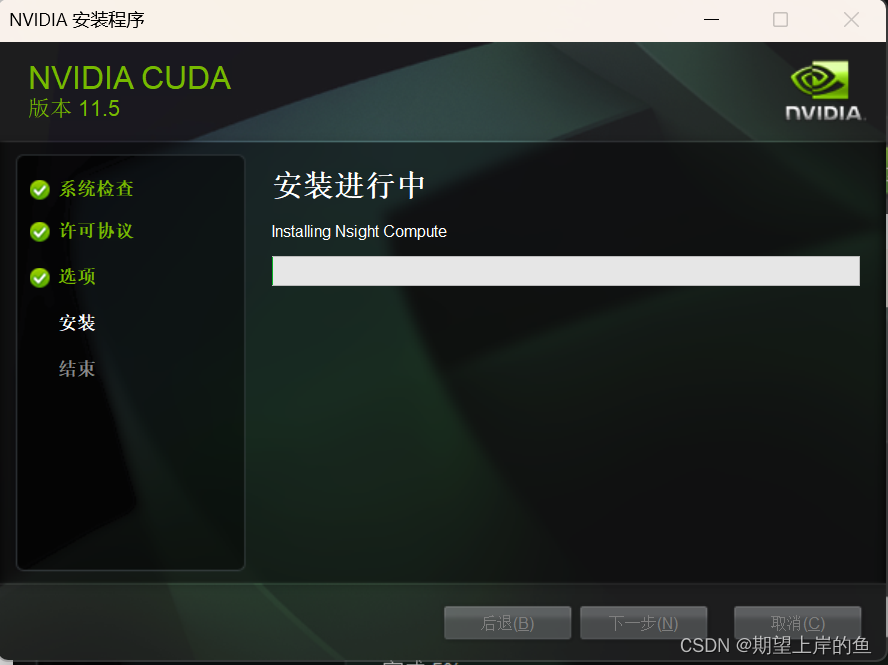
f. Being installed
g. Installation is successful!
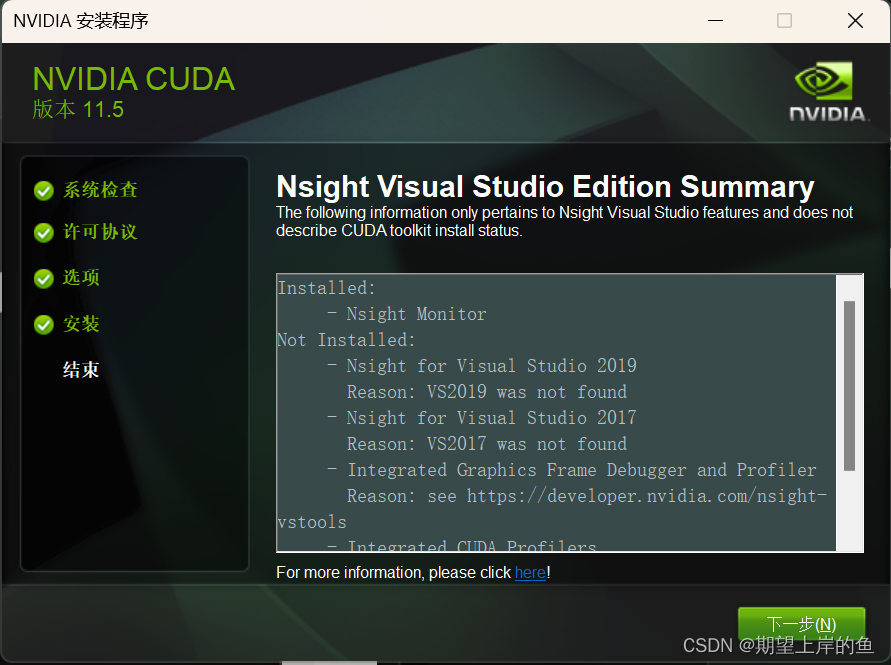
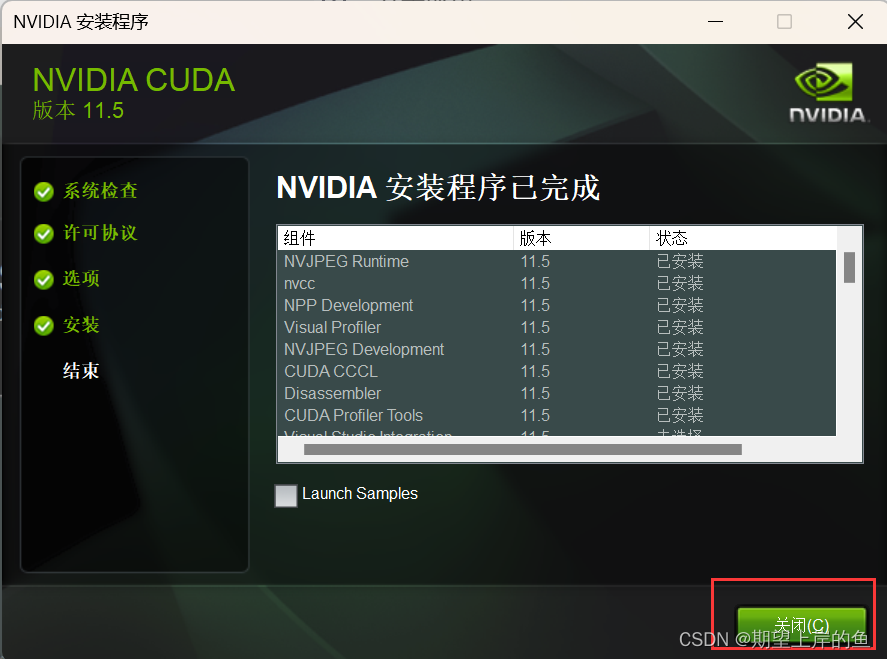
Just click on Close!
Checking environment variables:
After completing the installation, check whether the environment variables exist, generally the installation will be automatically configured environment variables, if not, you need to manually configure, the specific process is as follows.
-
show (a ticket)Computer PropertiesFindAdvanced System SettingsSelectionenvironment variable Open up.
-
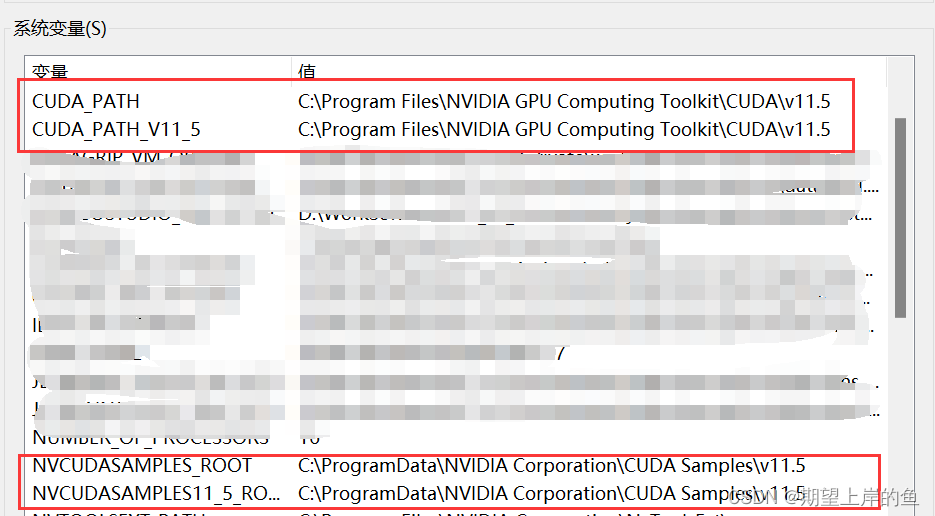
Check to see if any of the followingsystem variableIf you don’t have it, you need to add it yourself, corresponding to the name and value on the picture, and configure your computer.
CUDAThe location where the installation is located.
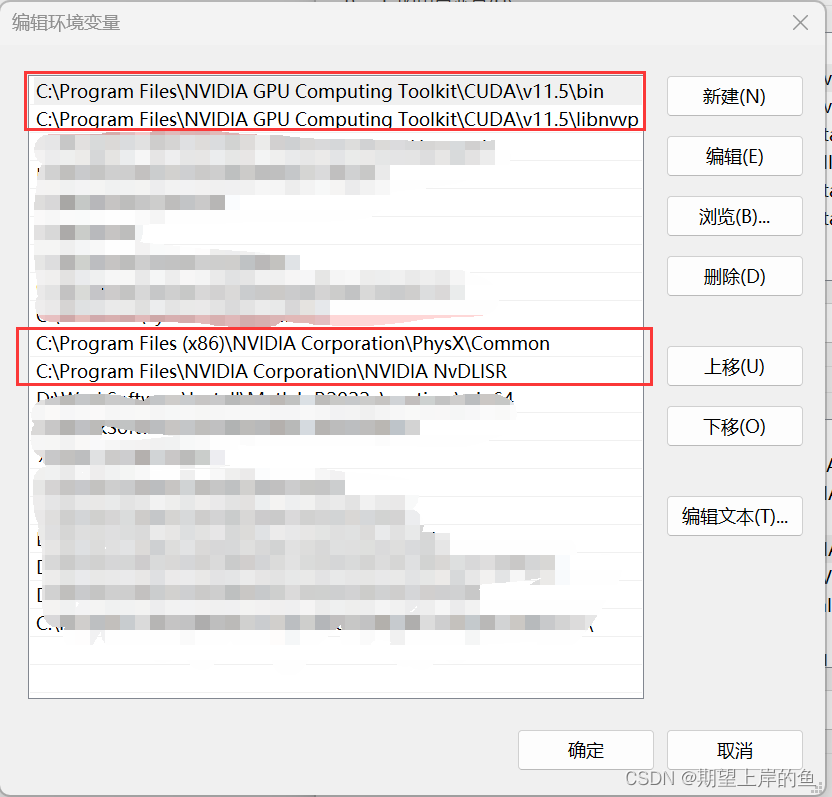
- Open the system variable for thePathIf you do not have the following two items, you will need to add them yourself, and be sure to configure the right location for the installation.
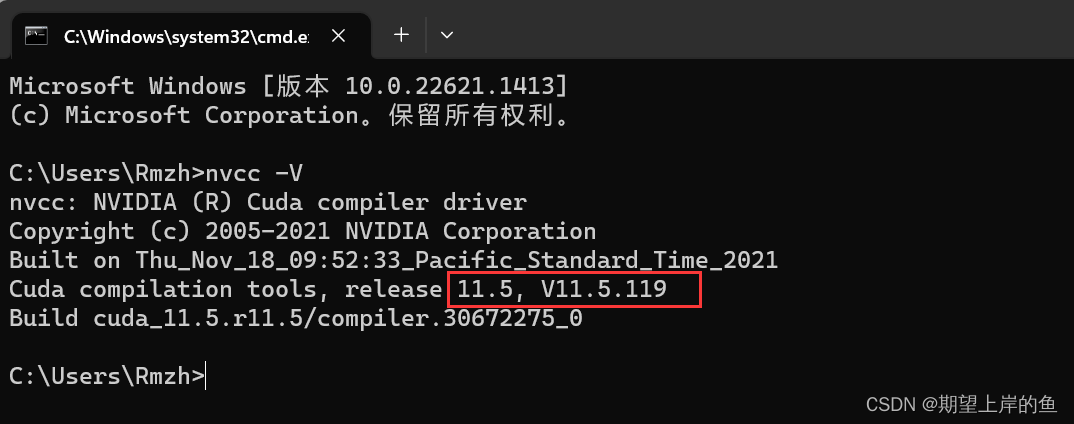
After configuring the environment variables, let’s check if CUDA was installed successfully.
- Open cmd and enter the following command to see if CUDA was installed successfully (one of two options)
If the following message cannot be displayed, the installation has failed.
nvcc -V
nvcc --version
- You can also view the environment variables set by CUDA.
set cuda

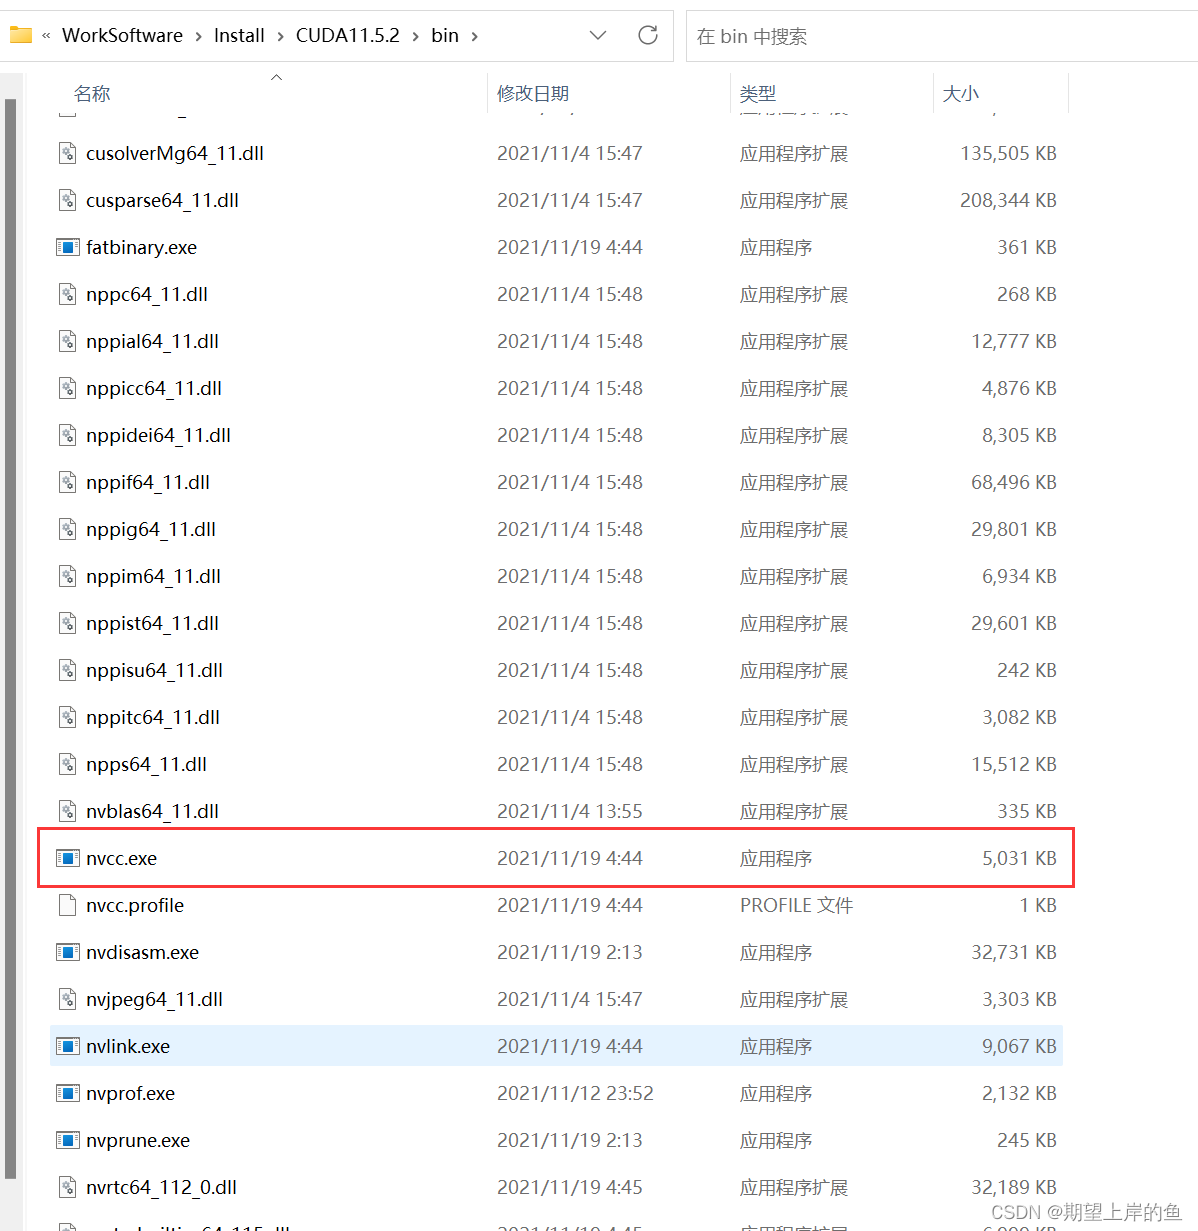
- We can also search the CUDA installation directory for the file “nvcc.exe”.
That concludes the CUDA installation, next download and unzip the cuDNN file.
(D), cudnn download and installation
CUDAIt’s not about realizingGPUIf we want to accelerate neural networks, we also need to install thecuDNNNeural Network Acceleration Library.
-
cuDNNNot the application, but a couple of file packages, download it and copy it to theCUDAThe directory of the
Download Address:cuDNN Archive | NVIDIA Developer。 -
The first time you click to download, you will be asked to register and login, and then download, the registration process to fill in the content carefully, no problem, here skipped, then enter the download link.
1), Download:
Download the corresponding version ofcuDNN. The choice here iscuDNN v8.3.2 for CUDA 11.5。
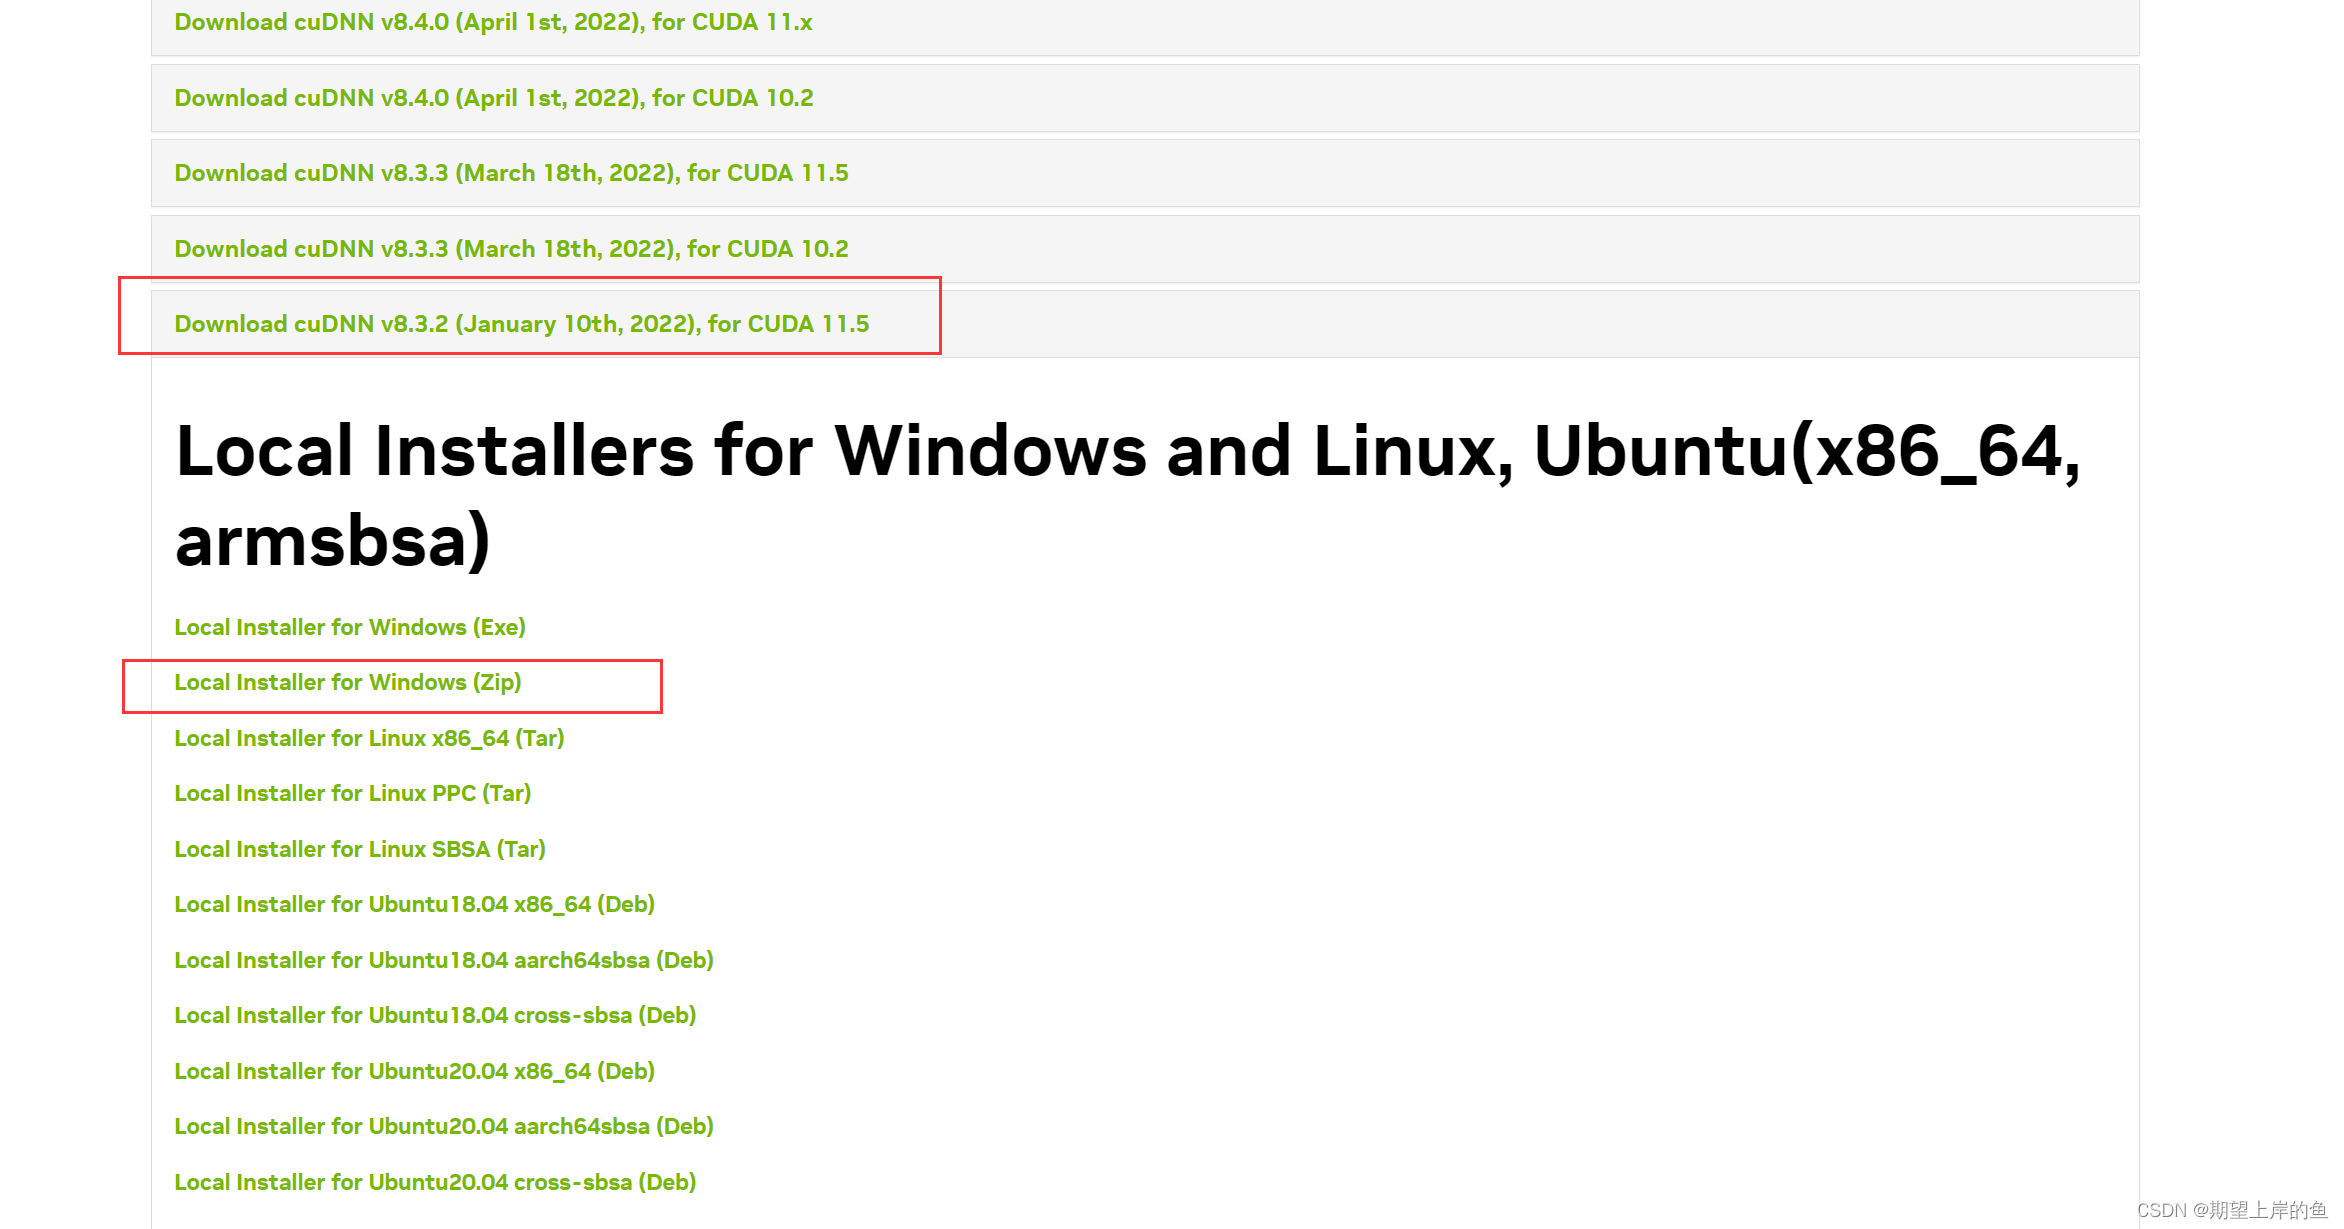
- After downloading and unzipping the installation package, we unzip it and can see that there are four files:

3) This step of the tutorial is going toparticular attention!
- connect
cudnnfile in the corresponding folder of all theDocument copying to the correspondinginstallation directoryMiddle. - (indicates contrast)fault classifier for objects with a handle
cudnnThe folder in the file is copied over.eg: the copy is notcudnnhit the nail on the headbinfolder, but ratherbinfolder of theAll documents. (It’s normal to have duplicate files, just overwrite them!)
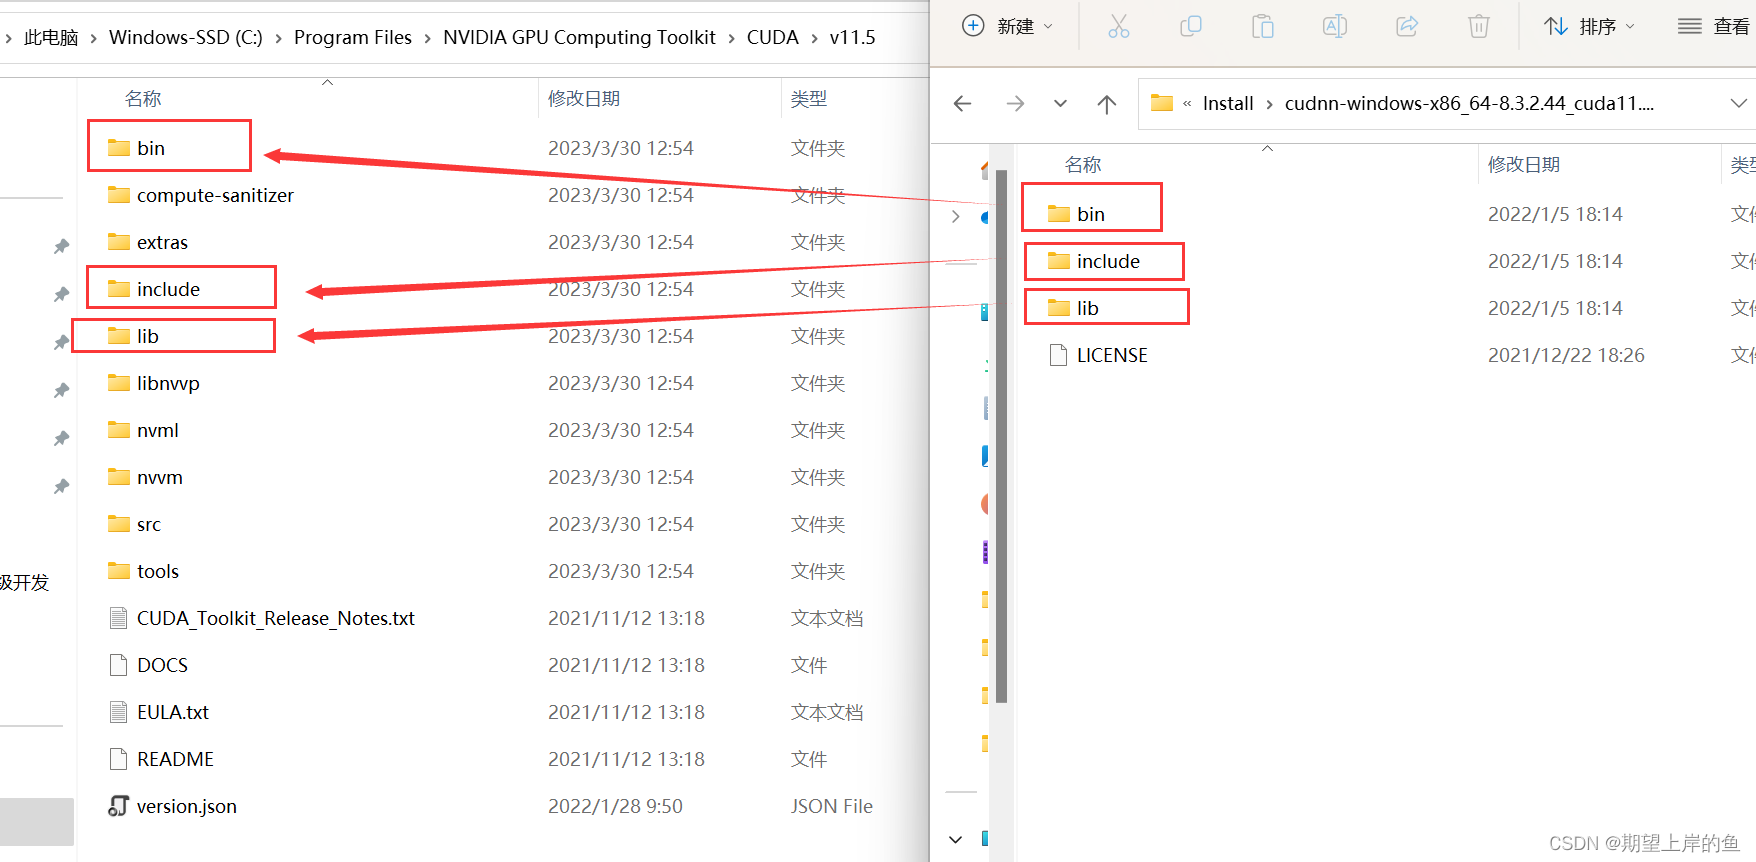
- show (a ticket)
cudnnin the filebinfolder, and then move all of thefile copy and paste until (a time)CUDA\v11.5\binfolder:

- show (a ticket)
cudnnin the fileincludefolder, and then move all of thefile copy and paste until (a time)CUDA\v11.5\includefolder:

- show (a ticket)
cudnnin the filelibfolder, and then move all of thefile copy and paste until (a time)CUDA\v11.5\lib\x64folder:
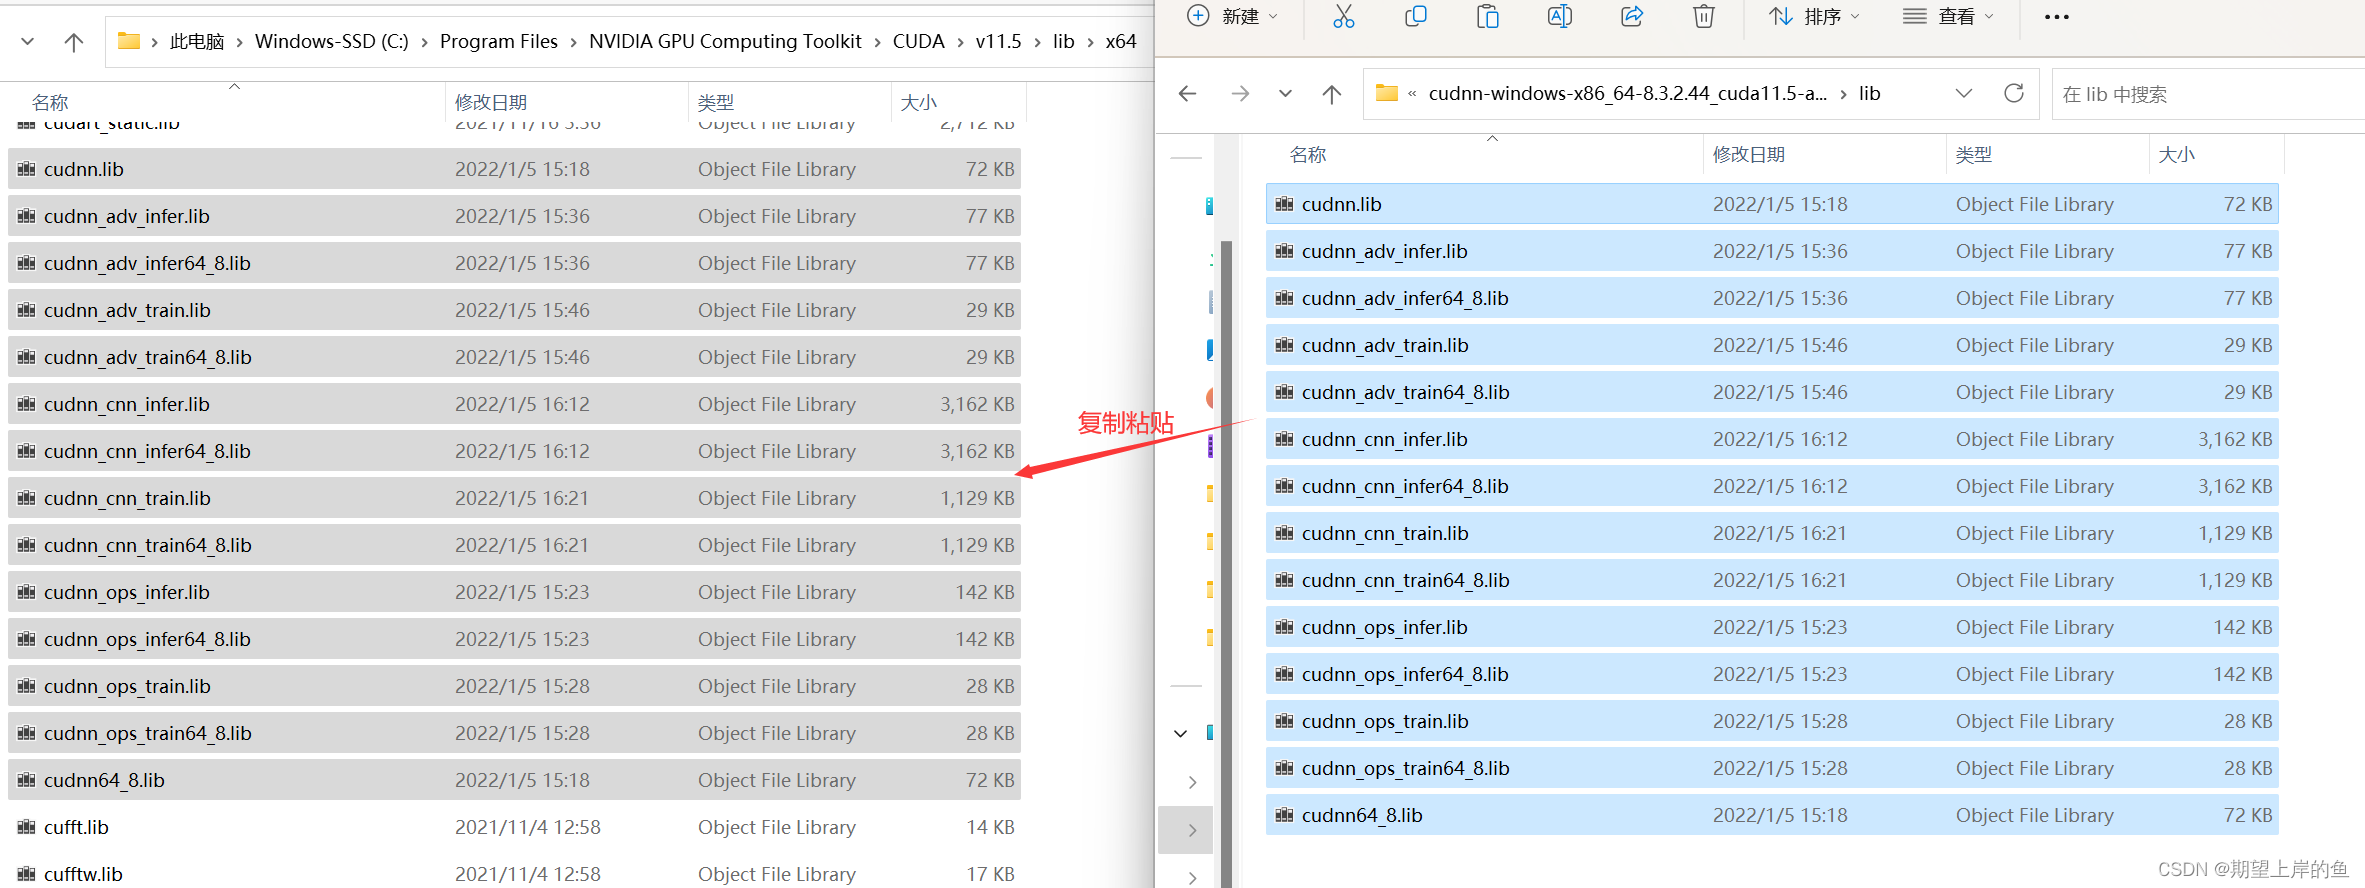
- show (a ticket)
cudnnin the fileRemaining documents, copy and paste until (a time)CUDA\v11.5folder:
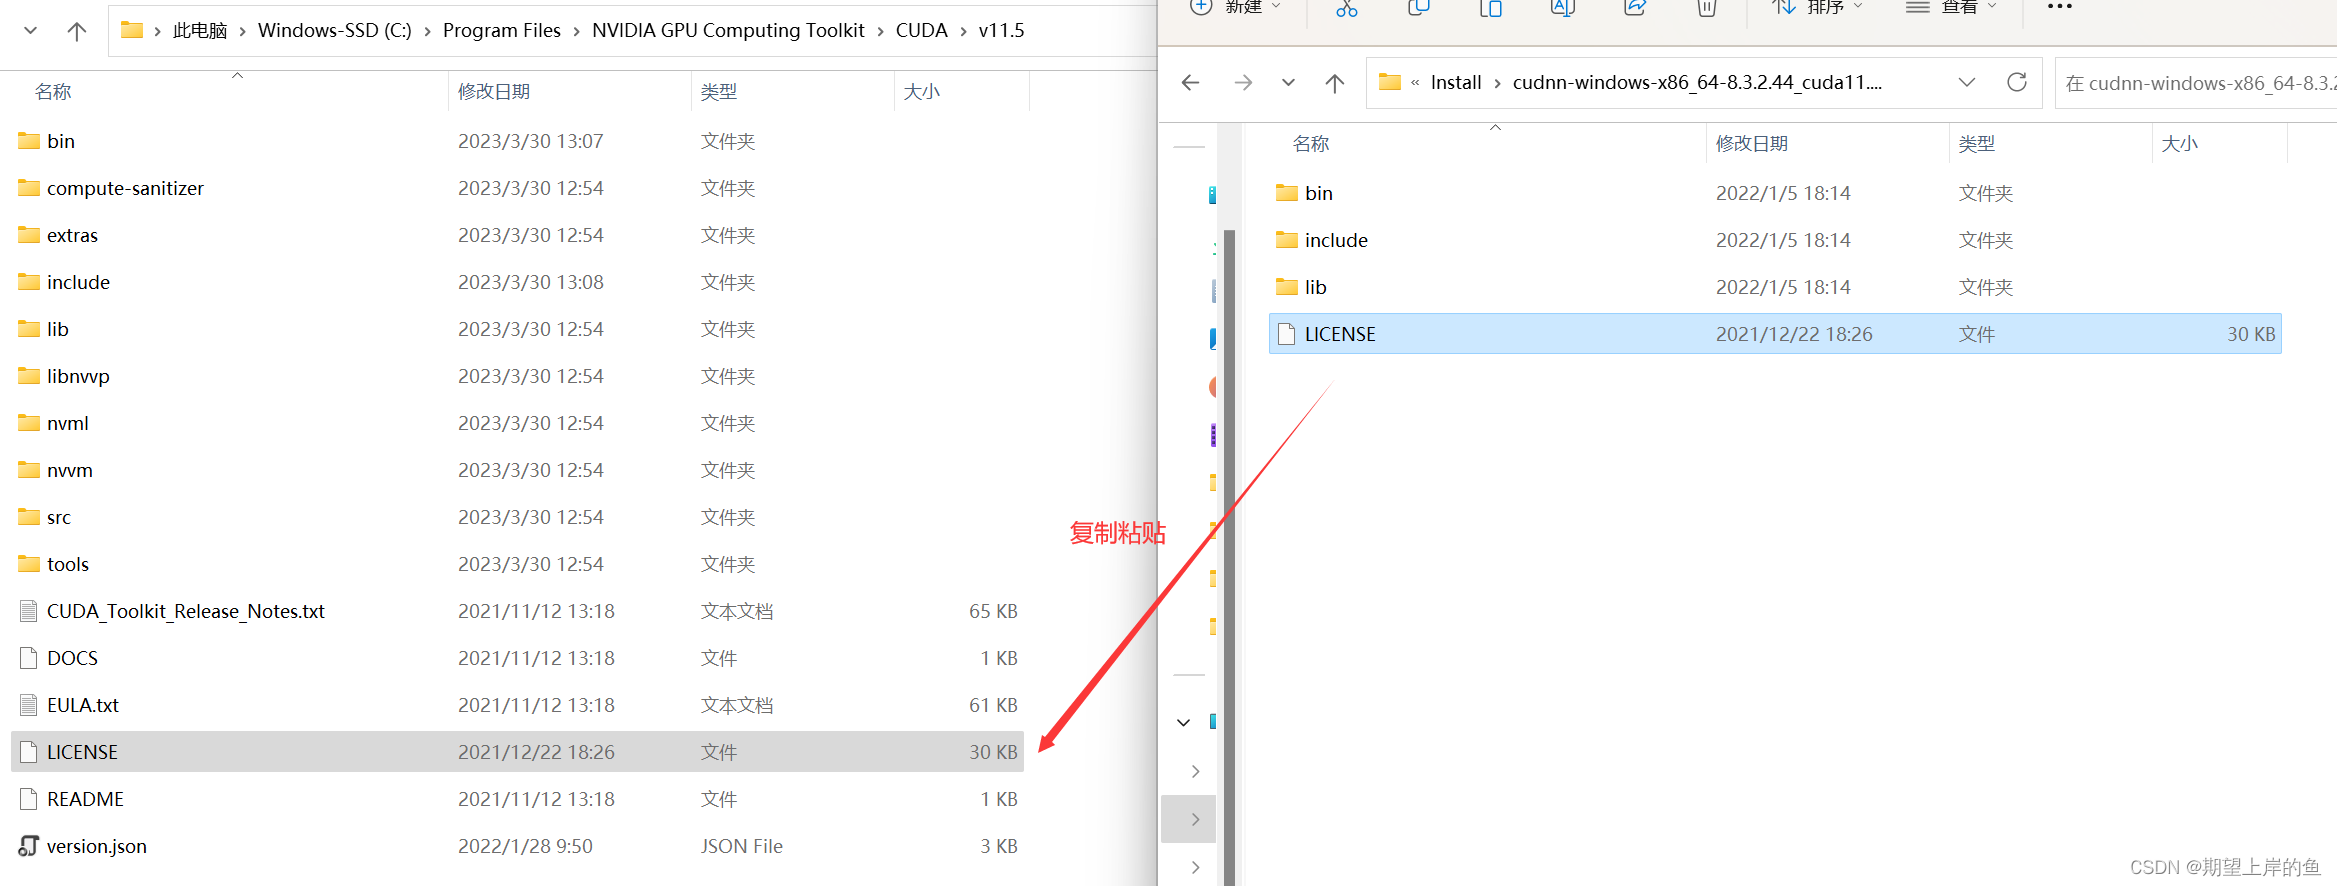
cuDNNIn fact, it’sCUDAIt’s just a patch, optimized for deep learning operations, and then we add the environment variables! Moving on.
(v) Configuration of environment variables
- The system variables are turned on in the
PathThe system variables in thepathAdd the following path to the path: (adjusted according to your own installation path)
C:\Program Files\NVIDIA GPU Computing Toolkit\CUDA\v11.5\bin
C:\Program Files\NVIDIA GPU Computing Toolkit\CUDA\v11.5\libnvvp
C:\Program Files\NVIDIA GPU Computing Toolkit\CUDA\v11.5
C:\Program Files\NVIDIA GPU Computing Toolkit\CUDA\v11.5\lib\x64
It looks like this when it’s added:

2), after configuring the environment, we need to verify that the environment variables are configured successfully:
show (a ticket)cmdIf you want to install CUDA, go to your own CUDA installation path....\CUDA\v11.5\extras\demo_suiteYes, I am.default pathSo mine is:
cd \Program Files\NVIDIA GPU Computing Toolkit\CUDA\v11.5\extras\demo_suite
Then execute the following two commands separately:
.\bandwidthTest.exe
.\deviceQuery.exe
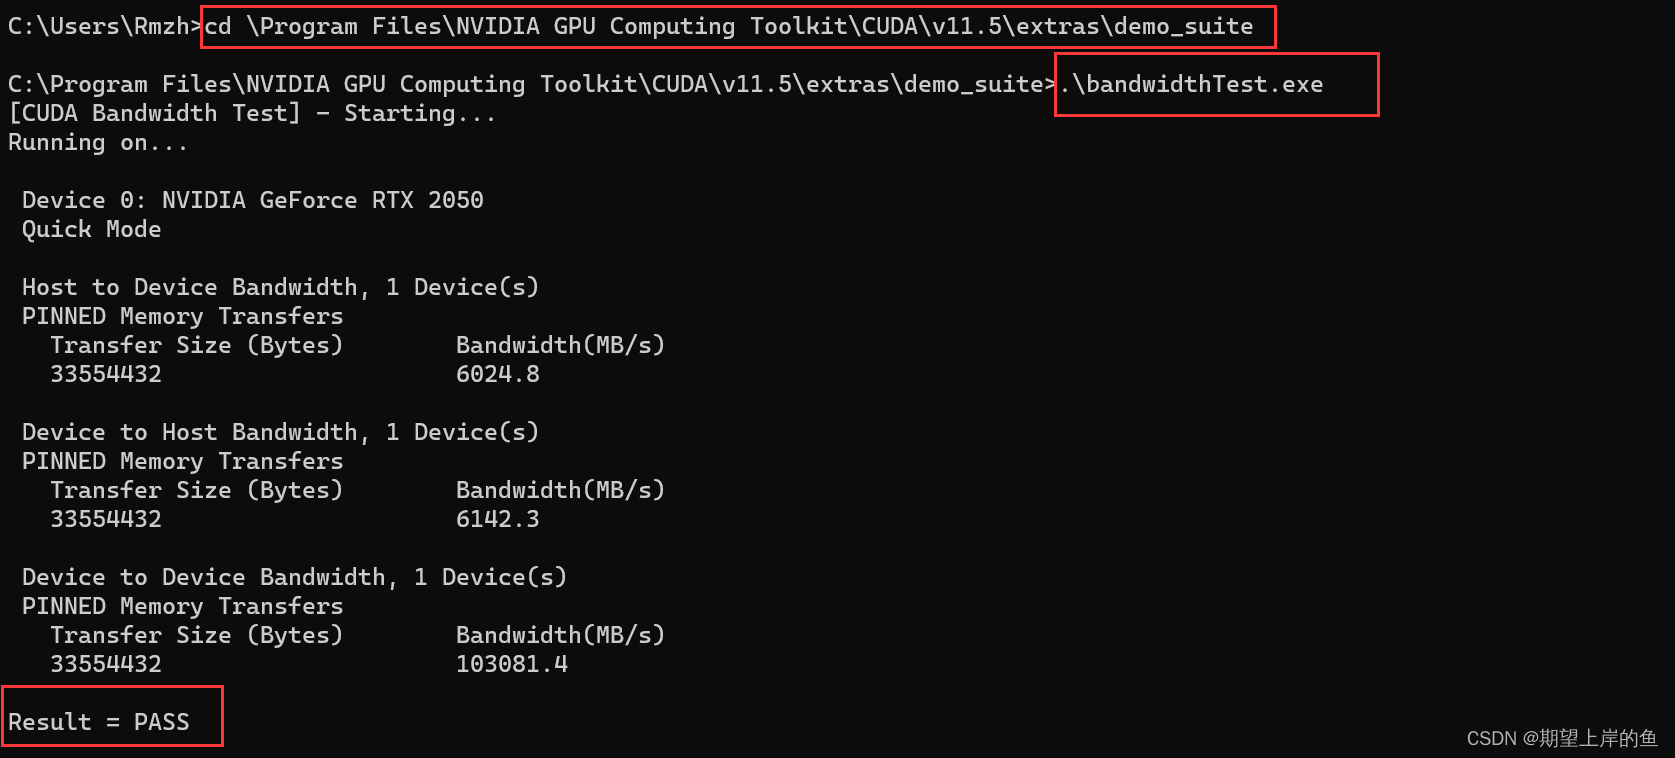
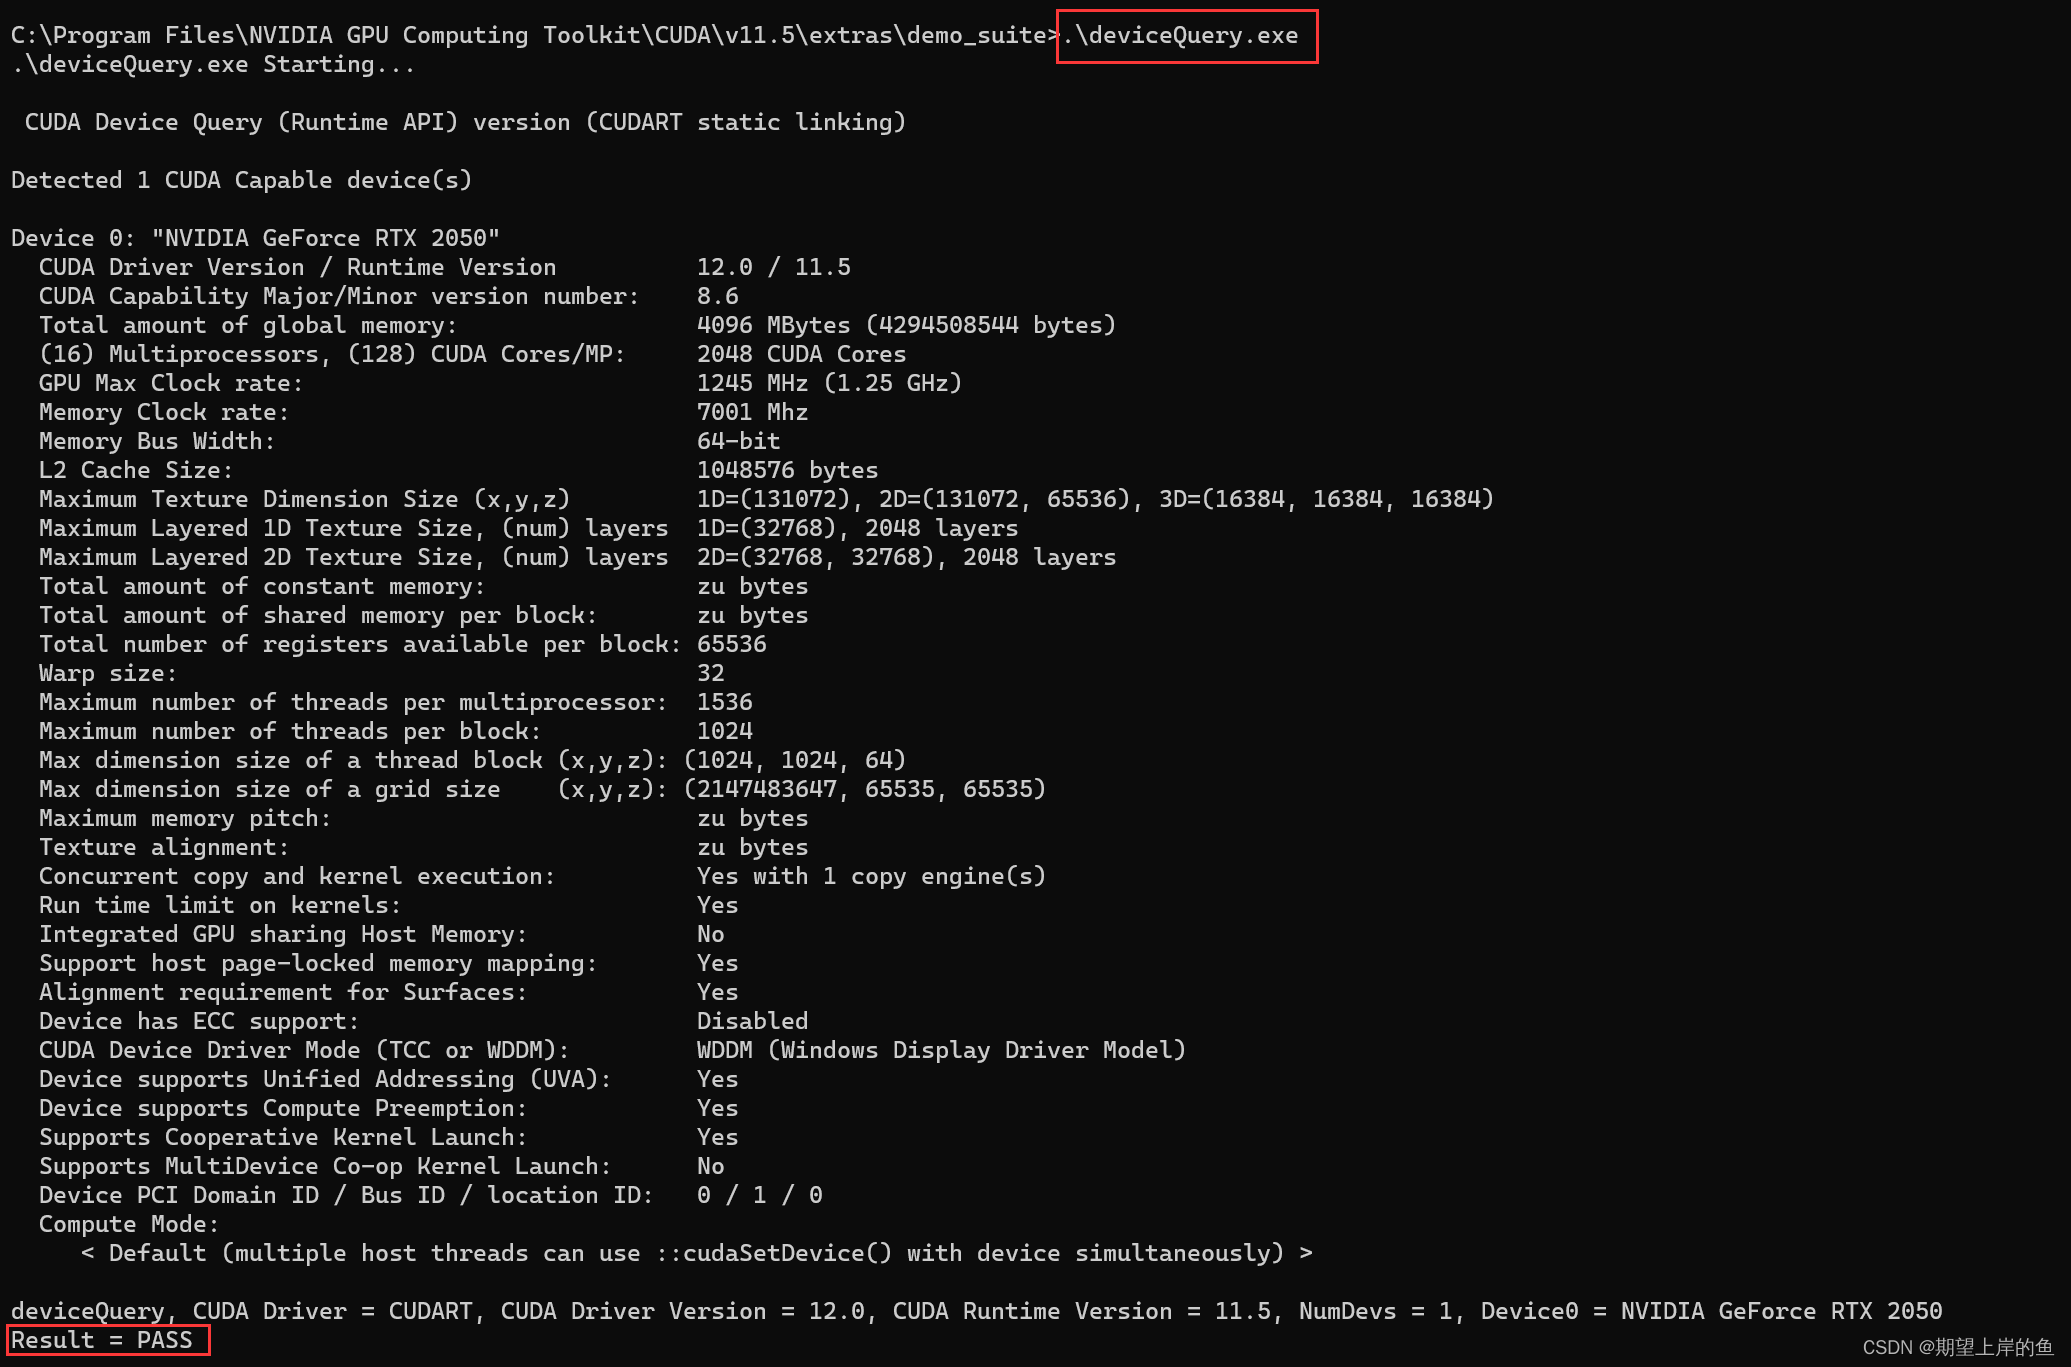
in the event thatResultall arePASSThe configuration is successful!
3), all installed, we can continue to enter thenvidia-smiferret outCUDAinformation, and then realize other library (environment) installation and use based on the information of the installed version!
nvidia-smi
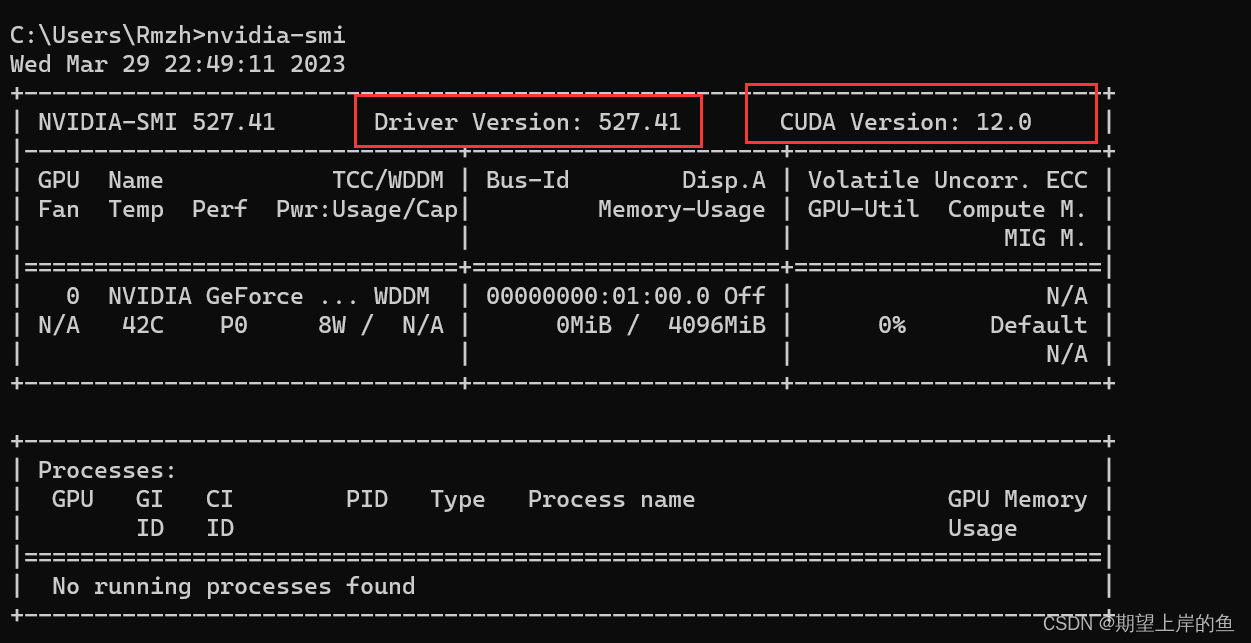
As shown in the figure, you can see that the version of the driver is527.41; the highest supportedCUDAThe version is12.0Version.
(F), create tensorflow environment
Here I am using theAnaconda(If you choose this step, there is no need to download the additionalpython(and various commonly used toolkits, it will be packaged and downloaded)
1)、Openanaconda prompt
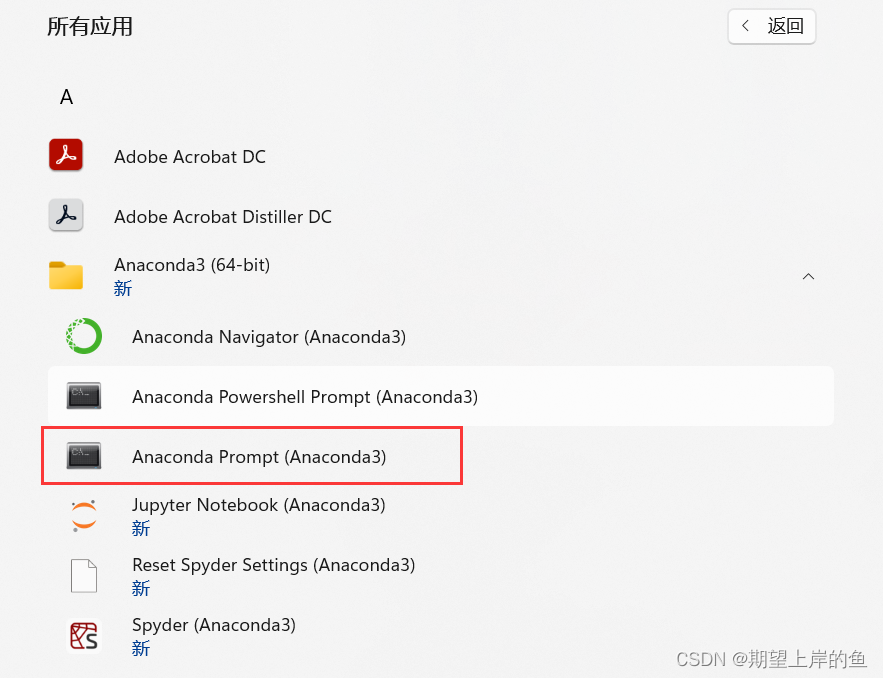
2)、Createtensorflowenvironment, enter the command:conda create -n tensorflow python=3.9, which means to create a file with the nametensorflowenvironment, this environment uses thepythonThe version is3.9version, which, if created by default, will be created in theC disc!
conda create -n tensorflow python=3.9

3), after creating successfully, enter the command:conda env listYou can seetensorflowThe environment has been created, the asterisk indicates the current environment (base environment)base)。
conda env list

4), enter the environment and enter the command:activate tensorflowYou can then access thetensorflowenvironments
conda activate tensorflow

To exit the environment, type.
conda deactivate
5), because of mycondaThe environment is in the D drive, so change the path below. If theanacondaThe installation is the default path, this step is not necessary.
d:
cd \WorkSoftware\Install\Anaconda3\envs\tensorflow\

6)、Install the specified version oftensorflow-gpuI’m installing the2.7.0Based onYour own matching versionTo install, enter the command:
pip install tensorflow-gpu==2.7.0 -i https://pypi.mirrors.ustc.edu.cn/simple

No errors reported end should be loaded.
7), openpythonenvironment, introducingtensorflowpackage to test and see if thetensorflowversion information, enter the command:
import tensorflow as tf
- If the imported package reports the following error (No error reported please ignore!):
(tensorflow) C:\Users\Rmzh>python
Python 3.9.16 | packaged by conda-forge | (main, Feb  1 2023, 21:28:38) [MSC v.1929 64 bit (AMD64)] on win32
Type "help", "copyright", "credits" or "license" for more information.
>>> import tensorflow as tf
Traceback (most recent call last):
  File "<stdin>", line 1, in <module>
  File "D:\WorkSoftware\Install\Anaconda3\envs\tensorflow\lib\site-packages\tensorflow\__init__.py", line 41, in <module>
    from tensorflow.python.tools import module_util as _module_util
  File "D:\WorkSoftware\Install\Anaconda3\envs\tensorflow\lib\site-packages\tensorflow\python\__init__.py", line 41, in <module>
    from tensorflow.python.eager import context
  File "D:\WorkSoftware\Install\Anaconda3\envs\tensorflow\lib\site-packages\tensorflow\python\eager\context.py", line 33, in <module>
    from tensorflow.core.framework import function_pb2
  File "D:\WorkSoftware\Install\Anaconda3\envs\tensorflow\lib\site-packages\tensorflow\core\framework\function_pb2.py", line 16, in <module>
    from tensorflow.core.framework import attr_value_pb2 as tensorflow_dot_core_dot_framework_dot_attr__value__pb2
  File "D:\WorkSoftware\Install\Anaconda3\envs\tensorflow\lib\site-packages\tensorflow\core\framework\attr_value_pb2.py", line 16, in <module>
    from tensorflow.core.framework import tensor_pb2 as tensorflow_dot_core_dot_framework_dot_tensor__pb2
  File "D:\WorkSoftware\Install\Anaconda3\envs\tensorflow\lib\site-packages\tensorflow\core\framework\tensor_pb2.py", line 16, in <module>
    from tensorflow.core.framework import resource_handle_pb2 as tensorflow_dot_core_dot_framework_dot_resource__handle__pb2
  File "D:\WorkSoftware\Install\Anaconda3\envs\tensorflow\lib\site-packages\tensorflow\core\framework\resource_handle_pb2.py", line 16, in <module>
    from tensorflow.core.framework import tensor_shape_pb2 as tensorflow_dot_core_dot_framework_dot_tensor__shape__pb2
  File "D:\WorkSoftware\Install\Anaconda3\envs\tensorflow\lib\site-packages\tensorflow\core\framework\tensor_shape_pb2.py", line 36, in <module>
    _descriptor.FieldDescriptor(
  File "D:\WorkSoftware\Install\Anaconda3\envs\tensorflow\lib\site-packages\google\protobuf\descriptor.py", line 561, in __new__
    _message.Message._CheckCalledFromGeneratedFile()
TypeError: Descriptors cannot not be created directly.
If this call came from a _pb2.py file, your generated code is out of date and must be regenerated with protoc >= 3.19.0.If you cannot immediately regenerate your protos, some other possible workarounds are:
 1. Downgrade the protobuf package to 3.20.x or lower.
 2. Set PROTOCOL_BUFFERS_PYTHON_IMPLEMENTATION=python (but this will use pure-Python parsing and will be much slower).

More information: https://developers.google.com/protocol-buffers/docs/news/2022-05-06#python-updates- Resolving the above errorInput
exit()abortpythonThe environment imports the following packages:
pip install protobuf==3.19.0 -i https://pypi.tuna.tsinghua.edu.cn/simple --trusted-host pypi.tuna.tsinghua.edu.cn
Then re-enterpython Environment, viewtensorflowversion information, enter the command:
import tensorflow as tf
tf.__version__

aborttensorflowEnvironment:
conda deactivate

Meanwhile.condaThe console is open by defaultbaseof the environment, if you want to manage this setting
conda config --set auto_activate_base false / true
(VII), test whether Tensorflow-gpu is installed successfully or not
- show (a ticket)
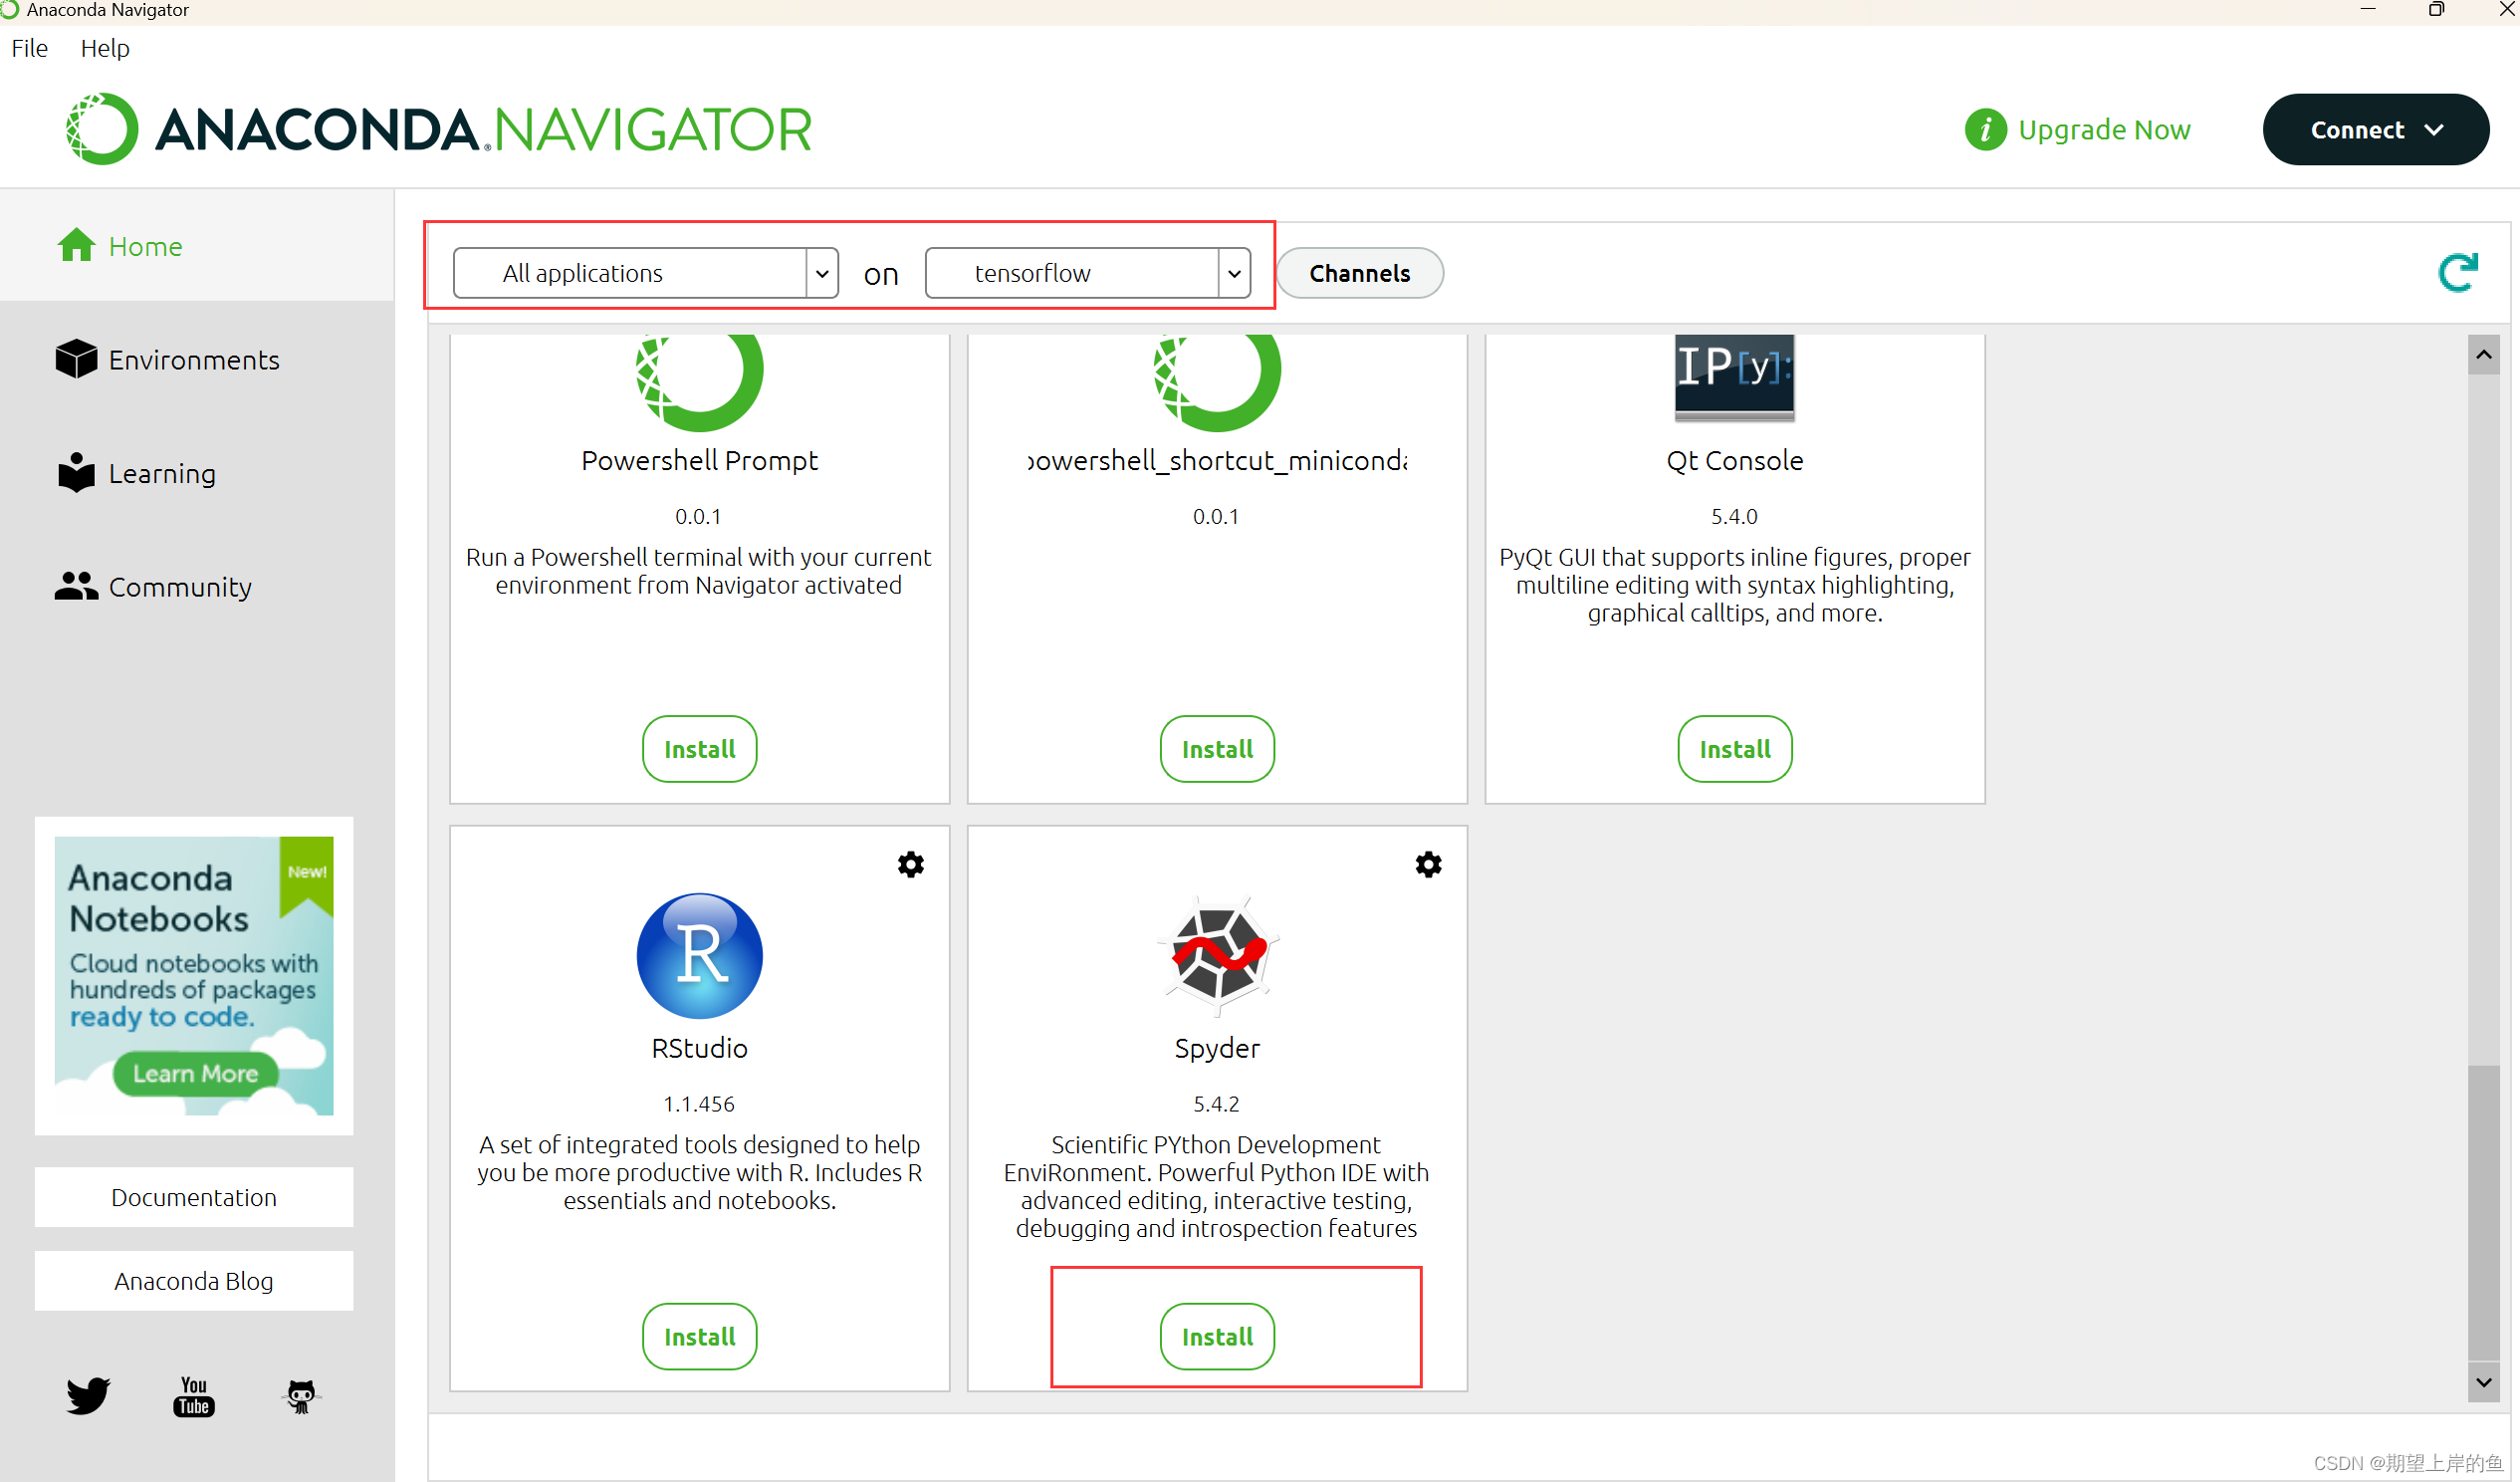
AnacondaSelectiontensorflowenvironment, open thespyderThe first time you open it, you need to installSpyderClick directly on the bottom of theinstallReady to go.
- Enter the following test code:
import tensorflow as tf

print(tf.__version__)
print(tf.test.gpu_device_name())
print(tf.config.experimental.set_visible_devices)
print('GPU:', tf.config.list_physical_devices('GPU'))
print('CPU:', tf.config.list_physical_devices(device_type='CPU'))
print(tf.config.list_physical_devices('GPU'))
print(tf.test.is_gpu_available())
# of GPUs available for output
print("Num GPUs Available: ", len(tf.config.experimental.list_physical_devices('GPU')))
# Query GPU devices
- The current environment has emerged
tensorflowand some other information, my version of the2.7.0, - If the following appears
TrueThat would indicate that ourtensorflow-gpuIt has been successfully installed and is working!
- Here’s a test.
GPUThe computing speed of the bar!
import tensorflow as tf
import timeit

# Specify to run on cpu
def cpu_run():
    with tf.device('/cpu:0'):
        cpu_a = tf.random.normal([10000, 1000])
        cpu_b = tf.random.normal([1000, 2000])
        c = tf.matmul(cpu_a, cpu_b)
    return c

# Specify to run on gpu
def gpu_run():
    with tf.device('/gpu:0'):
        gpu_a = tf.random.normal([10000, 1000])
        gpu_b = tf.random.normal([1000, 2000])
        c = tf.matmul(gpu_a, gpu_b)
    return c

cpu_time = timeit.timeit(cpu_run, number=10)
gpu_time = timeit.timeit(gpu_run, number=10)
print("cpu:", cpu_time, "  gpu:", gpu_time)
- can be seen
gpuThe speed of the program is higher than the speed ofcpuIt’s still a lot faster! - For the training of neural network models in machine learning, it can dramatically speed up our training process to help us save a lot of time, or very good!
uninstall and reinstall
You can uninstall and reinstall if there is an installation error:
tensorflow- Uninstalling the gpu
Note: Personal installation process, for learning reference only, if there are deficiencies, welcome to correct!
