catalogs
Basic Axios usage (get, post, put, etc. request methods)
Axios Advanced Usage (examples, configuration, interceptors, cancel requests, etc.)
1, axios instance creation and configuration
3. Cancellation requests (not commonly used, understood)
Axios further packaging, practical application in the project
act on behalf of sb. in a responsible position

The Birth of Axios
Why was Axios born?AxiosWe just have to talk about it.Ajax. Initially, when the old browser page requested data from the server, the whole page would be forced to refresh because the data returned was for the whole page, which was not very friendly to the user. Because when we only need to request part of the data, the server returns to us the whole page of data, which will cause network resources, that is, very consuming network resources. In order to improve the efficiency of data request, asynchronous web request Ajax came into being, which can request data without refreshing the page. Therefore, in this way, when we just need to modify some of the data on the page, we can realize the function of not refreshing the page.
Introduction to Axios
define
- Axios is a promise-based HTTP library (similar to jQuery’s Ajax for HTTP requests) that can be used in both browsers and node.js (both on the client side as well as on the server side written in node.js).
Axios is a promise-based web request library that can be used in the browser and node.js. Axios (compared to the native XMLHttpRequest object) is simple and easy to use , (compared to jQuery) axios package is small in size and provides an easy to extend the interface is focused on web request library .
principle
- axios (ajax i/o system) is not a new technology, is also essentially a wrapper for the native XHR (XMLHttpReques), except that it is based on Promise, is a version of the Promise implementation, in line with the latest ES specification.
Extra:AJAX AJAX = Asynchronous JavaScript and XML. — Asynchronous Web Requests — Ajax enables pages to request data without refreshing — AJAX is not a new programming language, but a new way of using existing standards. AJAX is the art of exchanging data with the server and updating parts of a web page without reloading the entire page ;By exchanging a small amount of data with the server in the background, AJAX enables asynchronous updating of web pages. This means that it is possible to update a portion of a web page without reloading the entire page Ways to implement ajaxThere are a variety of , such as jQuery wrapped ajax, native XMLHttpRequest, and axios can be implemented asynchronous network requests. Ajaxis a technical solution, but not a new technology. It relies on existing CSS/HTML/JavaScript, and one of the core dependencies is the XMLHttpRequest object provided by the browser, which is the object that allows the browser to make HTTP requests and receive HTTP responses.Implemented to interact with the server without refreshing the page... Asynchronous javascript and xml AJAX is a technology used to create fast dynamic web pages. ajax is used to interact with the backend So, let’s sort it out nowRelationship between the three: References:Understanding and using ajax and XHR References:What is the difference between native ajax and jquery’s ajax? ① AjaximplementationdependenciesinXMLHttpRequest object, i.e. XMLHttpRequest can implement Ajax. Asynchronous JavaScript + XML (Asynchronous JavaScript and XML), is not a new technology per se, but rather a new term coined by Jesse James Garrett in 2005 to describe a way of using a collection of existing technologies to describe ‘new ‘ approach, including.HTML maybeXHTML, CSS,JavaScript, DOM, XML, XSLTand most importantlyXMLHttpRequestAJAX When using the AJAX model in conjunction with these techniques, web applications are able to quickly render incremental updates to the user interface without reloading (refreshing) the entire page. This allows programs to respond to user actions more quickly. XMLHttpRequest is the foundation of AJAX and the XMLHttpRequest API is the core of Ajax.XMLHttpRequest is used to exchange data with the server in the background. This means that it is possible to update a part of a web page without reloading the whole page. ② Axioson this basisseal insidetheXMLHttpRequestAxios can implement Ajax. ③ Jqueryis a lightweight encapsulation of Javascript framework , and Ajax is an application of JavaScript , is asynchronous JavaScript and XML – by XML + Javascript combination of an asynchronous request technology to achieve dynamic local refresh . That is to say, Jquey is a library of JavaScript, and JavaScript contains Ajax. Jquery is based on the native Ajaxseal inside(To put it bluntly, Jquey encapsulates Ajax, which is actually the first step in the nativeXHRwrapper – doing the compatibility processing and simplifying the use), which means that in Jquery you can use theAjax。 JQuery provides a rich library of functions (methods) for AJAX development. With jQuery Ajax, you can request TXT, HTML, XML, or JSON from a remote server using both HTTP Get and HTTP Post. But there are pros and cons to each approach:
- Native XMLHttpRequest configuration and invocation methods are cumbersome , the implementation of asynchronous requests is very troublesome .
- jQuery’s ajax is very good compared to native ajax, but there is no need to quote the entire jQuery framework just because you want to use ajax asynchronous web requests.
characterization
- Creating XMLHttpRequests Requests from the Browser
- Creating http requests from node.js
- Support for Promise API
- Intercept requests and responses, e.g. add authorization before request and do something before response.
- Convert request data and response data, e.g., perform request encryption or response data encryption.
- Cancel request
- Automatic conversion of JSON data
- Client support for defense against XSRF
Browser Support
- Firefox、Chrome、Safari、Opera、Edge、IE8+
How to install
5 mounting options- Installation with npm
$ npm install axios- utilizationbowermounting
$ bower install axios - Installation with yarn
$ yarn add axios- Using the jsDelivr CDN
<script src="https://cdn.jsdelivr.net/npm/axios/dist/axios.min.js"></script>- Using the unpkg CDN
<script src="https://unpkg.com/axios/dist/axios.min.js"></script>Use of Axios
◼️ Creating a vue project
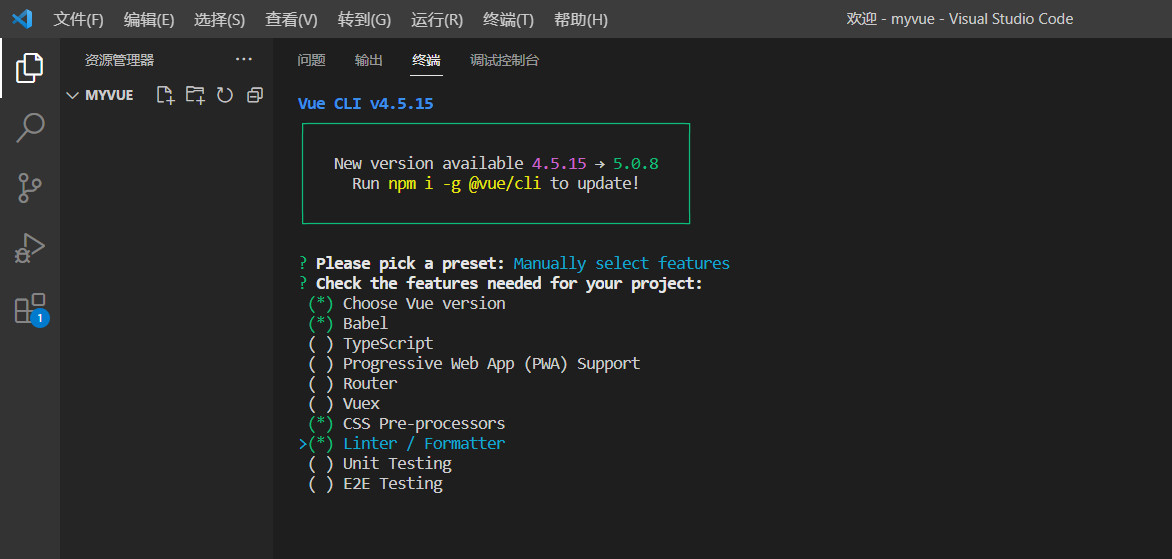
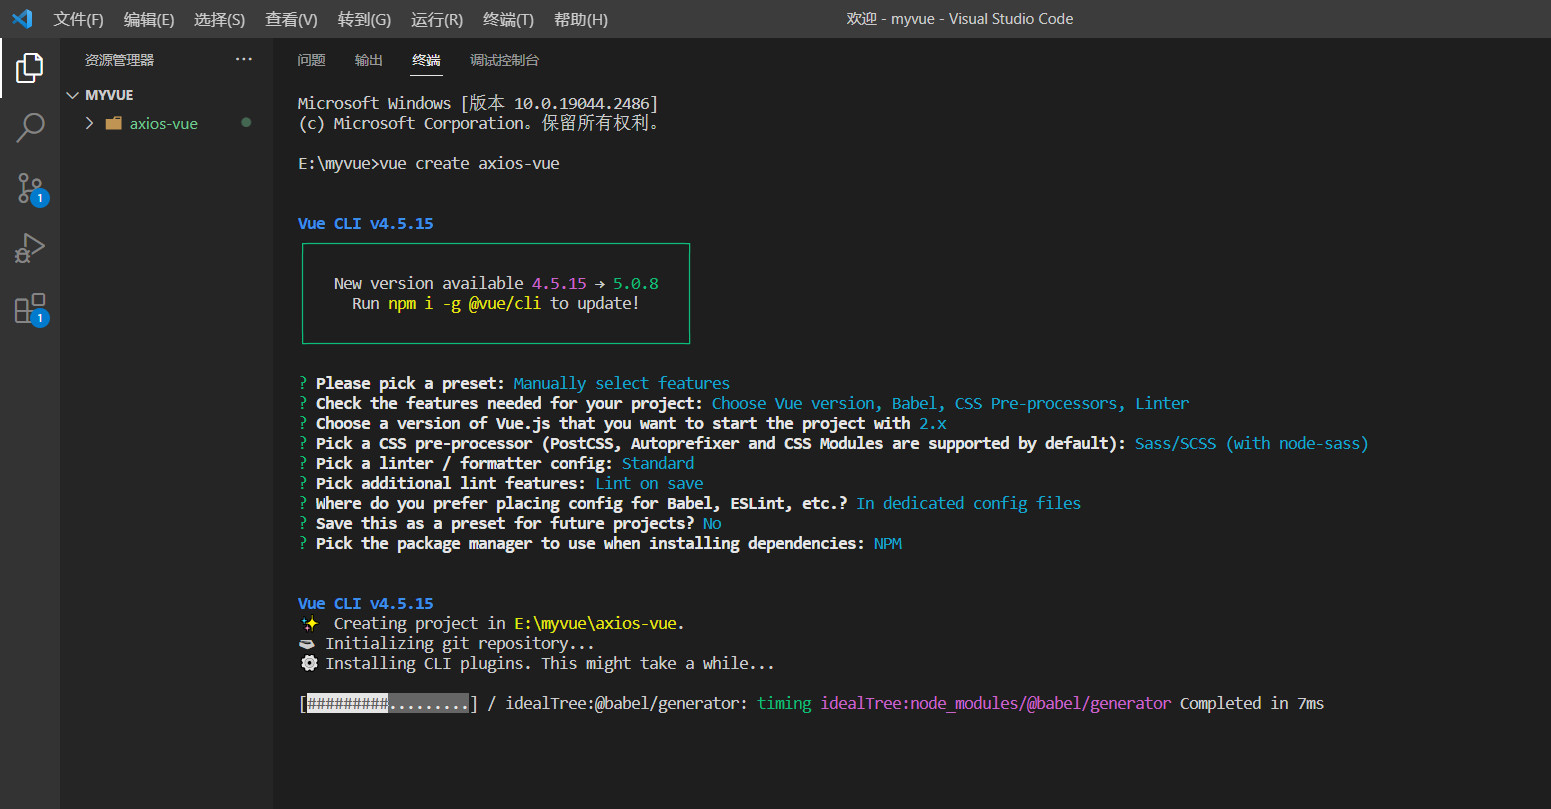
Let’s take the example of using axios in vue In your computer hard disk, create a new project folder, use vscode to open the project folder, under the project folder, right-click and select “Open in Integrated Terminal” to open the terminal. (Of course, you can also create a vue project by typing cmd in the path address bar of the project folder directory and pressing enter to open a command line window.) Now, let’s start creating a vue project:vue create axios-vueSelect Custom Configurationmanually select featuresThe terminal display is as follows: up and down keys toggle, space bar to select the corresponding configuration.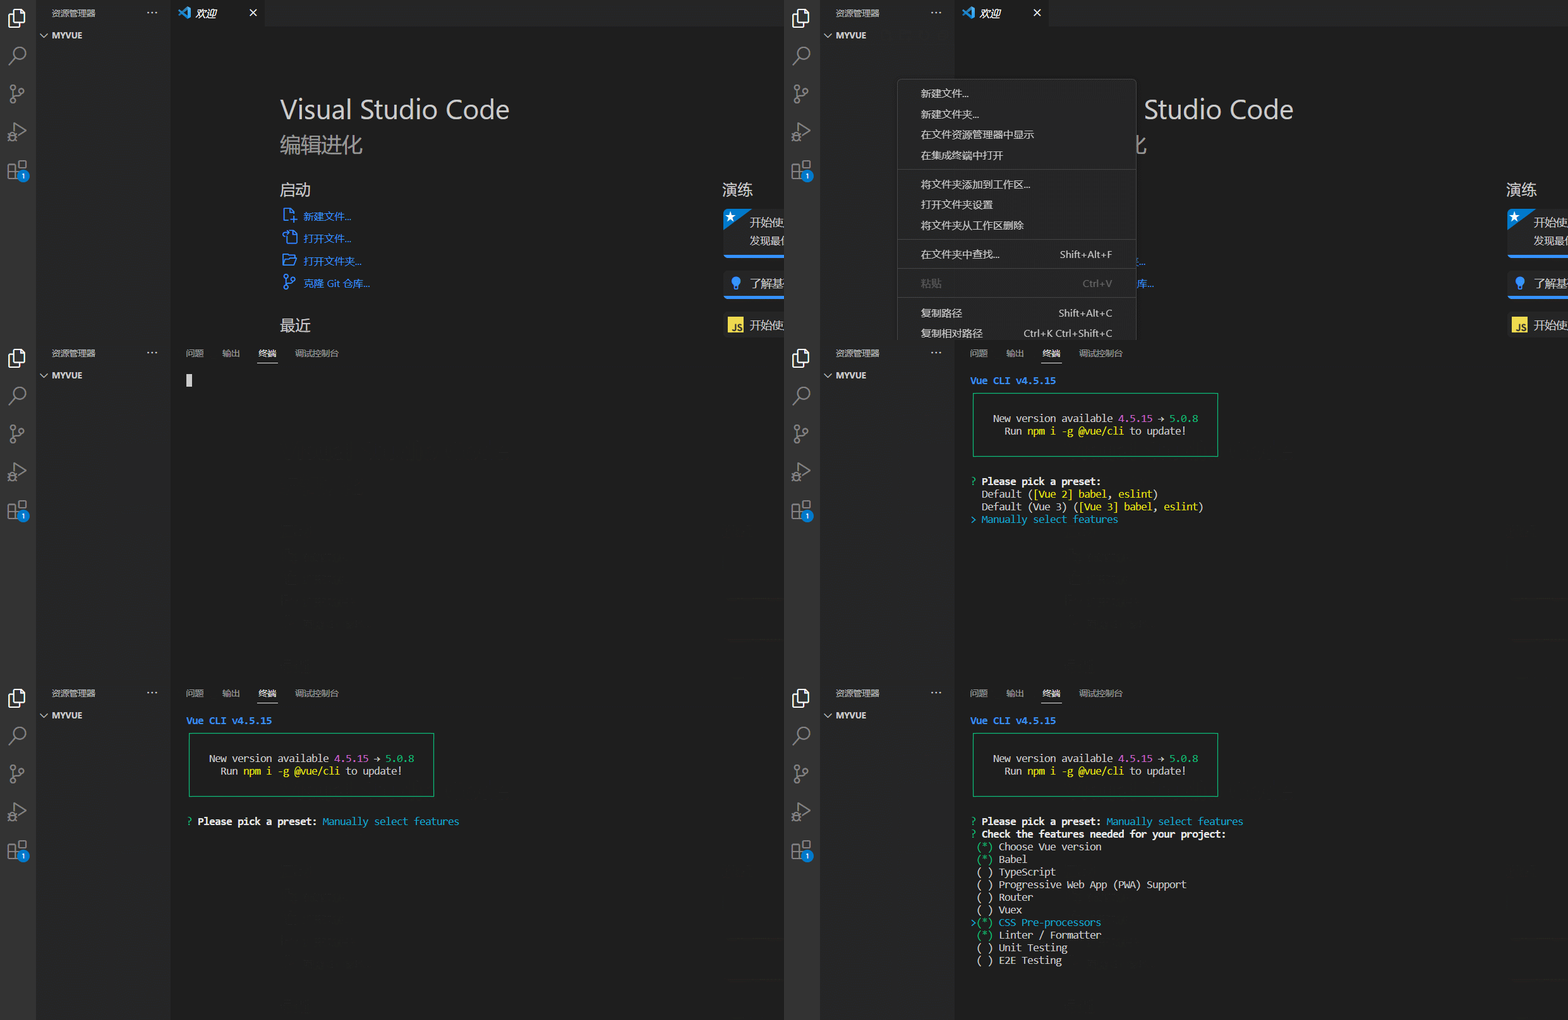
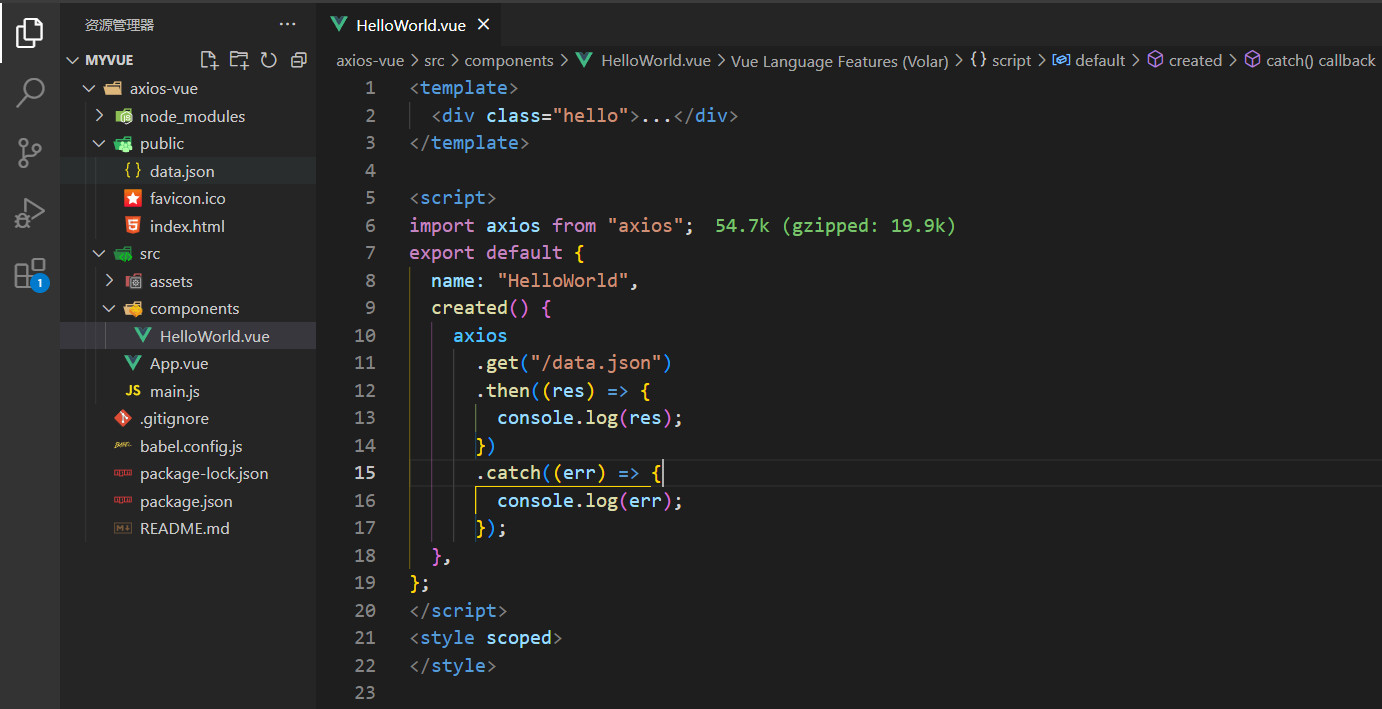
<template>
  <div id="app">
    <img alt="Vue logo" src="./assets/logo.png">
    <HelloWorld></HelloWorld>
  </div>
</template>

<script>
import HelloWorld from './components/HelloWorld.vue'

export default {
  name: 'App',
  components: {
    HelloWorld
  }
}
</script>

<style>
#app {
  font-family: Avenir, Helvetica, Arial, sans-serif;
  -webkit-font-smoothing: antialiased;
  -moz-osx-font-smoothing: grayscale;
  text-align: center;
  color: #2c3e50;
  margin-top: 60px;
}
</style><!DOCTYPE html>
<html lang="">
<head>
<meta charset="utf-8">
<meta http-equiv="X-UA-Compatible" content="IE=edge">
<meta name="viewport" content="width=device-width,initial-scale=1.0">
<link rel="icon" href="<%= BASE_URL %>favicon.ico">
<title><%= htmlWebpackPlugin.options.title %></title>
</head>
<body>
<div id="app"></div>
</body>
</html>{
"title":"vue project",
"create_time":"2023-02-13"
}<template>
<div class="hello">...</div>
</template>
<script>
import axios from "axios";
export default {
name: "HelloWorld",
created() {
axios
.get("/data.json")
.then((result) => {
// result is not a direct result
console.log(result);
// result.data is the actual returned result
console.log(result.data);
})
.catch((err) => {
console.log(err);
});
},
};
</script>
<style scoped>...</style>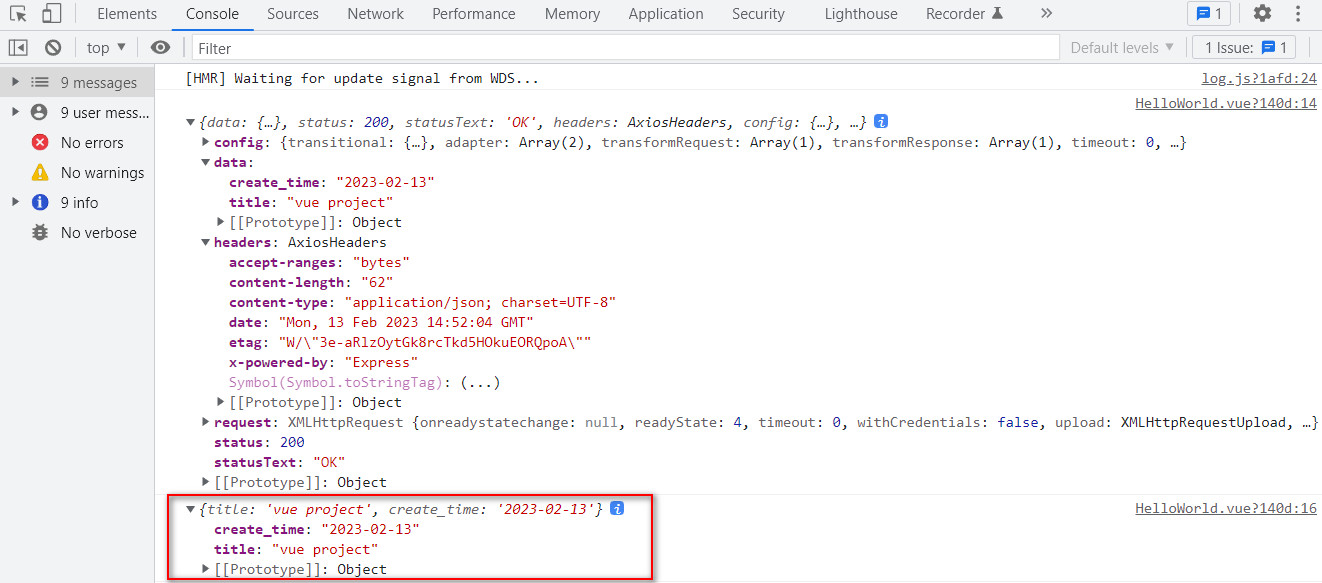
My doubts: Personal understanding – although the base path is not configured, axios.get(“/data.json”), the console can also request the data because the server is local (my computer at this time to act as a server), so when requesting using the get method of axios, the url can be written only the requested url, and omit the base path http 8080. Personal understanding – when using axios for web requests, it seems that only get methods can be used directly in their url parametersfile instead of the url, which in turn gets the contents of the file requested from the server, i.e.axios.get(“/data.json“), where data.json is a file in json format, and so try axios.get(“/index.html“) to get, the content of the index.html file, and it was found to be accessible as well. ButReplace with postrequest method.It will be 404 (Not Found), in my humble opinion.This is probably because post is used to submit data to the server, not to get it, and the back-end interface has not been written (configured) yet, so, a 404 (Not Found) will appear.
◼️ Basic Usage of Axios(get, post, put, etc. request methods)
Several request methods commonly used by Axios:get,post,put,patch,delete- get: generally used to get data
- post: generally used to submit data (form submission and file upload)
- patch: update data (push only modified data to the backend (server side))
- put: update data (all data pushed to the server)
- delete: deletes the data
Off-topic: the average company in the actual project development process: (1) post: generally used for new data (2) put: generally used to update data (suitable for updates with relatively small amounts of data) (3) patch is generally used to update data when the data volume is large. For example, a form has a large amount of data, many items, use put, all the data pushed once is relatively performance-consuming, this time you can consider using patch, only the modified data will be pushed to the backend. These off-topic, just the general conventional use, does not mean that you must use this; of course, you may say I use post to get data, okay? This of course, the answer is yes, absolutely no problem! Specifically how to use or front and back end together to discuss the decision.
get method
Mode 1: Use of request aliasesA way to request aliases, an API that simplifies request method configuration.axios.get(url[, config]) is used to get the data
- Without parameters, the code is as follows:
<script>
import axios from "axios";
export default {
  name: "HelloWorld",
  created() {
    axios
      .get("/data.json")
      .then((result) => {
        // result is not a direct result
        console.log(" Data: ",result);
        // result.data is the actual returned result
        console.log("Real data:",result.data);
      })
      .catch((err) => {
        console.log(err);
      });
  },
};
</script>- If with parameters, the code is as follows:
<script>
  import axios from "axios";
  export default {
    name: "HelloWorld",
    created() {
      // The first way: write the parameters directly in the url
      // Initiate a request to a user with a given ID
      axios
        .get("/data.json?id=5")
        .then((result) => {
          // Processing success
          console.log(result);
        })
        .catch((err) => {
          // Handling error conditions
          console.log(err);
        });


      // The second way: write the parameters directly in params
      axios
        .get("/data.json", {
          //with parameters ---- if no parameters directly omit the params object is not written
          params: {
            id: 5,
          },
        })
        .then((result) => {
          // result is not a direct result
          console.log(" Data: ", result);
          // result.data is the actual returned result
          console.log("Real data: ", result.data);
        })
        .catch((err) => {
          console.log(err);
        });

      // Supports async/await usage.
      // axios is a promise-based web request library, which means that you have to use either ES6's then() or ES8's async/await to work with Promise instance objects.
      // Note: Since async/await is part of ECMAScript 2017 and is not supported in Internet Explorer and some older browsers, it should be used with care.

      async function getUser() {
        try {
          const response = await axios.get("/user?ID=12345");
          console.log(response);
        } catch (error) {
          console.error(error);
        }
      }
    },
  };
</script>
At this point, the parameter is id=5, the final request path Request URL: http 8080/data.json?id=5Way two:pass (a bill or inspection etc)Passing relevant configuration to axiosto create the request
At some point we may need to set more detailed configuration parameters for axios, and it is more convenient to create a request by passing the relevant configuration to axios. Reference:What are the request configuration items for axios | Request Configuration | Axios Chinese Documentation | Axios Chinese Website
- Without parameters, the code is as follows:
<script>
import axios from "axios";
export default {
  name: "HelloWorld",
  created() {
    axios({
      method: "get",
      url: "/data.json"
    }).then((res) => {
      // result is not a direct result
      console.log(" Data: ", result);
      // result.data is the actual returned result
      console.log("Real data: ", result.data);
    });
  },
};
</script>- If with parameters, the code is as follows:
<script>
import axios from "axios";
export default {
  name: "HelloWorld",
  created() {
    axios({
      method: "get",
      url: "/data.json",
      //with parameters ---- if no parameters directly omit the params object is not written
      params: {
        id: 5,
      },
    }).then((result) => {
      // result is not a direct result
      console.log(" Data: ", result);
      // result.data is the actual returned result
      console.log("Real data: ", result.data);
    });
  },
};
</script>
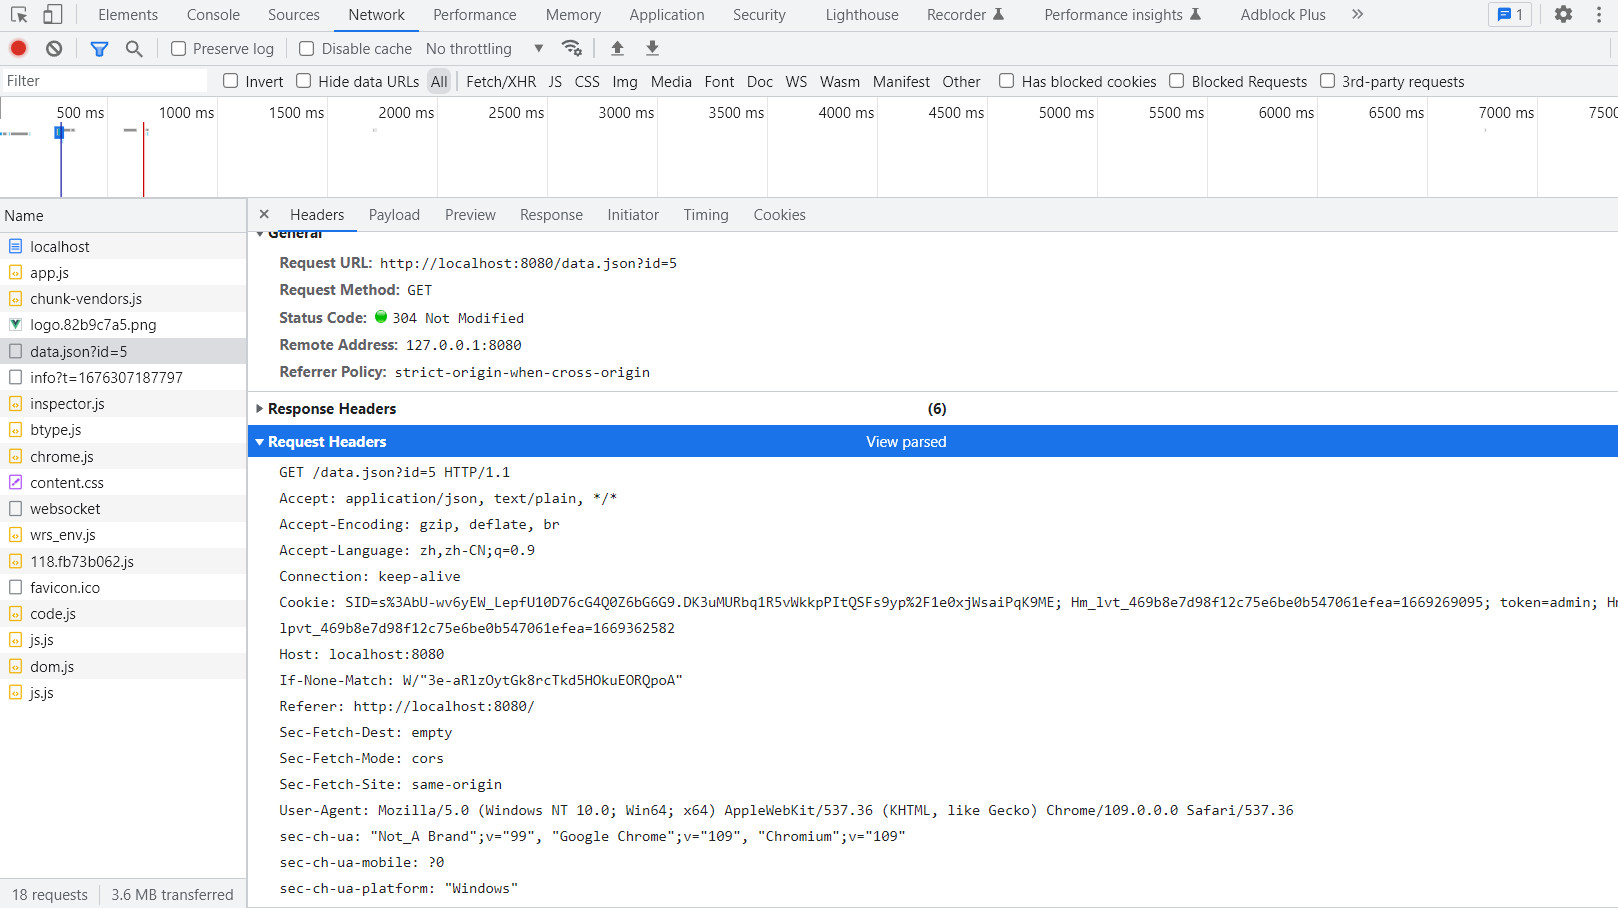
At this point, the parameter is id=5, the final request path Request URL: http 8080/data.json?id=5Get to know the request information related to the browser console: Request URL: request URL Request Method Status Code
Status Code:304 Not Modified 304 is redirected; under normal circumstances, the first time you visit the interface return is 200; when you visit the interface for the second time, if the data does not change, then the browser will automatically recognize the return of a state 304, on behalf of the data did not change, redirected; the equivalent of redirected to the resources you just accessed, in this case, it will be loaded faster!Request Header: request header — view parsed mode User-Agent: the type of browser that generated the request. Accept: list of content types recognized by the client. Host: the name of the requested host. Query String Parameters: Query String Parameters
For get requests, parameters are passed as url strings, i.e. ? The string that follows is the request parameter, separated by &.
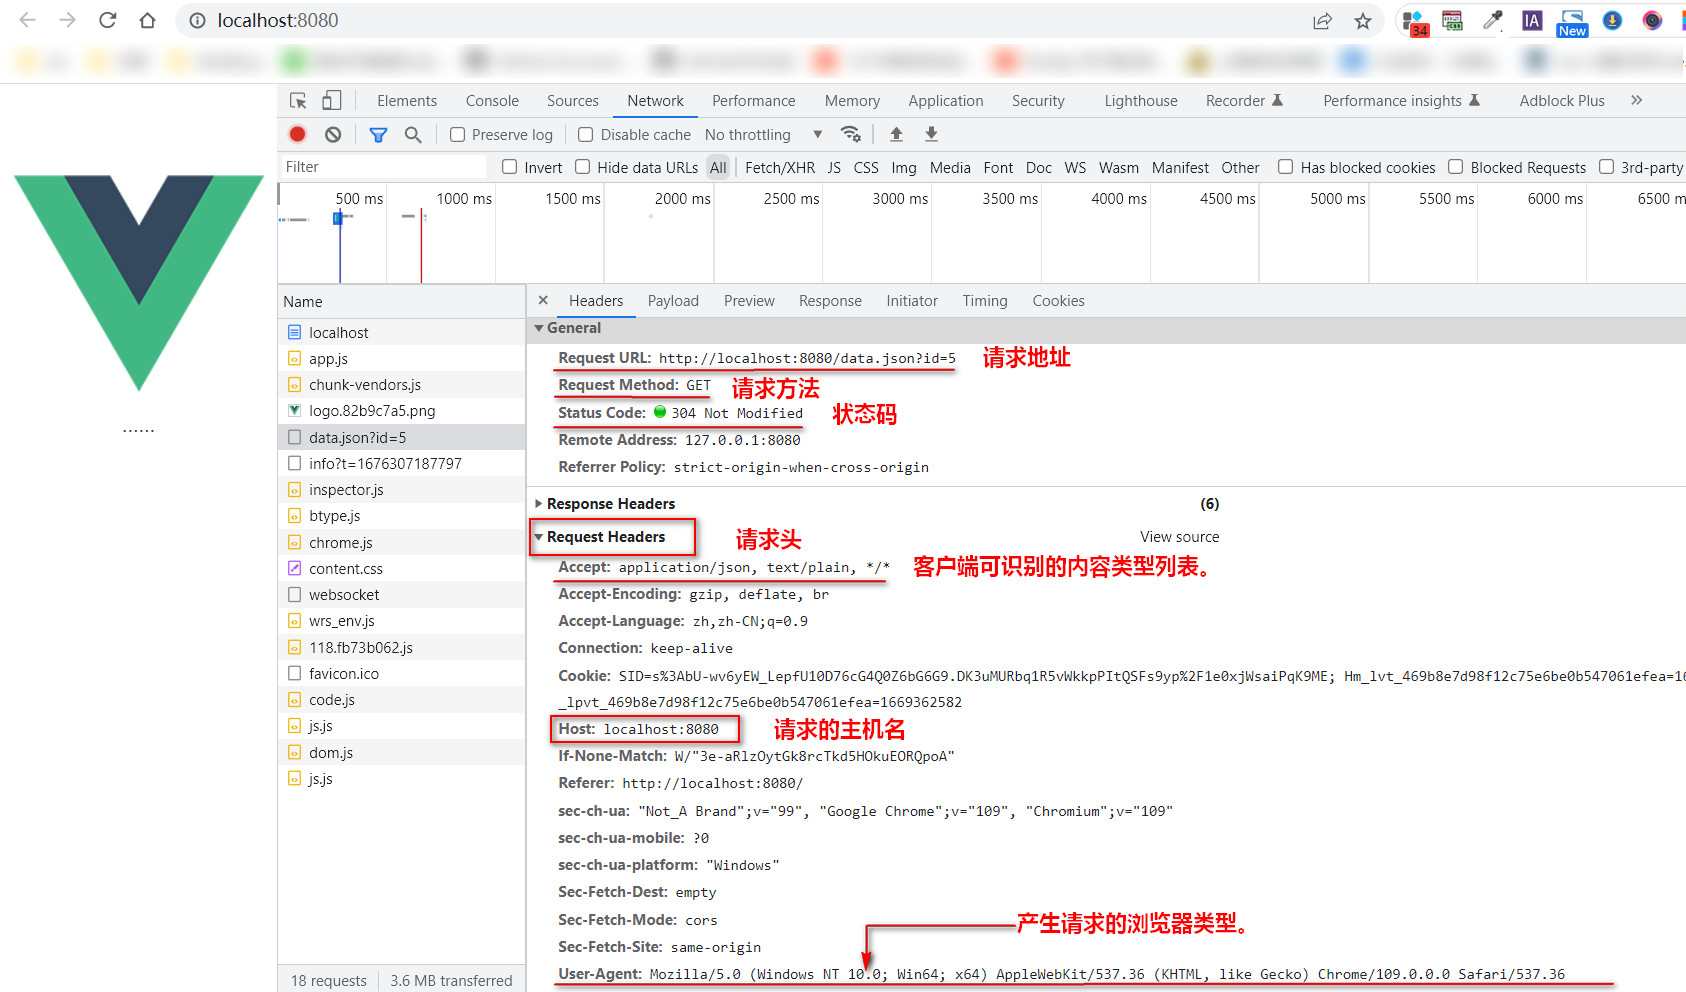
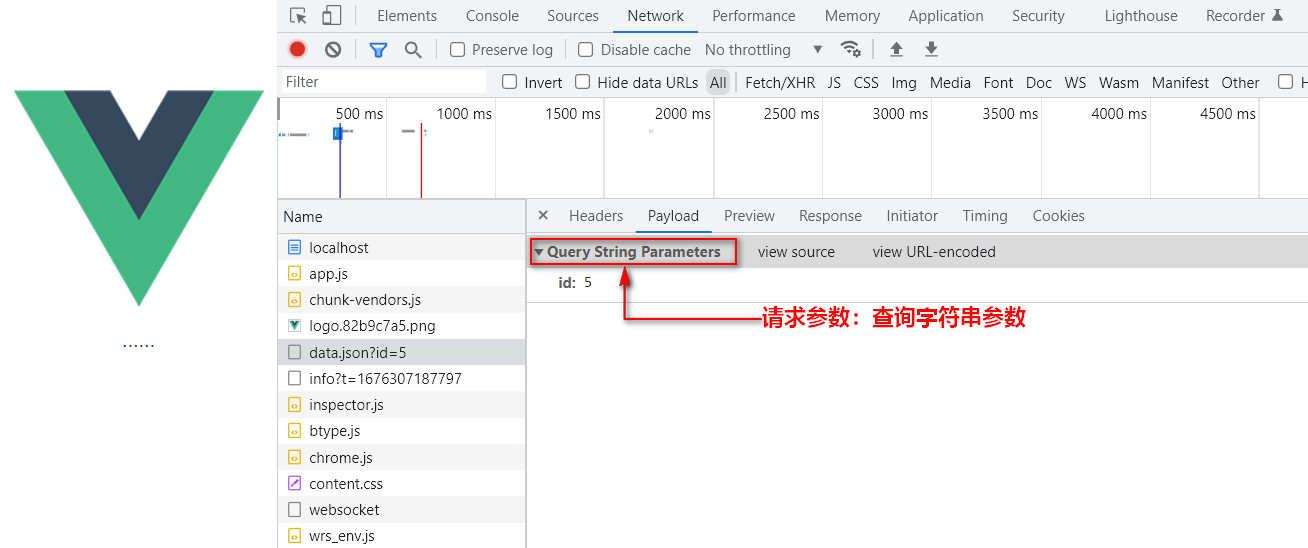
Switching between view source and view parsed modes In the process of analyzing the content of the web page submission, return value, etc., request header, request post data, response header and other information in the view source and view parsed two modes, click on the switch, convenient data analysis. For example, after viewing the data encoded in URLEncode, you can know that “%2F” means slash “/” by view parsed.
post method
There are three common data request formats for post requests:1、Content-Type : application/x-www-form-urlencoded。 ajaxDefault data format. The data in the request body will be formatted asjson stringform to the backend. 2、Content-Type : application/json ; charset=utf-8。 axiosDefault data format. The data in the request body will be formatted asGeneral Formsform (key-value pairs) to the backend. 3、Content-Type : multipart/form-data 。 It will process the data from the request body as a single message, in tags, separated by separators. Both key-value pairs and files can be uploaded. References:Three common data submission formats for POST requestsBelow, we briefly understand the three types of http post requests
🌱 Content-Type:application/x-www-form-urlencoded
<template>
  <div class="hello">......</div>
</template>

<script>
import axios from "axios";
import qs from 'qs';

export default {
  name: "HelloWorld",
  created() {
    // The attribute names uname and upwd of the object data may or may not be quoted.
    let data = {uname:"dingding",upwd:"123456"};

    axios.post("/date.json",qs.stringify({ data }))
    .then(res=>{
        console.log(res);
    })
  },
};
</script>
<style scoped>
</style>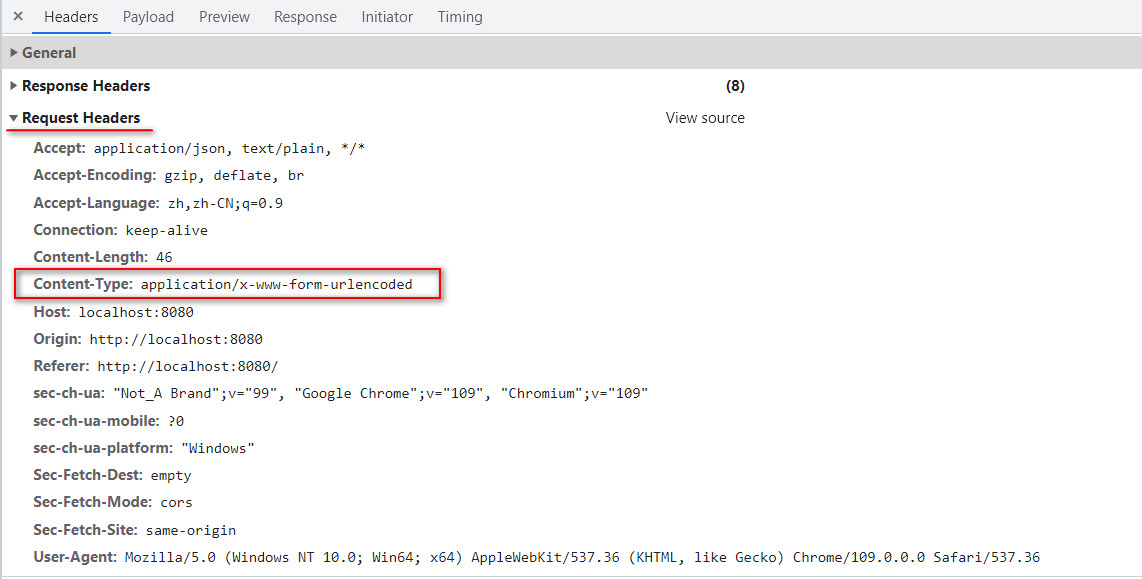

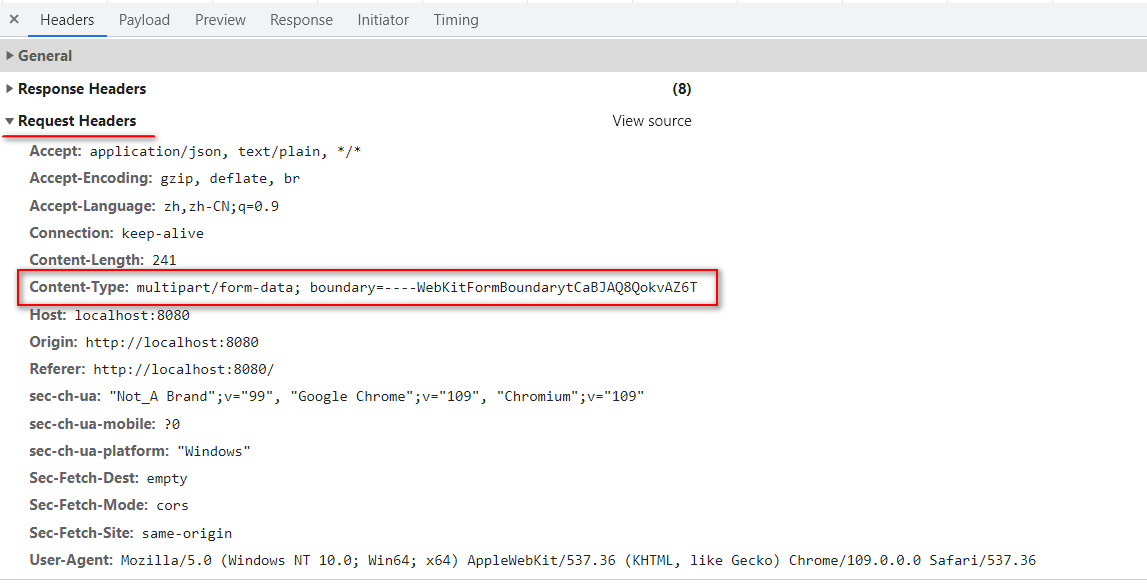
🌱 Content-Type: multipart/form-data (commonly used for form submissions (image uploads, file uploads))
<template>
  <div class="hello">......</div>
</template>

<script>
import axios from "axios";
export default {
  name: "HelloWorld",
  created() {
    let data = {uname: "dingding", upwd: 123456};
    let formData = new FormData();
    for (let key in data) {
      formData.append(key, data[key]);
    }
    console.log(formData);

    axios.post("/date.json", formData).then((res) => {
      console.log(res.data);
    });
  },
};
</script>
<style scoped>
</style>
Note: Request information related to form-data type – Request URL: http 8080/data.json – Content-Type: multipart/form-data in the request header; boundary=—-WebKitFormBoundarySmuEKOlBaxhc0In2 – Parameter form: {uname: “dingding”, upwd: 123456}Content-Type and parameters:

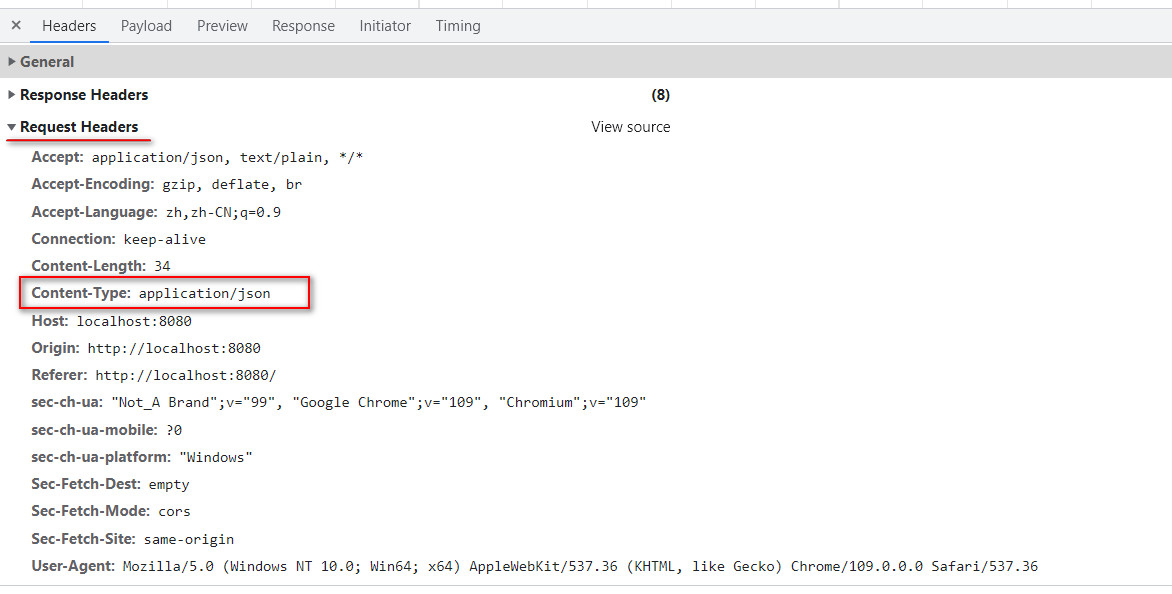
Content-Type: application/json (regular use)
- Approach I: Use of request aliases
<template>
  <div class="hello">......</div>
</template>

<script>
import axios from "axios";
export default {
  name: "HelloWorld",
  created() {
    // Just change get to post for get no-participation requests
    axios.post("/data.json").then(res=>{
      console.log(res)
    });
  },
};
</script>

<style scoped>...</style><template>
<div class="hello">......</div>
</template>
<script>
import axios from "axios";
export default {
name: "HelloWorld",
created() {
//Send a post request with parameters, use "uname=dingding&upwd=123456" directly.
axios.post("/data.json", "uname=dingding&upwd=123456").then(res=>{
console.log(res)
});
},
};
</script>
<style scoped>...</style>
<template>
  <div class="hello">......</div>
</template>

<script>
import axios from "axios";
export default {
  name: "HelloWorld",
  created() {
    //Send a post request with parameters, this way of passing parameters to the backend must use requestBody processing
    axios.post("/data.json", {uname:"dingding",upwd:123456}).then(res=>{
      console.log(res)
    });
  },
};
</script>

<style scoped>...</style>- Way 2: Create a request by passing the relevant configuration to axios
<template>
  <div class="hello">......</div>
</template>

<script>
import axios from "axios";
export default {
  name: "HelloWorld",
  created() {
     let data = {uname:"dingding",upwd:123456};
     axios({
       method:'post',
       url:'/data.json',
       // Unlike get requests, which use params, post requests use the data attribute.
       data:data
     }).then(res=>{
       console.log(res)
    })
  },
};
</script>

<style scoped>...</style>
Note: The alias method and the data method are related to the request information. – Request URL: http 8080/data.json. – Content-Type: application/json in the request header – Parameter form: {uname: “dingding”, upwd: 123456}Content-Type and parameters:

References: The post requests in axios are application/json and application/x-www-form-urlencoded
put and patch methods
put and patch requests and post requests are similar to the same usage, the same x-www-form-urlencoded, application/json and form-data, only the method is different, the other is the same. In this case, but not too much detail, simply write!
let data = {uname:"dingding",upwd:123456};
// axios.put(url[, data[, config]]) is used like post to modify data.
axios.put("/data.json", data).then(res=>{
  console.log(res)
});


let data = {uname:"dingding",upwd:123456};
// axios.patch(url[, data[, config]]) is used like post to modify data.
axios.patch("/data.json", data).then(res=>{
  console.log(res)
});
delete method
axios.delete(url[, config]) is basically similar to axios.get(url[, config]), but has a different purpose, it is used to delete data, and like the get method it can be written in several ways. The delete request sometimes requiresSplice the parameters to the URLSometimes it’s like a post request.Putting parameters inside the request body. As for exactly how to call it, you need to discuss it with the backend!- Mode 1: get –params
// Use of aliasing

// 2 forms of parameter passing, same as get

1、params
axios
  .delete("/data.json", {
    params: {
      id: 12
    }
  })
  .then(res => {
    console.log(res, "delete");
  });

2、Query string form, that is, the parameters are spliced into the url
axios
  .delete("/data.json?id=2", {
    params: {
      id: 12
    }
  })
  .then(res => {
    console.log(res, "delete");
  });


// Without the alias method ----- creates the request __axios(config) with the relevant configuration passed to axios
let params = {
  id: 5
};
axios({
  method:'delete',
  url:'/data.json',
  params:params
}).then(res=>{
  console.log(res)
})
- Mode 2: post –data
// Use of aliasing
// data
axios
  .delete("/data.json", {
    data: {
      id: 5
    }
  })
  .then(res => {
    console.log(res);
  });

// Without the alias method ---- creates the request by passing the relevant configuration
let data = {
  id: 5
};
axios({
  method:'delete',
  url:'/data.json',
  data:data
}).then(res=>{
  console.log(res)
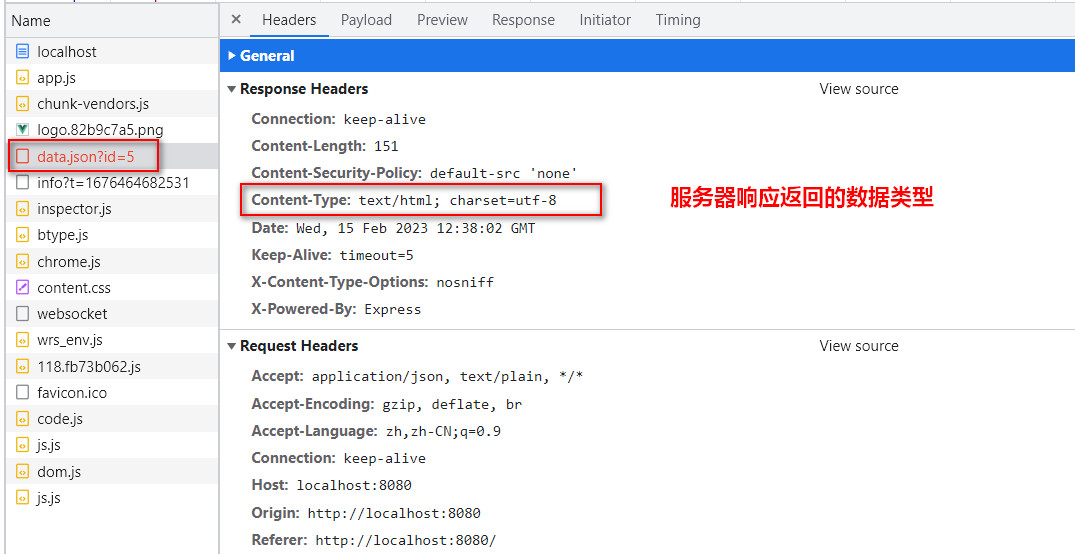
})Caution:Difference between get-params and post-data request information in delete request. – The params approach will put the requestParameters are spliced on the URLRequest URL: http 8080/data.json?id=5 – Parameter form: id:5 – Content-Type: text/html; charset=utf-8– The data method does not splice the parameters, it puts them directly in thePlacement in the body of the request(the type of data requested is in the request header because content is submitted to the server), Request URL: http 8080/data.json – Parameter form: {id:5} – Content-Type: application/json
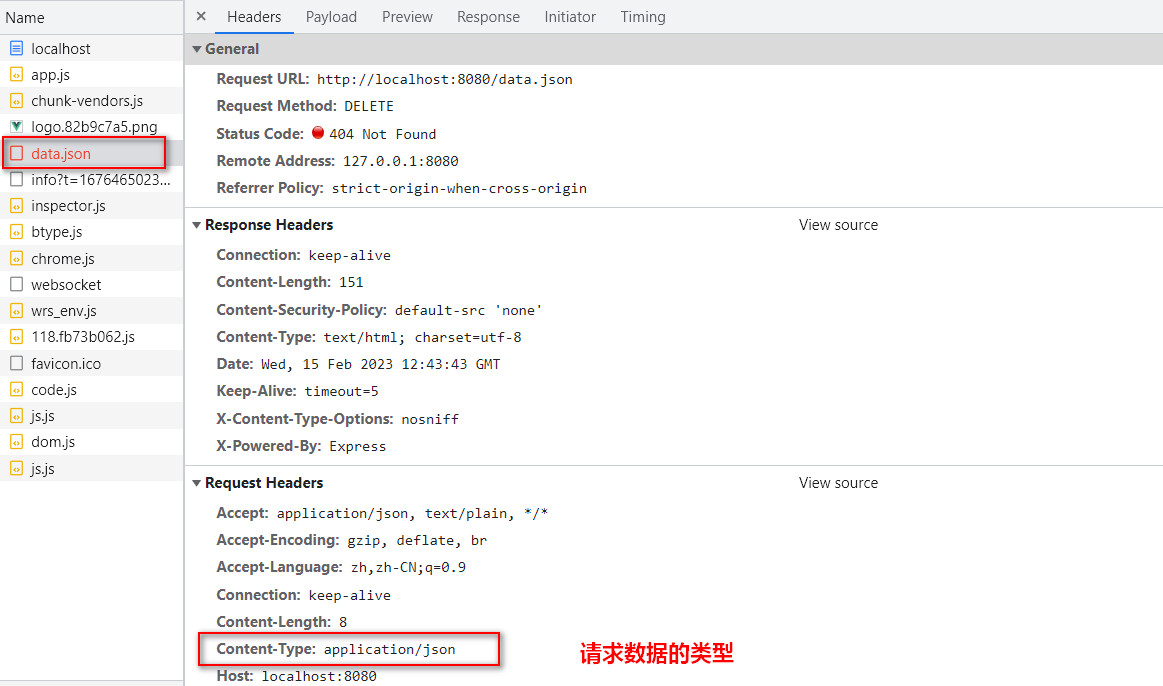
Summarize: All of the above methods correspond to two ways of writing: (1) using aliases: as in axios.get(); (2) not using aliases: as in axios();
Concurrent requests
Concurrent requests, that is, multiple requests are made at the same time and the return values are handled uniformly. In the example, we use axios.all(), to make a request for data.json/city.json at the same time, and axios.spread(), to process the returned results separately. The code is as follows:<template>
<div class="hello">......</div>
</template>
<script>
import axios from "axios";
export default {
name: "HelloWorld",
created() {
// Concurrent requests
// Concurrent requests用到了axios的两个方法:axios.all('参数是一个数组')、axios.spread('回调函数')
axios.all([axios.get("/data.json"), axios.get("/city.json")]).then(
axios.spread((dataRes, cityRes) => {
console.log(dataRes, cityRes);
})
);
},
};
</script>
<style scoped>
</style>Axios Advanced Usage (examples, configuration, interceptors, cancel requests, etc.)
1、axios instance creation and configuration
For example: there are multiple back-end interface addresses (www.test.com, www.example.com) and different timeout lengths, such as 1000ms, 2000ms, at this time, we can create instances and utilize axios instances for network requests. The idea is as follows: create multiple instances, configure different timeout lengths, and use different instances to request different interfaces. Use axios.acquire to create the instances, configure the relevant information, and make network requests. The code is as follows:<template>
<div class="hello">......</div>
</template>
<script>
import axios from "axios";
// Scenario: If there are multiple back-end interface addresses with different timeouts, we can create an axios instance and use it to make network requests.
export default {
name: "HelloWorld",
created() {
// Create axios instance 1
let instance = axios.create({
baseURL: "http://loacalhost:8080",
timeout: 1000,
});
instance.get("/data.json").then((res) => {
console.log(res);
});
// Create an instance of axios2 ---- If there are two domains or the timeouts are set differently, we can create another instance of axios
let instance2 = axios.create({
baseURL: "http://loacalhost:8081",
timeout: 2000,
});
instance2.get("/city.json").then((res) => {
console.log(res);
});
},
};
</script>
<style scoped>
</style>Note: At this point we will be able to access the interfaces for two different domains, http 8080 and http 8081, and use different configurations.
Configuration of axios instances
(1) Configuration list: – baseURL: the domain/base address of the request. – timeout: the timeout of the request, default: 1000 milliseconds (ms), if it exceeds this timeout, the backend will report (return) 401 timeout.Remarks: Generally defined by the back-end, when the back-end interface requires a long processing time, if the request is too long, the back-end can not handle it, it will block and cause more pressure on the server. After setting, it can be released in time.– url: path of the request. – method: the method of the request. E.g. get, post, put, patch, delete, etc. – headers: request headers. – params: splice the request parameters to the url – data: place the request parameters into the request body
let instance = axios.create({
  // Setting the configurator when creating an instance
  baseURL: "", //requested domain name/base address
  timeout: 2000, //Timeout duration of the request in milliseconds, default.
  url: "/data.json", //request path
  method: "get", //request method
  headers: {
    // set the request header ---- we can add some parameters to the request header
    token: "",
    post: {
       'Content-Type': 'application/x-www-form-urlencoded;charset=UTF-8'
    }
  },
  params: { id: 5 }, // splice request parameters to url
  data: { id: 5 }, //Place the request parameters into the request body
});- axios global configuration
axios.defaults.baseURL = 'http://localhost:8080'
axios.defaults.timeout = 2000
Note: In a project, we often need to request the same basic URL many times under the different routes, if each time you send a request to write a basic URL will undoubtedly produce a lot of code duplication, so you can use the global configuration to simplify the code.Default Configuration | Axios Chinese Documentation | Axios Chinese Website
- axios instance configuration
let instance = axios.create();
instance.defaults.timeout = 3000
- axios request configuration
instance.get('/data.json',{
    timeout:5000
})
- Example 1:
let instance1 = axios.create({
  baseURL: "http://localhost:9090",
  timeout: 1000,
});
instance1
  .get("/contactList", {
    params: {
      id: 5,
    },
  })
  .then((res) => {
    console.log(res);
  });
Analysis: The configured parameters are baseURL: ‘http 8080’, timeout ‘get’, params:{ id ‘/contactList ‘
- Example 2:
let instance2 = axios.create({
  baseURL: "http://localhost:8081",
  timeout: 3000,
});
instance2
  .get("/contactList", {
    timeout: 5000,
  })
  .then((res) => {
    console.log(res);
  });
Analyze: The configured parameters are baseURL: ‘http 8081’, timeout ‘get’, url: ‘/contactList ‘Caution:The final efficient allocation is made by the high priority overriding the low priority.
2. Interceptor
What is an interceptor? It’s.Intercepting them before the request or before the response is processed is of two kinds:request interceptorwithResponse Interceptor(1) Usage of axios interceptor
- Request interceptor – intercepts requests before they are made
// Add a request interceptor
   /* Reasons for the need to intercept requests
    * :: 1.config contains some information that does not meet the requirements of the server
    * :: 2. Need to show users some loading icons when sending web requests
    * :: 3. Websites require a login to request resources, i.e., a token to request resources */
    axios.interceptors.request.use(config => {
      // What to do before sending a request
      console.log(config)
      return config; //Interceptor must remember to process the result of the interception and return it, otherwise it will not be able to get the data.
    }, err=>{
        // Do something about the request error
        console.log(err)
        return Promise.reject(err) // Logic in case of request errors
}); var instance = axios.create([config]);
instance.interceptors.request.use(function () {/*...*/});
- Response Interceptor – intercepts the response before it is processed by then, catch
// Add a response interceptor
    axios.interceptors.response.use(res => {
      // Data processing after a successful request
      console.log(res)
      return res.data; // do something with the response data
    }, err=>{
        // Do something about the response error
        console.log(err)
        return Promise.reject(err) // Logic handling in response to an error
});- Cancel Interceptor (Understanding)
	let inter = axios.interceptors.request.use(config=>{
        config.header={
            auth:true
        }
        return config
    })
axios.interceptors.request.eject(inter)In the actual project, we can not send only one network request, if we write a separate axios configuration for each network request, if axios is no longer maintained in the future or the project needs to replace the other network request library, the amount of code that needs to be refactored is undoubtedly huge. Therefore, we try to think whether it is possible to separate the network request and encapsulate it as a function, so that when making a network request, we only need to call the corresponding function and pass in the parameters. In this way, even if we need to change the request library in the future, we only need to modify the encapsulated function instead of heavily refactoring the code, which can greatly reduce the workload. Based on this requirement, it is more recommended to use the axios instance approach for network requests in your project.
export function request(config) {
    // 1. Create an instance of axios
    const instance = axios.create({
      baseURL: "http://localhost:8080",
      timeout: 5000,
    });
    // 2. Use of the axios interceptor
    // 2.1 Adding a request interceptor
    /** Reasons for which requests need to be intercepted
     * :: 1.config contains some information that does not meet the requirements of the server
     * :: 2. Need to show users some loading icons when sending web requests
     * :: 3. The website requires a login to request resources, i.e., a token to request resources
     */
    instance.interceptors.request.use(
      (config) => {
        // What to do before sending a request
        return config; //Interceptor must remember to process the result of the interception and return it, otherwise it will not be able to fetch the data.
      },
      (err) => {
        // Do something about the request error
        return Promise.reject(err); // Logic handling in case of request errors
      }
    );
    // 2.2 Adding a Response Interceptor
    instance.interceptors.response.use(
      (res) => {
        // Process the response data after a successful request.
        return res; // do something with the response data
      },
      (err) => {
        // Do something about the response error
        return Promise.reject(err); // Logic handling in response to an error
      }
    );
    // 3. Send a web request
    // The axios instance itself returns the Promise object, just call it directly.
    return instance(config);
}
The above code is a simple request network request function package, so that each time you call it to make a network request to create a separate instance of axios, you can be more flexible configuration. Need to be worth noting that the place is the interceptor, the interceptor will be the result of the request and response of certain processing, but after the configuration of the interceptor must remember to intercept the results of the final release.(2) Practical Examples Practical Example A: Login Privileges Example of an interface that requires a token
// Interfaces that require a token
    let instance = axios.create({});
    instance.interceptors.request.use(config=>{
        config.headers.token = '';
     //This way of writing will overwrite the other parameters in the headers, resulting in the headers containing only one parameter, the token, so this way of writing is not recommended
     // config.headers = {
     //       token: ''
     // }
        return config
    }, err => {
      return Promise.reject(err);
})// No token interface required
let newInstance = axios.create({});// Load loading animation on request
let instance_phone = axios.create({});
instance_phone.interceptors.request.use(config=>{
$('#loading').show();
return config
}, err => {
return Promise.reject(err);
})
instance_phone.interceptors.response.use(res=>{
$('#loading').hide();
return res
}, err => {
return Promise.reject(err);
})Remarks:The effect is to show the loading animation when requesting data and hide the loading animation after data response.error handling In conjunction with the request interceptor and response interceptor, the catch method is executed regardless of whether it is a request error or a response error.
// Request Interceptor
    axios.interceptors.request.use(
      config => {
        // What to do before sending a request
        return config;
      },
      err => {
        // Logic handling in case of request errors
        return Promise.reject(err);
      }
    );

    // Response Interceptor
    axios.interceptors.response.use(
      res => {
        // Data processing after a successful request
        return res;
      },
      err => {
        // Logic handling in response to an error
        return Promise.reject(err);
      }
    );

	axios
      .get("/data.json")
      .then(res => {
        console.log(res);
      })
      .catch(err => {
        console.log(res);
});// Request error handling
let instance = axios.create({});
instance.interceptors.request.use(
config => {
return config;
},
err => {
// Common status codes for request errors: 4XX 401-Request timeout 404-mot found
$("#error").show();
setTimeout(()=>{
$("#error").hide();
}, 2000)
return Promise.reject(err);
}
);
// Respond to error handling
instance.interceptors.response.use(
res => {
return res;
},
err => {
// Common Status Codes for Response Errors 5XX 500-Server Error 502-Server Reboot
$("#error").show();
setTimeout(()=>{
$("#error").hide();
}, 2000)
return Promise.reject(err);
}
);
instance.get("/data.json").then(res=>{
console.log(res,'Request successful')
}).catch(err=>{
console.log(err,'Processing other than that set by the interceptor')
})- (1) Common status codes for request errors begin with 4, such as 401-Request Timeout, 404-Interface Not Found;
- (2) Common status codes for response errors begin with 5, such as 500-Server Error, 502-Server Reboot, etc.
- (3) In addition to handling the operation of setting up the request interceptor and response interceptor, if there are other operations to be performed, we can use the catch method again at the time of the request.
3. Cancellation requests (not commonly used, understood)
Cancel request: used to cancel an ongoing http request (not commonly used, as an understanding)
- code example
<template>
  <div class="hello">Cancel Request</div>
</template>

<script>
import axios from "axios";
export default {
  name: "HelloWorld",
  created() {
    // Cancel request: used to cancel a http request in progress (not commonly used, as an understanding)
    let source = axios.CancelToken.source();
    axios
      .get("/data.json", {
        cancelToken: source.token,
      })
      .then((res) => {
        console.log(res);
      })
      .catch((err) => {
        console.log(err);
      });

    // Cancel the request (where the parameter message is optional)
    source.cancel("Customized string optional");;
  },
};
</script>
<style scoped>
</style>- application scenario
While querying the data, the data is still not fetched for a very long time (3-5s), at this time the request needs to be canceled.
◼️ Axios further packaging, practical application in the project
In the vue project, and the backend interaction to get data this piece, we usually use the axios library, it is based on the promise http library, can run in the browser side and node.js. axios has a lot of good features, such as intercepting the request and response, cancel the request, convert the json, client-side defense against XSRF. In a complete project, the interaction with the server side will be very frequent, a project will have a lot of requests, a lot of redundant code. So it is necessary to encapsulate the requests and manage them in a unified way. in this paperPackaging for axiosThe main purpose is to help us simplify the project code and facilitate the maintenance of later updates. Improve the readability and maintainability of the code, reduce and simplify the writing of the code, which is theThe Meaning of Encapsulationbelong to (organization etc)act on behalf of sb. in a responsible position
// Vue-CLI2 Older Agents
// Vue-CLI2 needs to be configured in config/index.js.
dev: {
    // Paths
    assetsSubDirectory: 'static',
    assetsPublicPath: '/',
    // Backend request address proxy, configure testIp to refer directly to http 8088 for subsequent page calls.
    proxyTable: {
      '/testIp': {
        target: 'http://197.82.15.15:8088',
        changeOrigin: true,
        pathRewrite: {
          '^/testIp': ''
        }
      },
      '/elseIp': {
        target: 'http://182.83.19.15:8080',
        changeOrigin: true,
        pathRewrite: {
          '^/esleIp': ''
        }
      },
    },

// Vue-CLI3 New Release Agent
// vue cil3 needs to be configured in the vue.config.js file.

    devServer: {
            overlay: { // Make the browser overlay both warnings and errors.
              warnings: true,
              errors: true
            },
            host: "localhost",
            port: 8080, // port number
            https: false, // https:{type:Boolean}
            open: false, // Automatically launch the browser when configured.
            hotOnly: true, // Hot update
            // proxy: 'http 8080' // Configure cross-domain handling, with only one proxy.
            proxy: { //configure multiple proxies
                "/testIp": {
                    target: "http://197.0.0.1:8088",
                    changeOrigin: true,
                    ws: true,//websocket support
                    secure: false,
                    pathRewrite: {
                        "^/testIp": "/"
                    }
                },
                "/elseIp": {
                    target: "http://197.0.0.2:8088",
                    changeOrigin: true,
                    //ws: true,//websocket support
                    secure: false,
                    pathRewrite: {
                        "^/elseIp": "/"
                    }
                },
            }
        }
When the project has more than one backend, you can create a new elseApi.js in the api folder to write the interface request under the current ip. Same method as above, except let resquest = “/elseIp”
seal inside
* request.jsCreate a new utils folder in your project’s src directory, and then create a new request.js file in it, which is the main file for writing thePackaging for axiosProcess.
/****   request.js   ****/
// Importing axios
import axios from "axios";
// Use element-ui Message for message alerts.
import { Message } from "element-ui";
// 1. Create a new instance of axios.
const service = axios.create({
  // public interface - global variable in webpack process.env.BASE_API
  // To accommodate multiple backends or if the development api address is different from the publish api address.
  baseURL: process.env.BASE_API,
  // Timeout time in ms, a timeout time of 3s is set here.
  timeout: 3 * 1000,
});
// 2. Request interceptor
service.interceptors.request.use(
  (config) => {
    // Some processing before sending the request, data conversion, configure the request header, set the token, set the loading, etc., according to the requirements to add the

    config.data = JSON.stringify(config.data); // data conversion, can also use qs conversion
    config.headers = {
      "Content-Type": "application/x-www-form-urlencoded", // Configures the request header
    };
    // Note that the use of token need to introduce cookie methods or use local localStorage and other methods, recommended js-cookie
    const token = getCookie("name"); // Here you definitely need to get the token before you can get it, save it
    if (token) {
      config.params = { token: token }; // if required to carry in parameters
      config.headers.token = token; // if required to be carried in the request header
    }

    return config;
  },
  (error) => {
    Promise.reject(error);
  }
);

// 3. Response interceptors
service.interceptors.response.use(
  (response) => {
    //Some common processing after receiving the response data and success, close loading, etc.

    return response;
  },
  (error) => {
    /* **** Processing of exception response received begins **** */
    if (error && error.response) {
      // 1. Public error handling
      // 2. Specific to the response code
      switch (error.response.status) {
        case 400:
          error.message = "Error request";
          break;
        case 401:
          error.message = "Not authorized, please log in again";
          break;
        case 403:
          error.message = "Access denied";
          break;
        case 404:
          error.message = "Error requesting this resource, not found";
          window.location.href = "/NotFound";
          break;
        case 405:
          error.message = "Requested method not allowed";
          break;
        case 408:
          error.message = "Request timed out";
          break;
        case 500:
          error.message = "Server-side error";
          break;
        case 501:
          error.message = "Network not realized";
          break;
        case 502:
          error.message = "Network Error";
          break;
        case 503:
          error.message = "Service unavailable";
          break;
        case 504:
          error.message = "Network timeout";
          break;
        case 505:
          error.message = "The request is not supported by the http version.";
          break;
        default:
          Error.message = 'Connection error ${error.response.status}';
      }
    } else {
      // Timeout handling
      if (JSON.stringify(error).includes("timeout")) {
        Message.error("Server response timed out, please refresh the current page");;
      }
      error.message("Failed to connect to the server");;
    }

    Message.error(error.message);

    /* **** End of Processing **** */
    // If no error handling is required, all of the above can be omitted.
    return Promise.resolve(error.response);
  }
);

// 4. Importing documents
export default service;
Note on data conversion The above code are requested configuration items, non-essential, but also divided into cases, data/headers/params This kind of parameters have a variety of itself, and the background communication, what is needed to match what! 👉 config.data = JSON.stringify(config.data) utilizationJSON.stringify()Or the qs.stringify() method depends on whether your backend wants json type passing parameters or needs to pass string type parameters.The JSON.stringify() method converts JavaScript objects to json type strings. qs.stringify() serializes the object into the form of a URL spliced with &, which means that the qs conversion converts to the form of a string spliced with key-value pairs. const token = getCookie(‘ name ‘) This is the token fetch, before fetching you definitely need to send a request to get the token and then setCookie to save it, and the name is the name of the token you saved, different for everyone. 👉 config.headers = { ‘Content-Type’:’application/x-www-form-urlencoded’ } The configuration of the request header content, is also different, application/x-www-form-urlencoded : form form data is encoded as key/value format to send to the server (the default format of the form to submit data), you can configure their own needs according to the actual situation; The process of writing code is the process of using your own brain to build the project, I hope to give you some inspiration: good search, good thinking, good summary; In addition, the knowledge of the article is you build on, you have a certain foundation of vue, if you do not have the relevant foundation as the root, or recommended to learn to master the basics for reference.* :: http.js in Axios
Create a new http.js file in the utils folder in the src directory of the project. This file is the main source for writing several types ofEncapsulation of request methodsProcess.
/****   http.js   ****/
// Import the wrapped axios instance
import request from './request'

const http ={
    /**
     * methods: Request
     * @param url Request address
     * @param params request parameter
     */
    // Shorthand for object methods get:function()(url,params){ ... }
    get(url,params){
        const config = {
            method: 'get',
            url:url
        }
        if(params) config.params = params
        return request(config)
    },
    post(url,params){
        const config = {
            method: 'post',
            url:url
        }
        if(params) config.data = params
        return request(config)
    },
    put(url,params){
        const config = {
            method: 'put',
            url:url
        }
        if(params) config.params = params
        return request(config)
    },
    delete(url,params){
        const config = {
            method: 'delete',
            url:url
        }
        if(params) config.params = params
        return request(config)
    }
}
//Export
export default httpCreate a new api folder in the src directory of the project, and then create a new api.js file in it, this file is the main writing tool for theAPI encapsulationProcesses. When the backend requests in a project are not from the same IP address, but from multiple IP addresses, you can create multiple js files in the api folder that can be used to call the request
// api.js has two types of exports, categorized and all.

// Category Export
import http from '../utils/http'
/**
 * @params resquest Request address Example: http 8088/request/...
 * @param '/testIp' stands for config in vue-cil, proxy configured in index.js
 */
let resquest = "/testIp/request/"

// get request
export function getListAPI(params){
    return http.get(`${resquest}/getList.json`,params)
}
// post request
export function postFormAPI(params){
    return http.post(`${resquest}/postForm.json`,params)
}
// put request
export function putSomeAPI(params){
    return http.put(`${resquest}/putForm.json`,params)
}
// delete request
export function deleteListAPI(params){
    return http.delete(`${resquest}/deleteList.json`,params)
}

// Export all
import http from '../utils/http'
/**
 * @params resquest Request address Example: http 8088/request/...
 * @param '/testIp' stands for config in vue-cil, proxy configured in index.js
 */
let resquest = "/testIp/request/"

// get request
export default{
 	getListAPI(params){
    	return http.get(`${resquest}/getList.json`,params)
	},
	postFormAPI(params){
    	return http.post(`${resquest}/postForm.json`,params)
	},
    putFormAPI(params){
    return http.put(`${resquest}/putForm.json`,params)
    },
    deleteListAPI(params){
    return http.delete(`${resquest}/deleteList.json`,params)
    }
}call (programming)
Calling interfaces in Vue// Import the api categories, and call whichever api is used ---- applies to the category export of the above interface.
import {getListAPI,postFormAPI, putSomeAPI, deleteListAPI} from '@/api/api'
methods: {
// promise call, chained call, getList() accepts only arguments in parentheses;
// get passes no parameters
getList() {
getListAPI().then(res => console.log(res)).catch(err => console.log(err))
},
// post passes a parameter
postForm(formData) {
let data = formData
postFormAPI(data).then(res => console.log(res)).catch(err => console.log(err))
},
// async await synchronized call
async postForm(formData) {
const postRes = await postFormAPI(formData)
const putRes = await putSomeAPI({data: 'putTest'})
const deleteRes = await deleteListAPI(formData.name)
// Data processing
console.log(postRes);
console.log(putRes);
console.log(deleteRes);
},
}
// Import all the api's and call which one you need ---- works for all exports
import api from '@/api/api'
methods: {
getList() {
api.getListAPI(data).then(res => {
// Data processing
}).catch(err => console.log(err))
}
}
