preamble
Since its initial release in 2015, the
You Only Look Once (YOLO) family of
computer vision models has been one of the most popular in the field. One of the core innovations of the YOLO architecture is to treat the
target detection task as a regression problem, thus allowing the model to generate predictions for all target bounding boxes and category probabilities simultaneously. Over the past eight years, this architectural innovation has spawned a series of YOLO models. We’ve also previously given you an overview of the deployment of some YOLO models on LabVIEW. If you are interested, you can check out the column
[Deep Learning: Object Recognition (Target Detection)]In this article, I would like to share with your readers the deployment of YOLOv8 in LabVIEW.
I. Introduction to YOLOv8
YOLOv8 is the latest version of YOLO released by Ultralytics, the publisher of YOLOv5. It can be used for object detection, segmentation, and categorization tasks as well as learning from large datasets and can be executed on a wide range of hardware including CPUs and GPUs.
YOLOv8 is a cutting-edge, state-of-the-art (SOTA) model that builds on previous successful YOLO versions and introduces new features and enhancements to further improve performance and flexibility.YOLOv8 is designed to be fast, accurate, and easy to use, which makes it an excellent choice for object detection, image segmentation, and image classification tasks. Specific innovations include a new backbone network, a new Ancher-Free detection header and a new loss function, as well as support for previous versions of YOLO for easy switching between versions and performance comparison.
YOLOv8 has 5 pre-trained models with different model sizes: n, s, m, l, and x. Focusing on the number of parameters and the COCO mAP (accuracy) below, we can see that the accuracy is greatly improved over YOLOv5. Especially l and x, which are large model sizes, improve the accuracy while reducing the number of parameters.
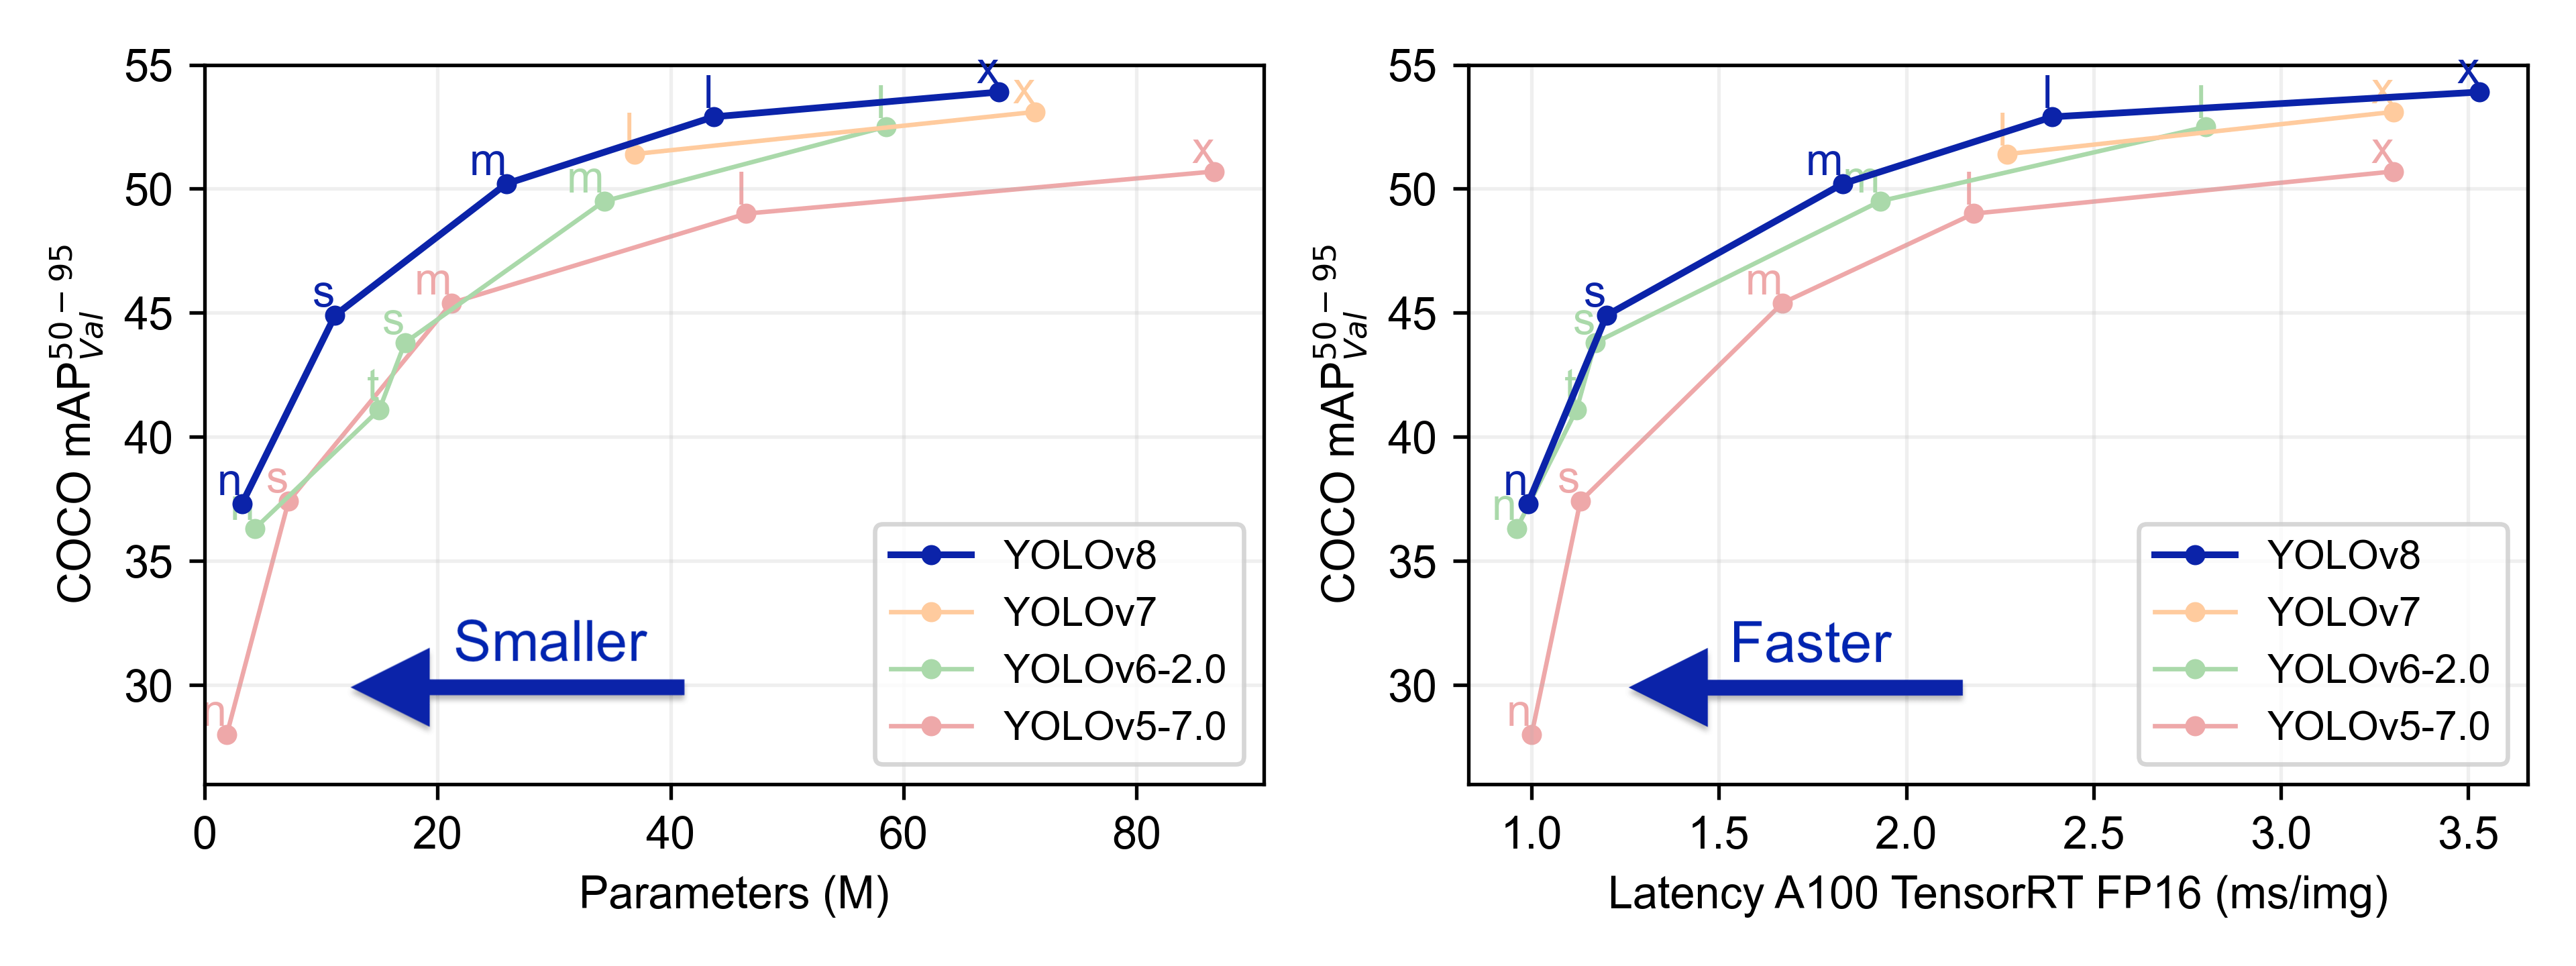
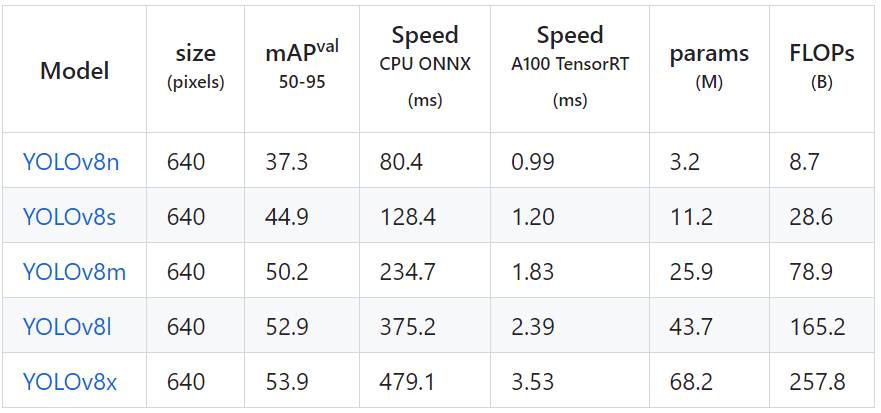
The accuracy of each model is as follows
YOLOv8 official open source address:
https://github.com/ultralytics/ultralytics
II. Environment Setup
2.1 Environment in which the project will be deployed
- Operating system: Windows 10
- python: 3.6 and above
- LabVIEW: 2018 and above64-bit version
- AI Vision Toolkit: techforce_lib_opencv_cpu-1.0.0.98.vip
- onnx toolkit: virobotics_lib_onnx_cuda_tensorrt-1.0.0.16.vip [version 1.0.0.16 and above] or virobotics_lib_onnx_cpu-1.13.1.2.vip
2.2 LabVIEW Toolkit Download and Installation
III. yolov8 export onnx
Note: This tutorial has already provided you with the onnx model for YOLOv8, so you can skip this step and go directly to Step 4 – Project Hands-on. If you want to know how to export the onnx model of YOLOv8, then you can continue to read this part.
Here we introduce the export of onnx model (take yolov8s as an example, if you want to export other models in the same way, you just need to change the name)
3.1 Install YOLOv8
There are two ways to install YOLOv8, pip install and GitHub install.
pip install ultralytics -i https://pypi.douban.com/simple/
git clone https://github.com/ultralytics/ultralytics

cd ultralytics

pip install -e '.[dev]'
Once the installation is complete you can use it at the command line with the yolo command.
3.2 Downloading the model weights file
Download the weights file we need from the official website
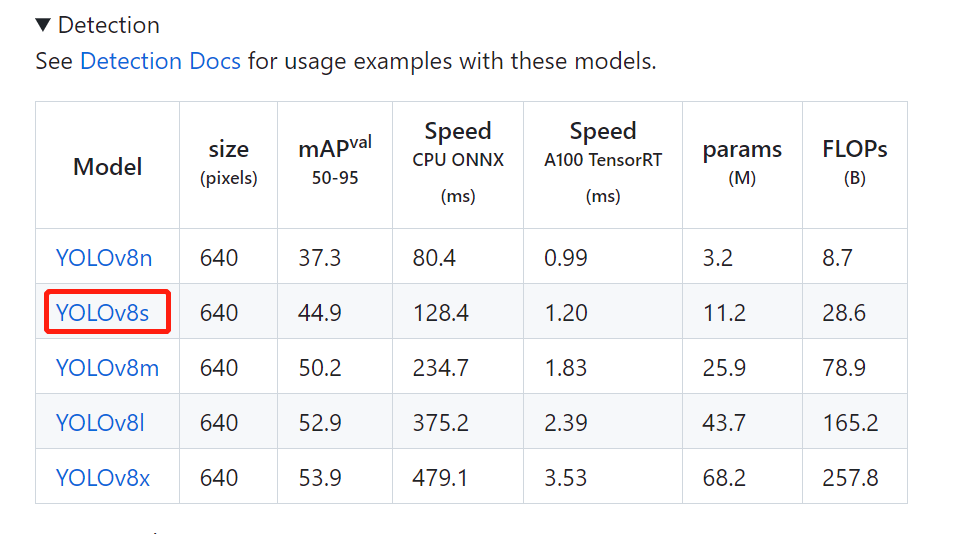
Note: This step can not be done, we export the model to onnx in the third step if the weight file does not exist, will automatically help us download a weight file, but the speed will be slower, so I personally recommend that you download the weight file on the official website, and then exported to onnx model!
3.3 Exporting the model as onnx
Create a new folder named “yolov8_onnx”, put the weight file “yolov8s.pt” you just downloaded into the models folder under this folder.

Open cmd in the models folder and enter the following command in cmd to export the model directly to onnx model:
yolo export model=yolov8s.pt format=onnx opset=12

The 3 detection heads of YOLOv8 have a total of 80×80+40×40+20×20=8400 output cells, each cell contains x,y,w,h which are 4 items plus 80 categories with a total of 84 columns of confidence, so the output dimensions of the onnx model exported by the above command are 1x84x8400.

If you think the above way is not convenient, then we can also write a python script to quickly export the onnx model of yolov8, the program is as follows:
from ultralytics import YOLO

# Load a model
model = YOLO("\models\yolov8s.pt")  # load an official model

# Export the model
model.export(format="onnx")
IV. Project practice
Realization effects: Deploying yolov8 in LabVIEW for Picture Reasoning and Video Reasoning
The entire project works as follows, this project to yolov8s for example
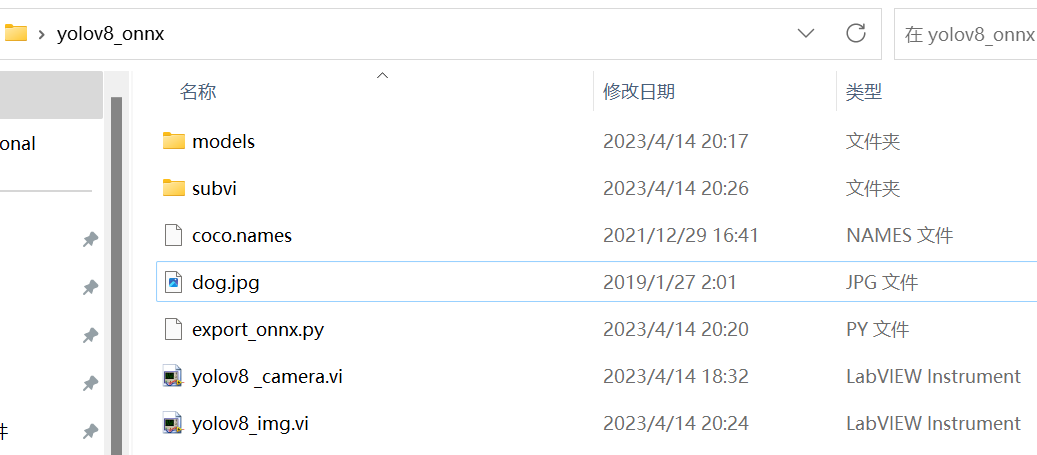
- model:yolov8 model file
- subvi: subvi
- export.py: export yolov8 ptd to onnx
- yolov8_camera:yolov8 camera video real-time reasoning
- yolov8_img:yolov8 picture reasoning
preliminary
- Place an image to be detected and coco.name into the yolov8_onnx folder, a dog.jpg image is placed in this project;
- Make sure that the models file has the yolov8 onnx model placed in it: yolov8s.onnx;
4.1 YOLOv8 Implementation of Picture Reasoning in LabVIREW
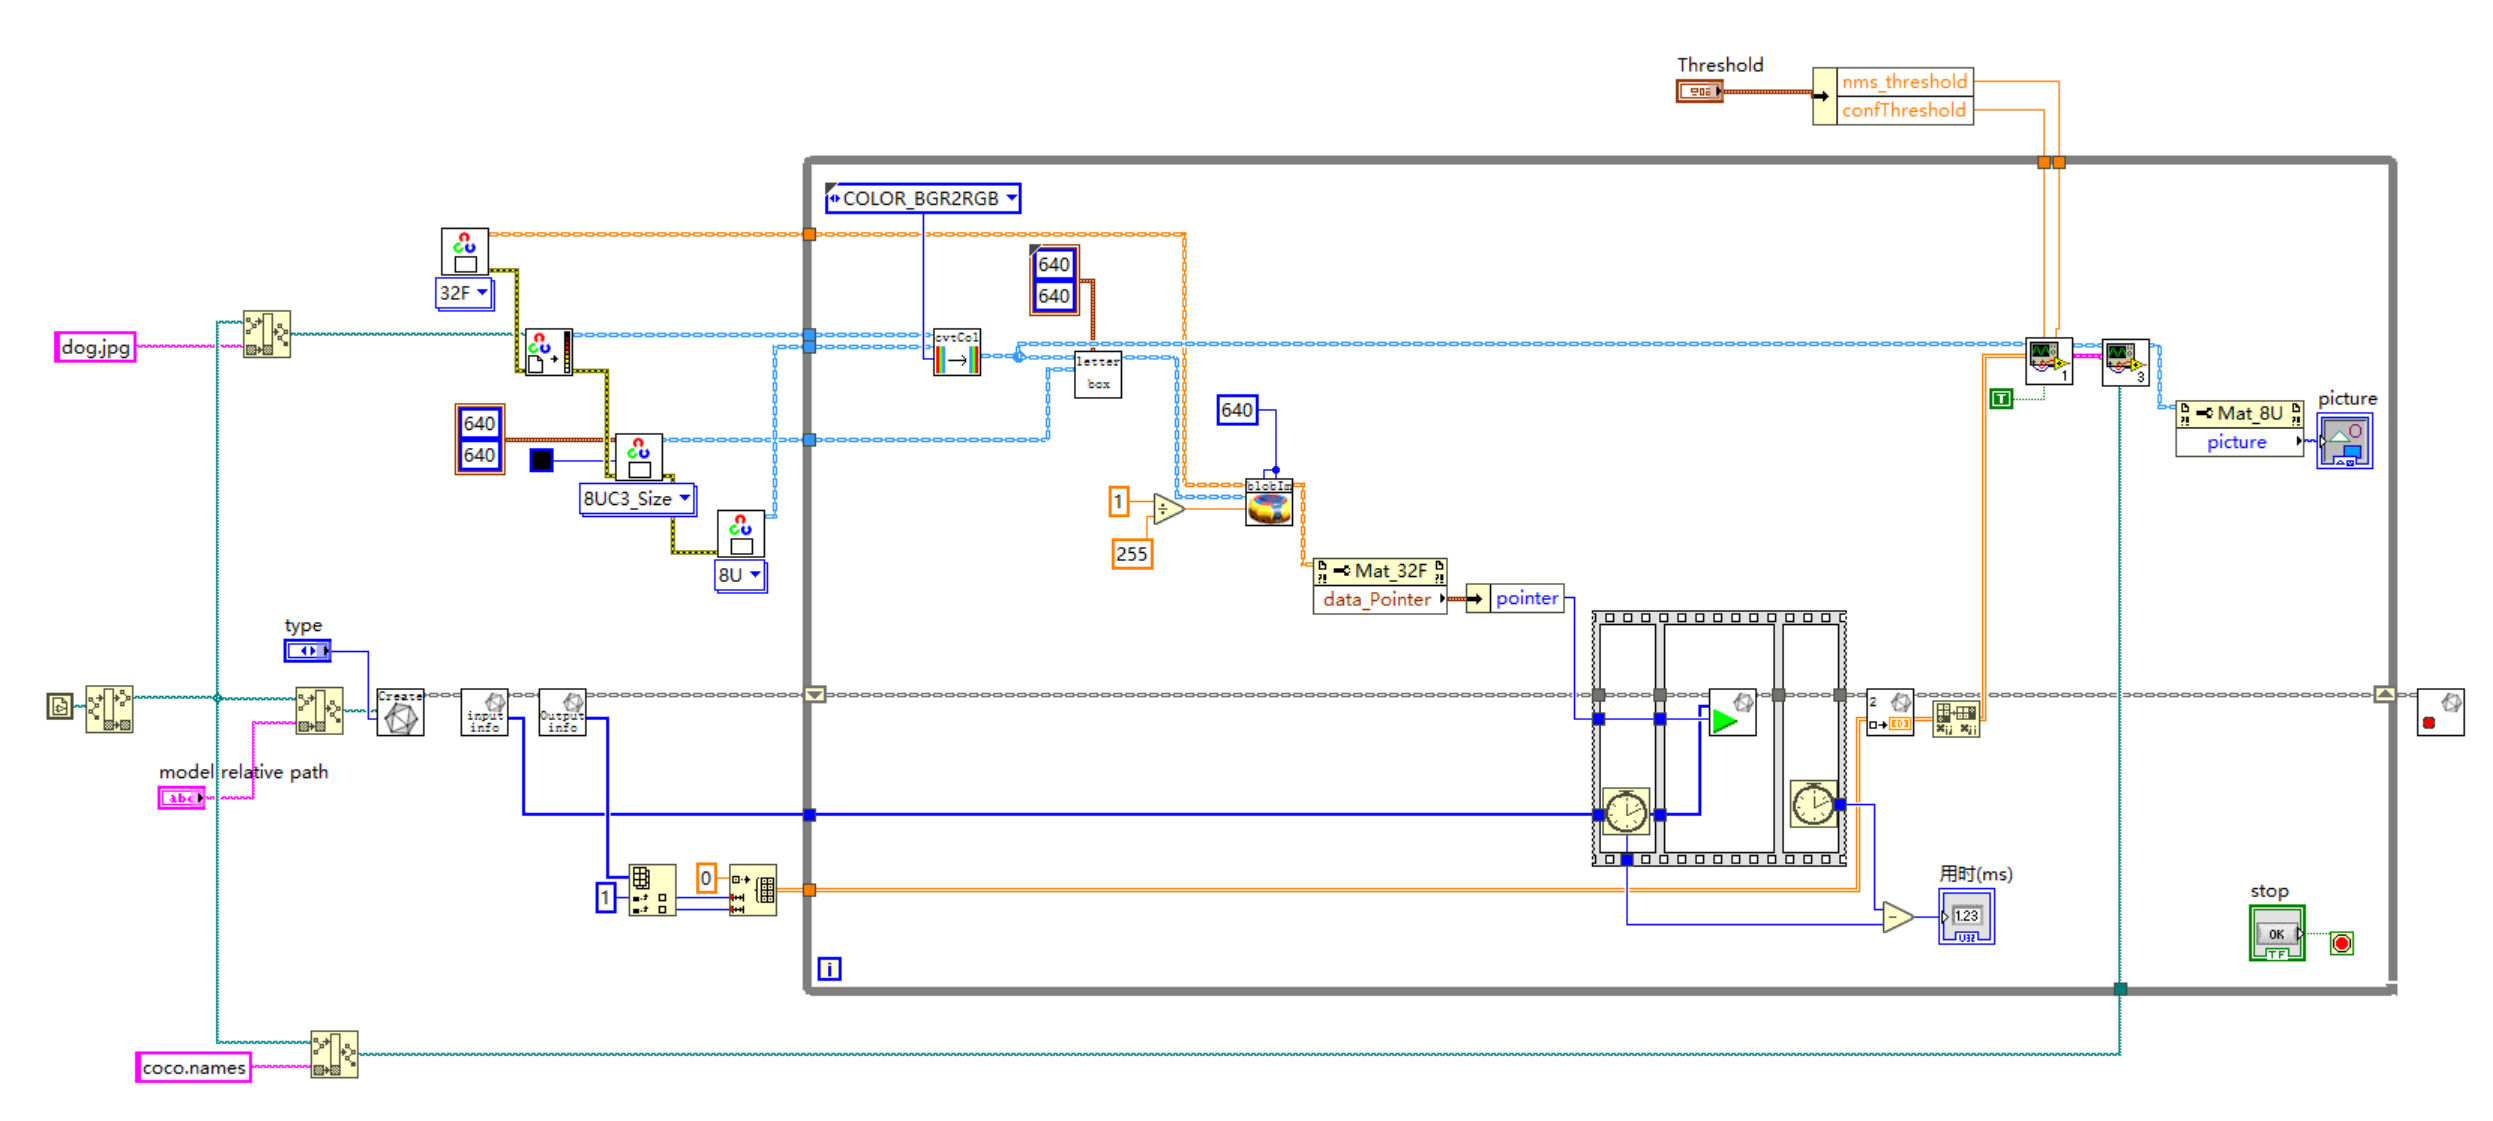
1. Get the path to the image to be detected, the model file and the category label file;
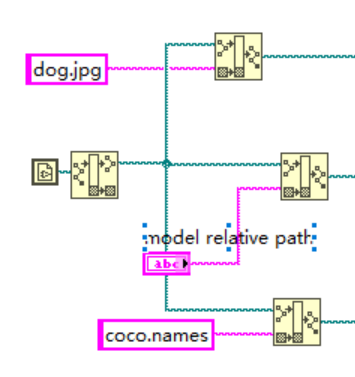
2.
Model initialization: Loads the onnx model and reads the shape of the inputs and outputs of that model;
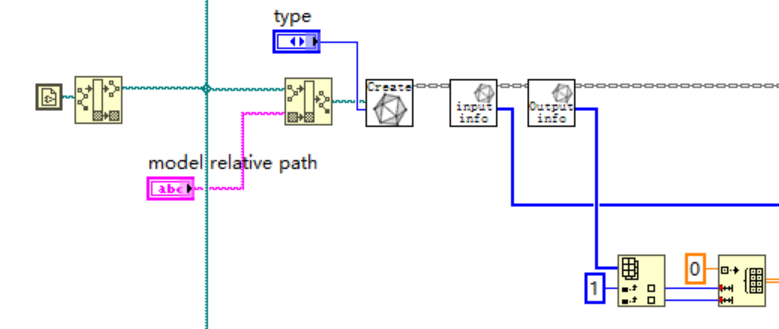
Of course, we can also view the inputs and outputs of the model directly in netron and manually create an array of model inputs and outputs shapes.
In netron we can see the inputs and outputs of the model as follows.
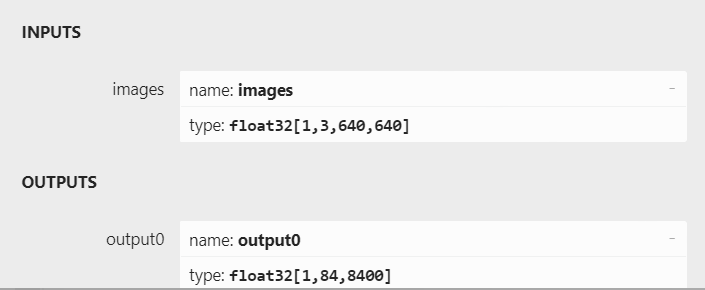
So this part of the program can also be changed as shown below:
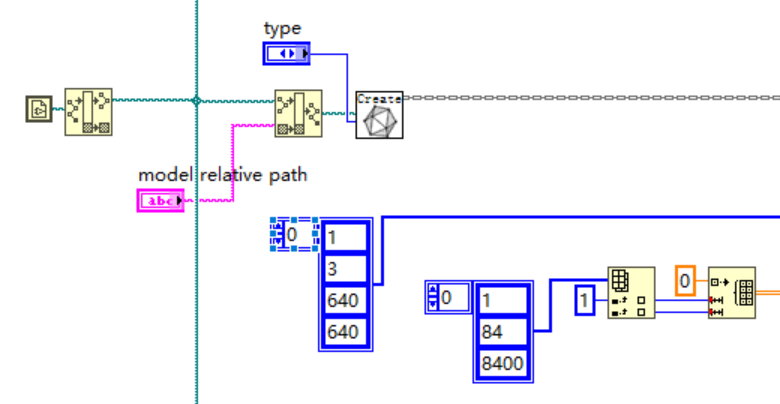
3.
Image Preprocessing: Create the required Mat and read the image, preprocess the image
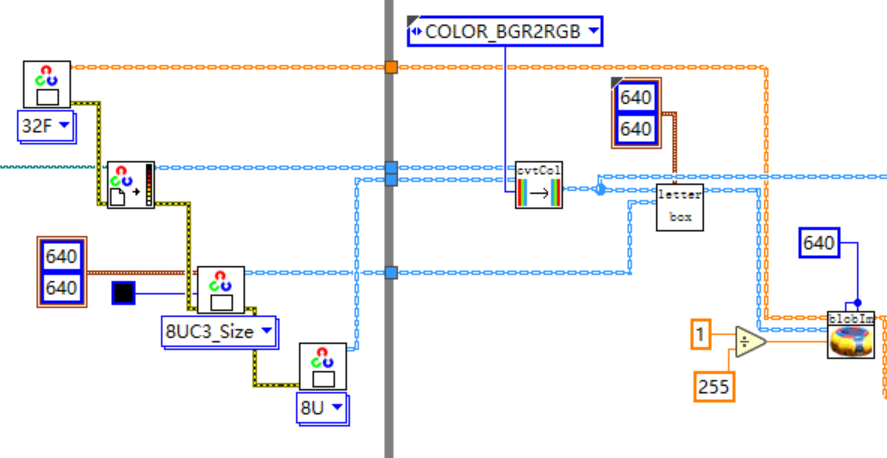
cvtColor: Color space conversion converts captured BGR images to RGB.
letterbox: The size of the input image of the deep learning model is square, while the images in the dataset are generally rectangular, rough resize will make the image distorted, using letterbox can better solve this problem. This method can maintain the aspect ratio of the image, and the rest of the part is filled with gray.
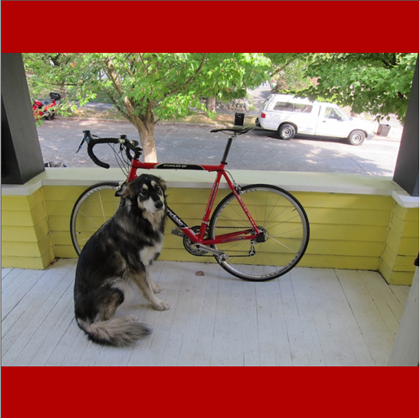 blobFromImageThe role of the
- size: 640×640 (image resize is 640×640)
- Scale=1/255,
- Means=[0,0,0] (image normalized to between 0 and 1)
Finally, the image data HWC is to be converted (transposed) into the NCHW format that is easily recognized by the neural network
- H: Height of the picture: 640
- W: width of the image: 640
- C: Number of channels of the picture: 3
- N: number of images, usually 1
4.
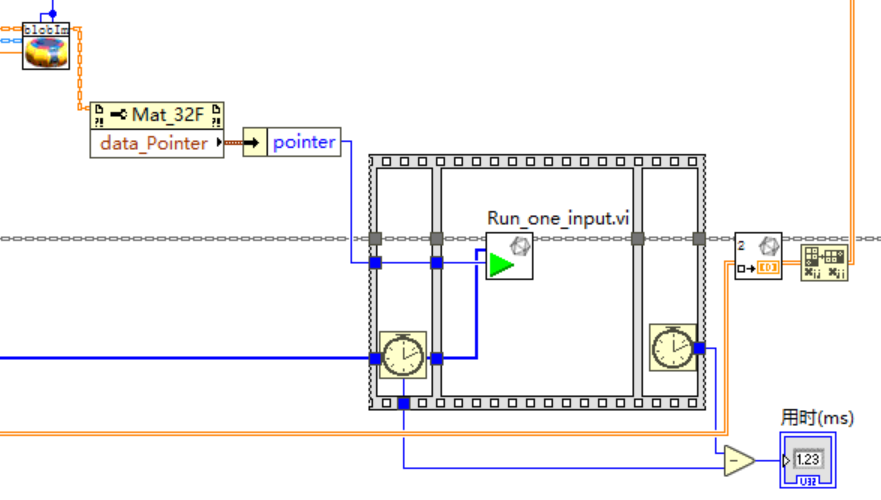
model-based reasoning: It is recommended to use the data pointer as input to Run_one_input.vi with a data size of 1x3x640x640;
5.
Getting Reasoning Results: Initialize a two-dimensional array of 84×8400 outside the loop, this array is used as the input to Get_Result, the other input is index=0, and the output is a two-dimensional array of 84×8400 results, and after reasoning, the result of the reasoning is transposed from 84×8400 to 8400×84 to make it easier to feed into the post-processing;

6.
reprocess
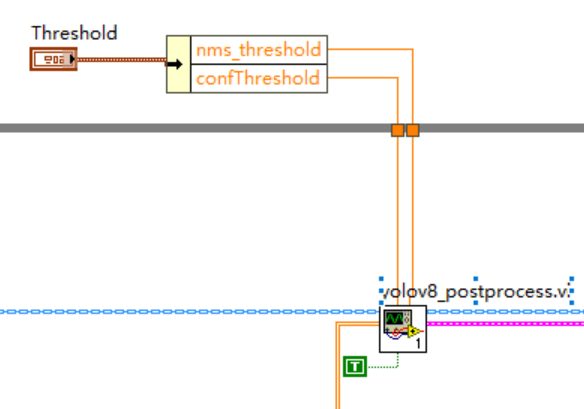
Inputs to yolov5_post_process in the example 8400×84,84 are listed in the following order.
- Column 0 represents the position of the center of the object x in the figure
- Column 1 indicates the position of the center of the object y in the diagram
- Column 2 indicates the width of the object
- Column 3 indicates the height of the object
- Columns 4 to 83 are the labeling weights for 80 classifications based on the COCO dataset, with the largest being the output classification.
8400 means: YOLOv8’s 3 detection heads have a total of 80×80 + 40×40 + 20×20 = 8400 output cells
Note: If the user trains their own dataset, the number of columns will change based on the number of categories defined by the user. If the user has 2 categories in their dataset, then the input data will be 8400×6. The first 4 columns will have the same meaning as before, and the last 2 columns will be the labeled weights for each category.
7.
Plotting test results;
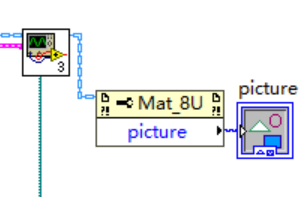
8. Complete source code;
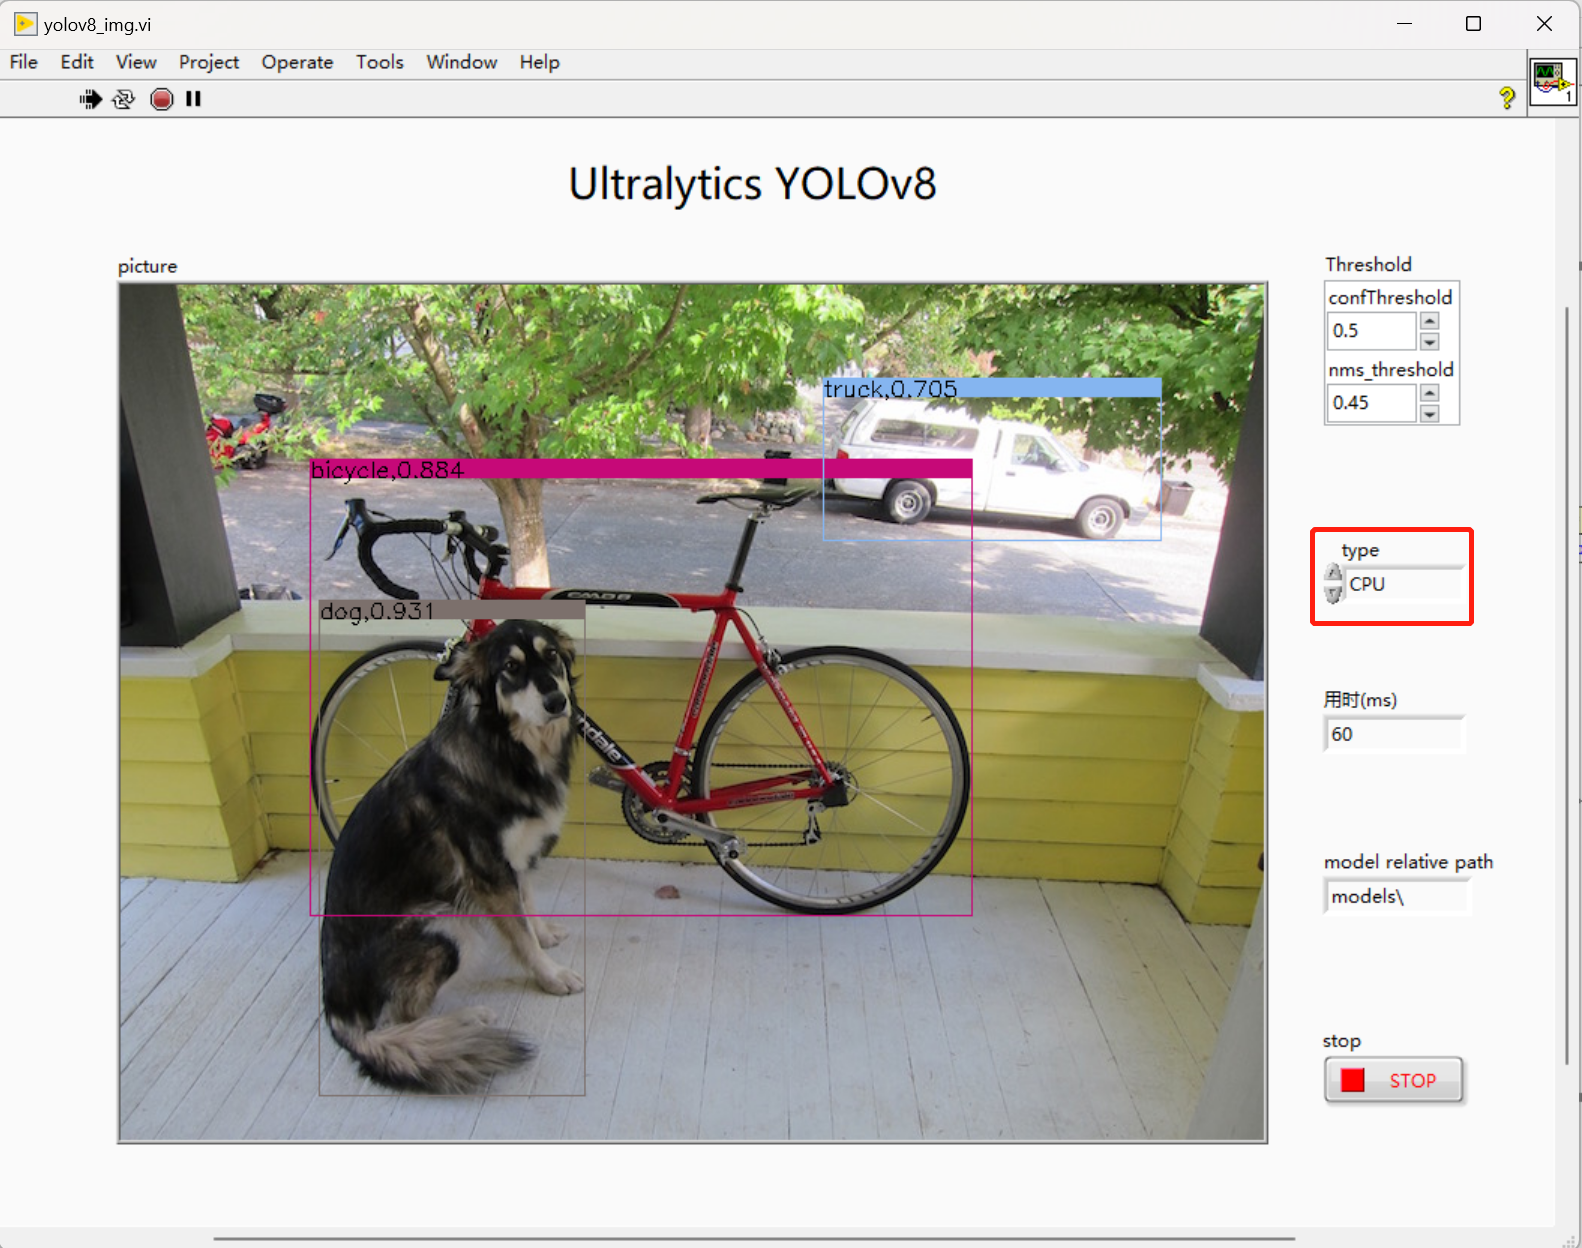
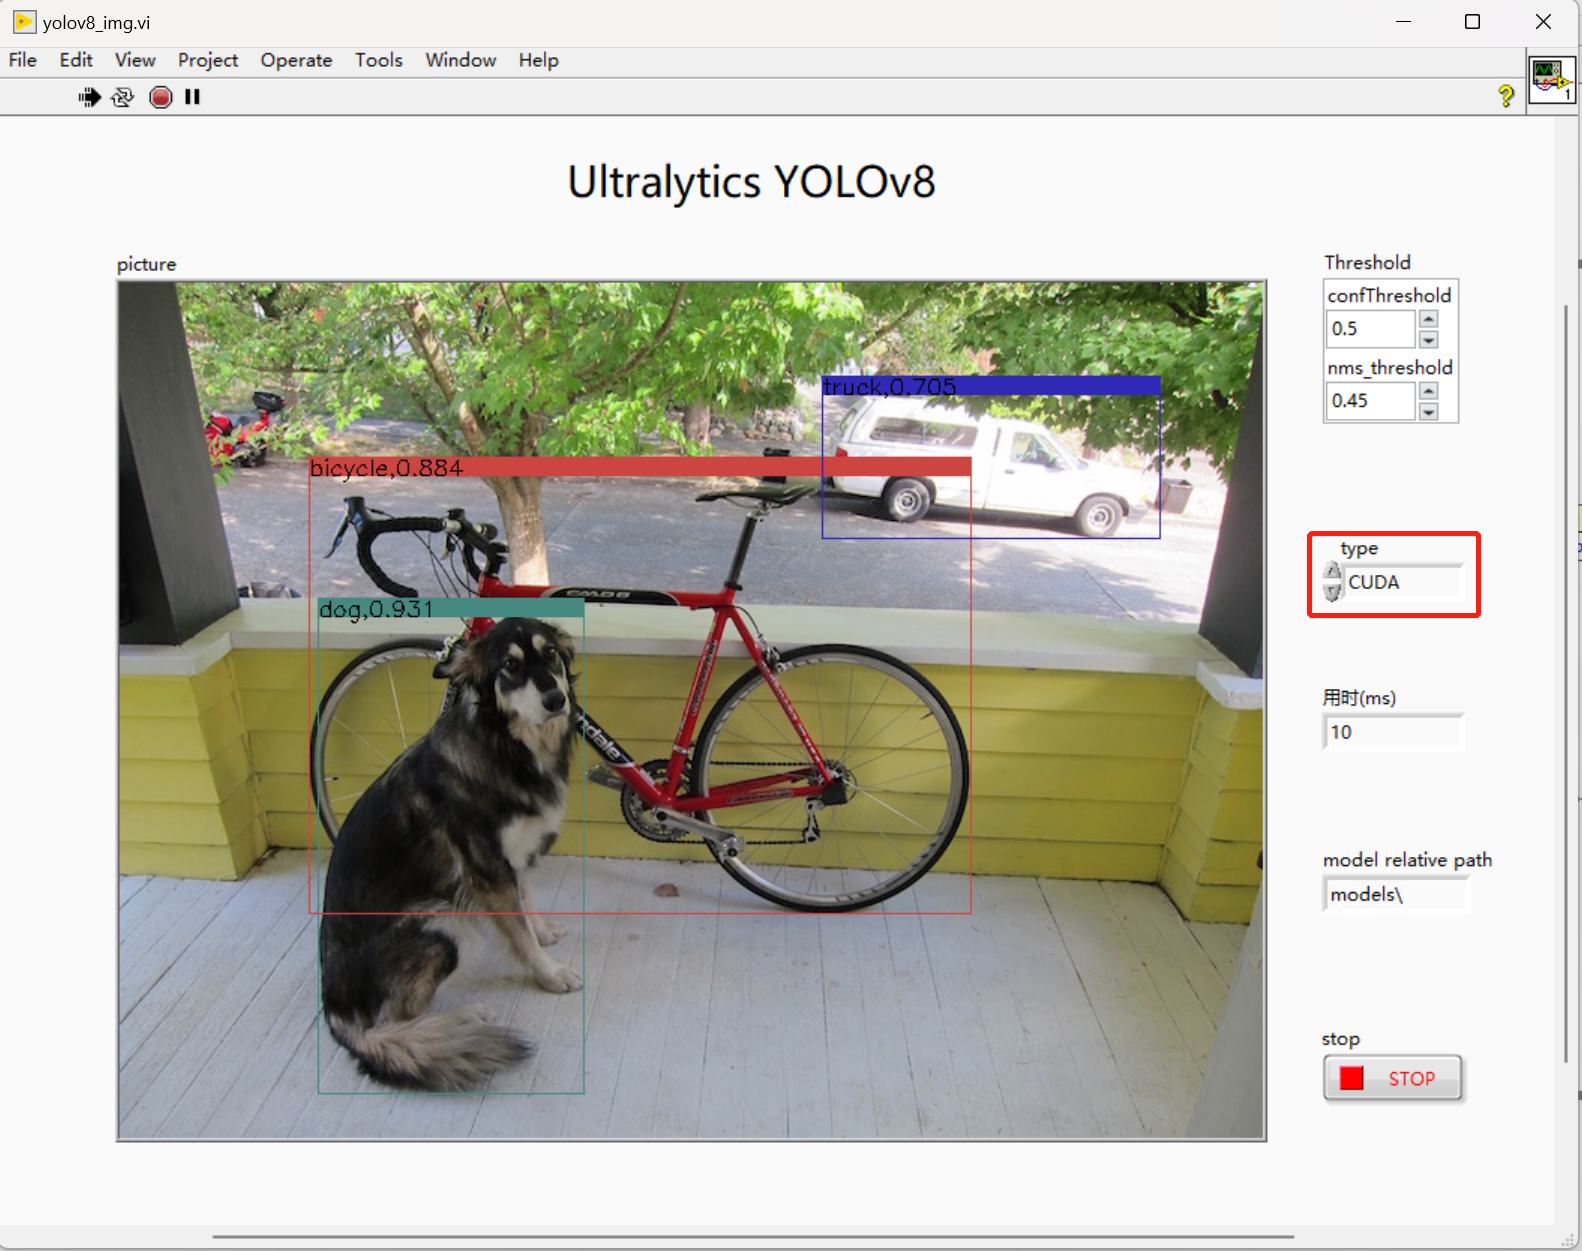
9. Running results (running computer solo for laptop RTX 3060)
- CPU acceleration:
- GPU acceleration:
4.2 YOLOv8 implementation of video inference in LabVIREW
Video inference and push-chip inference implementation is basically the same, the only difference is that the camera real-time inference process on the video stream inference and time-consuming part of the pre-processing, inference and post-processing three parts.
1. Complete procedures;
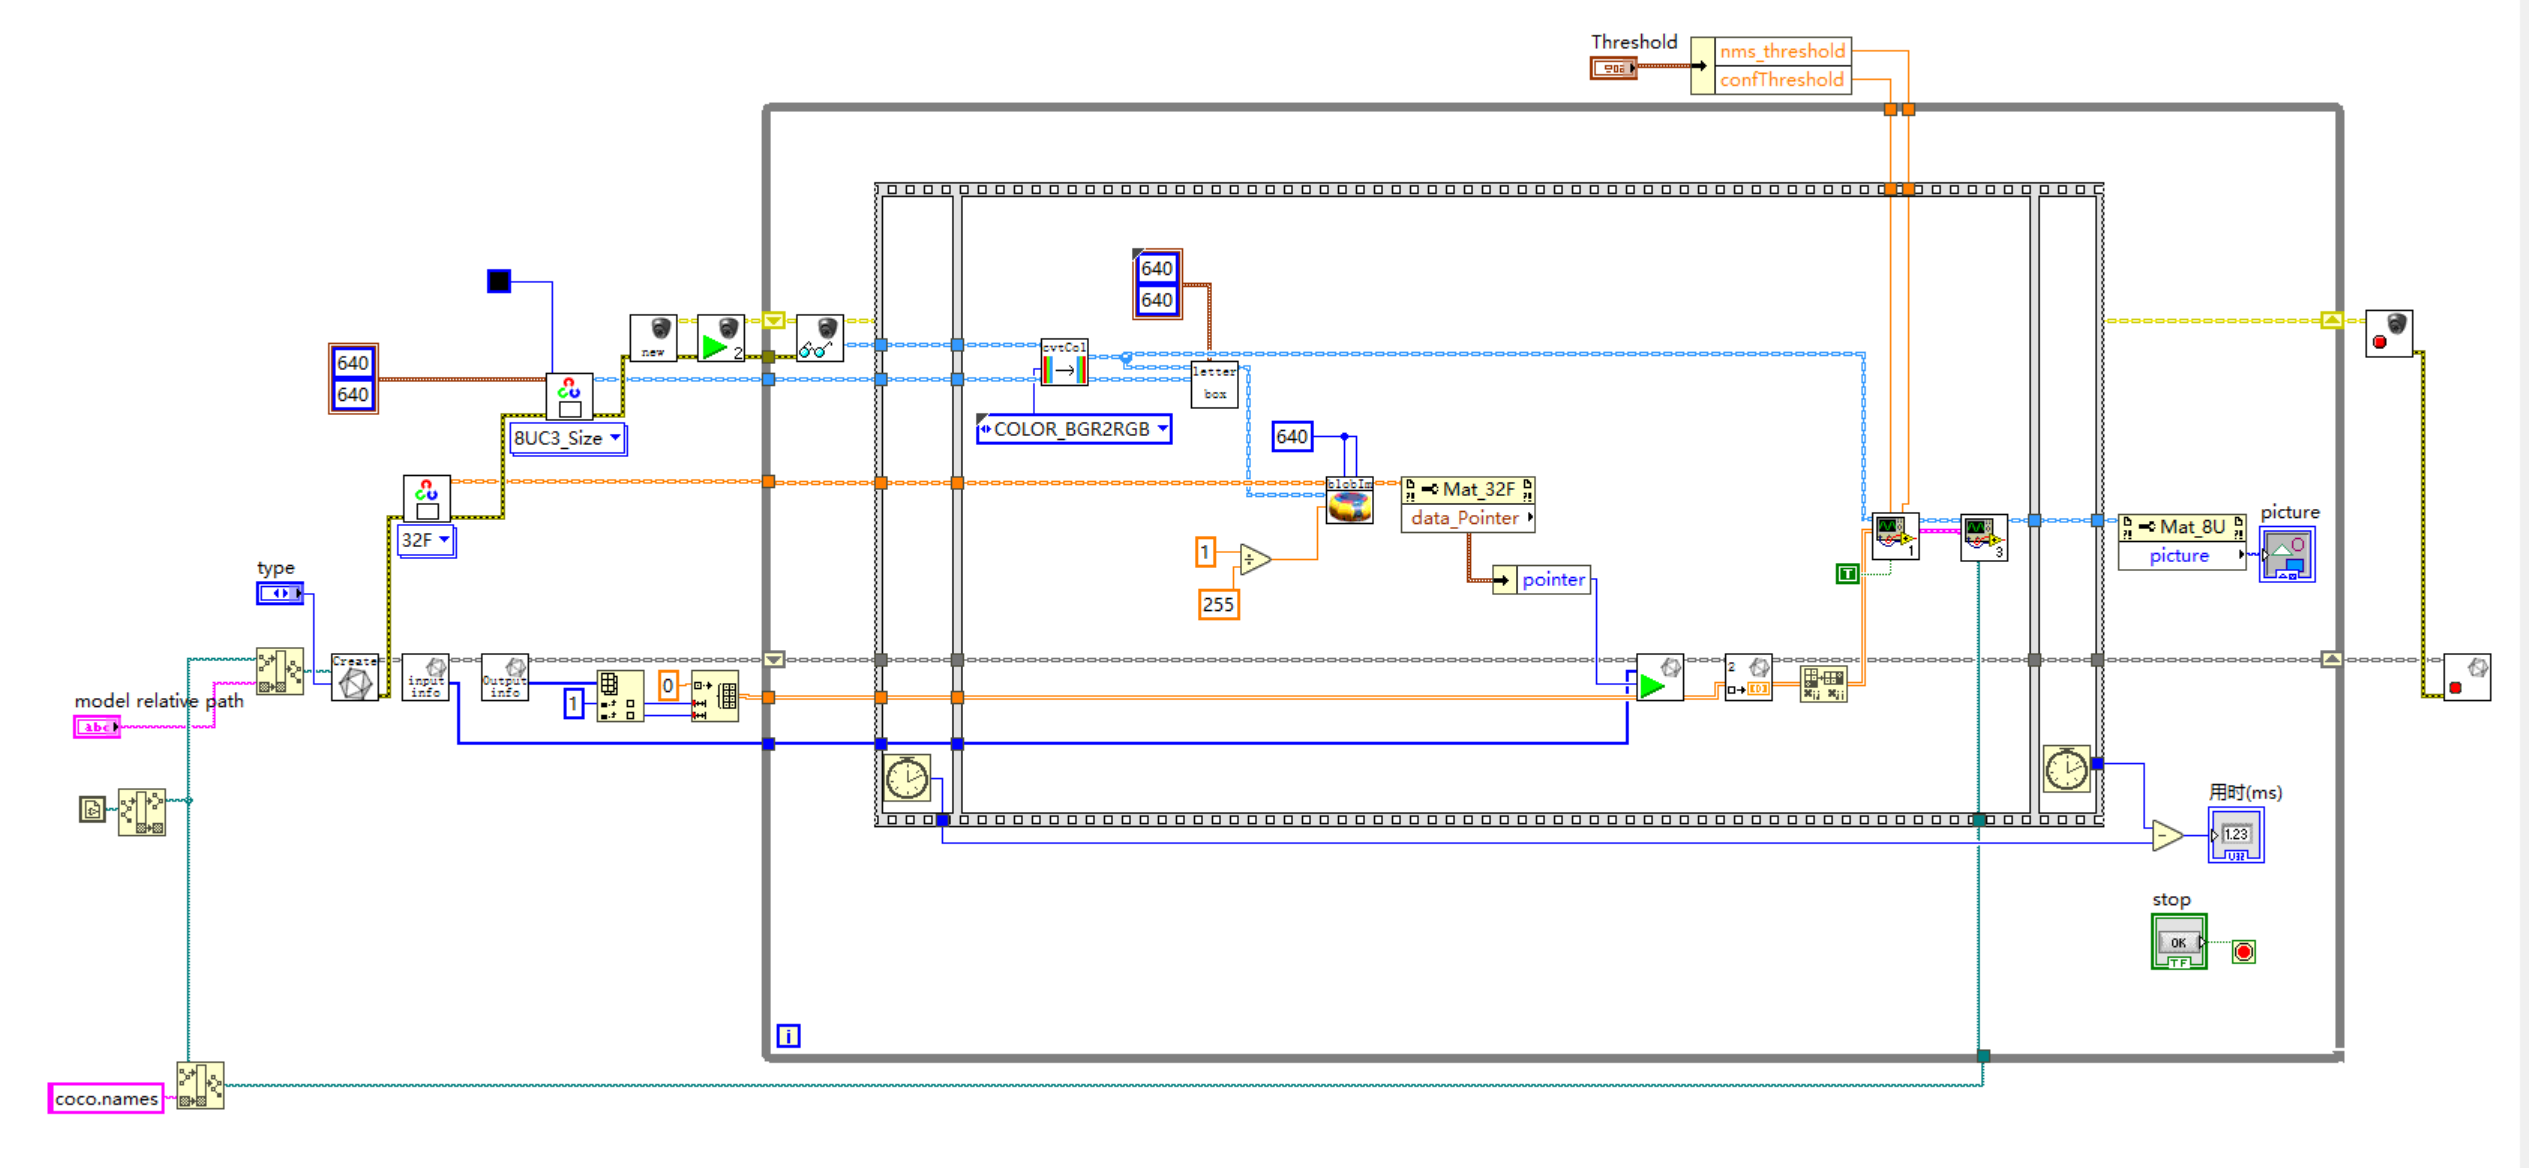
2. Realization of the effect (running computer solo for laptop RTX 3060)
- CPU acceleration:
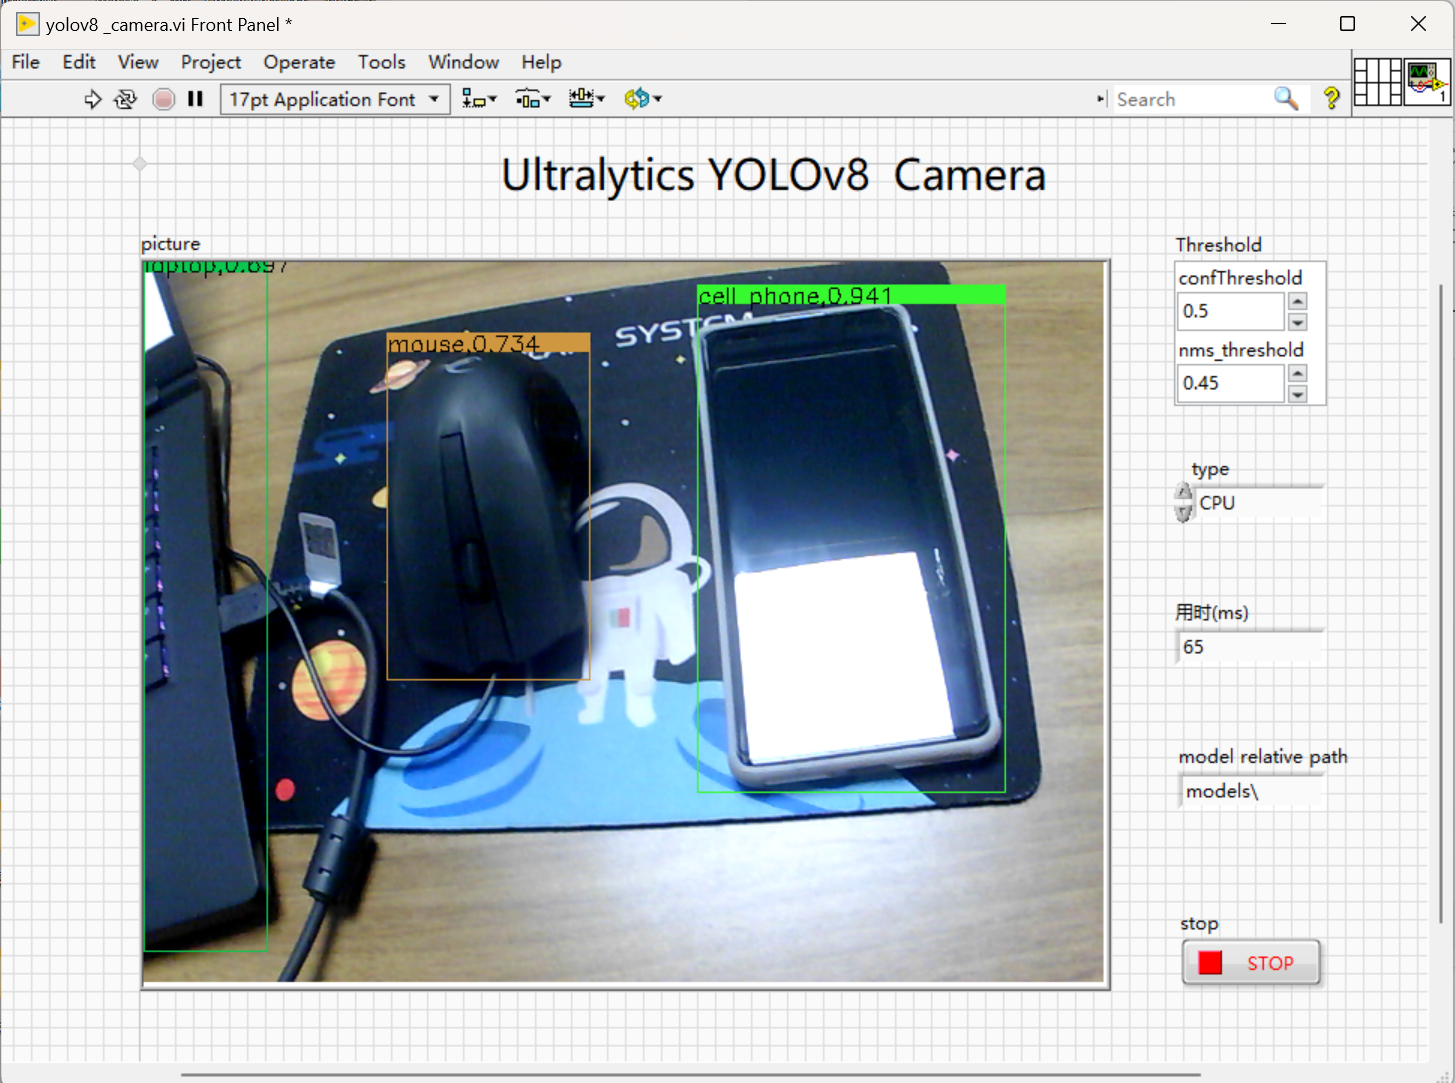
- GPU acceleration:
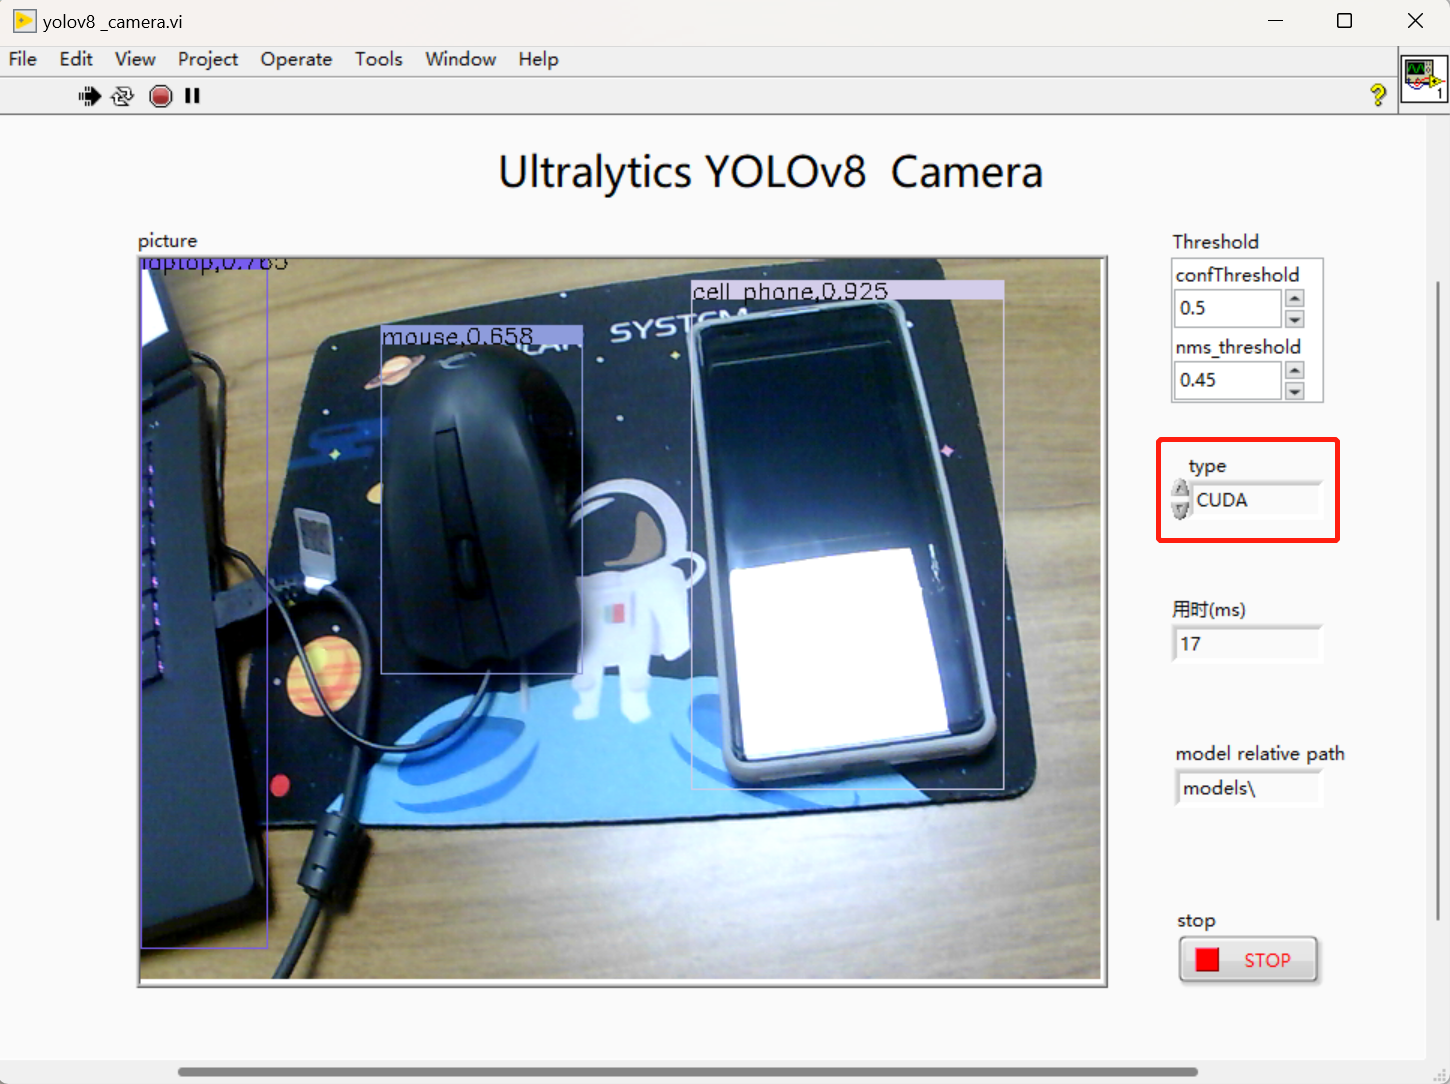
V. Project source code
For source code, please leave your email in the comments section after subscribing to this column!
summarize
This is what I want to share with you today, I hope it is useful to you. We will continue to update you on using OpenVINO and TensorRT to deploy accelerated YOLOv8 for target detection, see you in the next post~!
If the article is helpful to you, welcome to follow, like, favorite, subscribe to the column!
 The accuracy of each model is as follows
 YOLOv8 official open source address:https://github.com/ultralytics/ultralytics

 Open cmd in the models folder and enter the following command in cmd to export the model directly to onnx model:
 The 3 detection heads of YOLOv8 have a total of 80×80+40×40+20×20=8400 output cells, each cell contains x,y,w,h which are 4 items plus 80 categories with a total of 84 columns of confidence, so the output dimensions of the onnx model exported by the above command are 1x84x8400.
 If you think the above way is not convenient, then we can also write a python script to quickly export the onnx model of yolov8, the program is as follows:

 2.Model initialization: Loads the onnx model and reads the shape of the inputs and outputs of that model;
 Of course, we can also view the inputs and outputs of the model directly in netron and manually create an array of model inputs and outputs shapes.
In netron we can see the inputs and outputs of the model as follows.
 So this part of the program can also be changed as shown below:
 3.Image Preprocessing: Create the required Mat and read the image, preprocess the image

blobFromImageThe role of the
 5.Getting Reasoning Results: Initialize a two-dimensional array of 84×8400 outside the loop, this array is used as the input to Get_Result, the other input is index=0, and the output is a two-dimensional array of 84×8400 results, and after reasoning, the result of the reasoning is transposed from 84×8400 to 8400×84 to make it easier to feed into the post-processing;
 6.reprocess

 8. Complete source code;
 9. Running results (running computer solo for laptop RTX 3060)


 2. Realization of the effect (running computer solo for laptop RTX 3060)


