color recognition
Article Catalog
preamble
This time I have been getting problems about machine vision recognition, in the competition used a lot of visual algorithms about color recognition, I feel that before starting to work on it, I still need to review the relevant knowledge of color recognition, to help myself to expand the optimization algorithm thinking.
An article on HSV-related applications
I. What is color recognition?
As the name suggests, it is a recognition direction that uses a camera to identify the corresponding color blocks on the screen in real time and then completes the downstream task.
Color recognition needs to be used for color product sorting, identification, detection, etc., such as assembly line bottle cap color mixing identification, cable line identification, electronic components color difference identification. System hardware using high-speed color camera to extract the product color, analyze the image to obtain product color information to detect the output product color difference, number, color sequence and other results.
Second, image processing in the conversion of color
There are many forms of conversion of color in image processing, the more mainstream is RGB, BGR, HSV, HSL, currently in the intelligent car and the machine camera used in the competition, vision algorithms, the processing of color most of the use of HSV.
HSV color mode
HSV: The HSV model, a color model for user perception, focuses on color representation, what color, how dark, how light and dark. For these reasons, the HSV color space is used more in image processing, which is closer to people’s perceptual experience of color than RGB. It is very intuitive to express the hue, vividness and lightness of the color, which is convenient for color comparison.
In HSV color space, it is easier to track objects of a certain color than BGR, and is often used to segment objects of a specified color.
- H:: Hue, (color tone, hue)
- S:: Saturation, (saturation, color purity)
- V:: Value, (brightness)
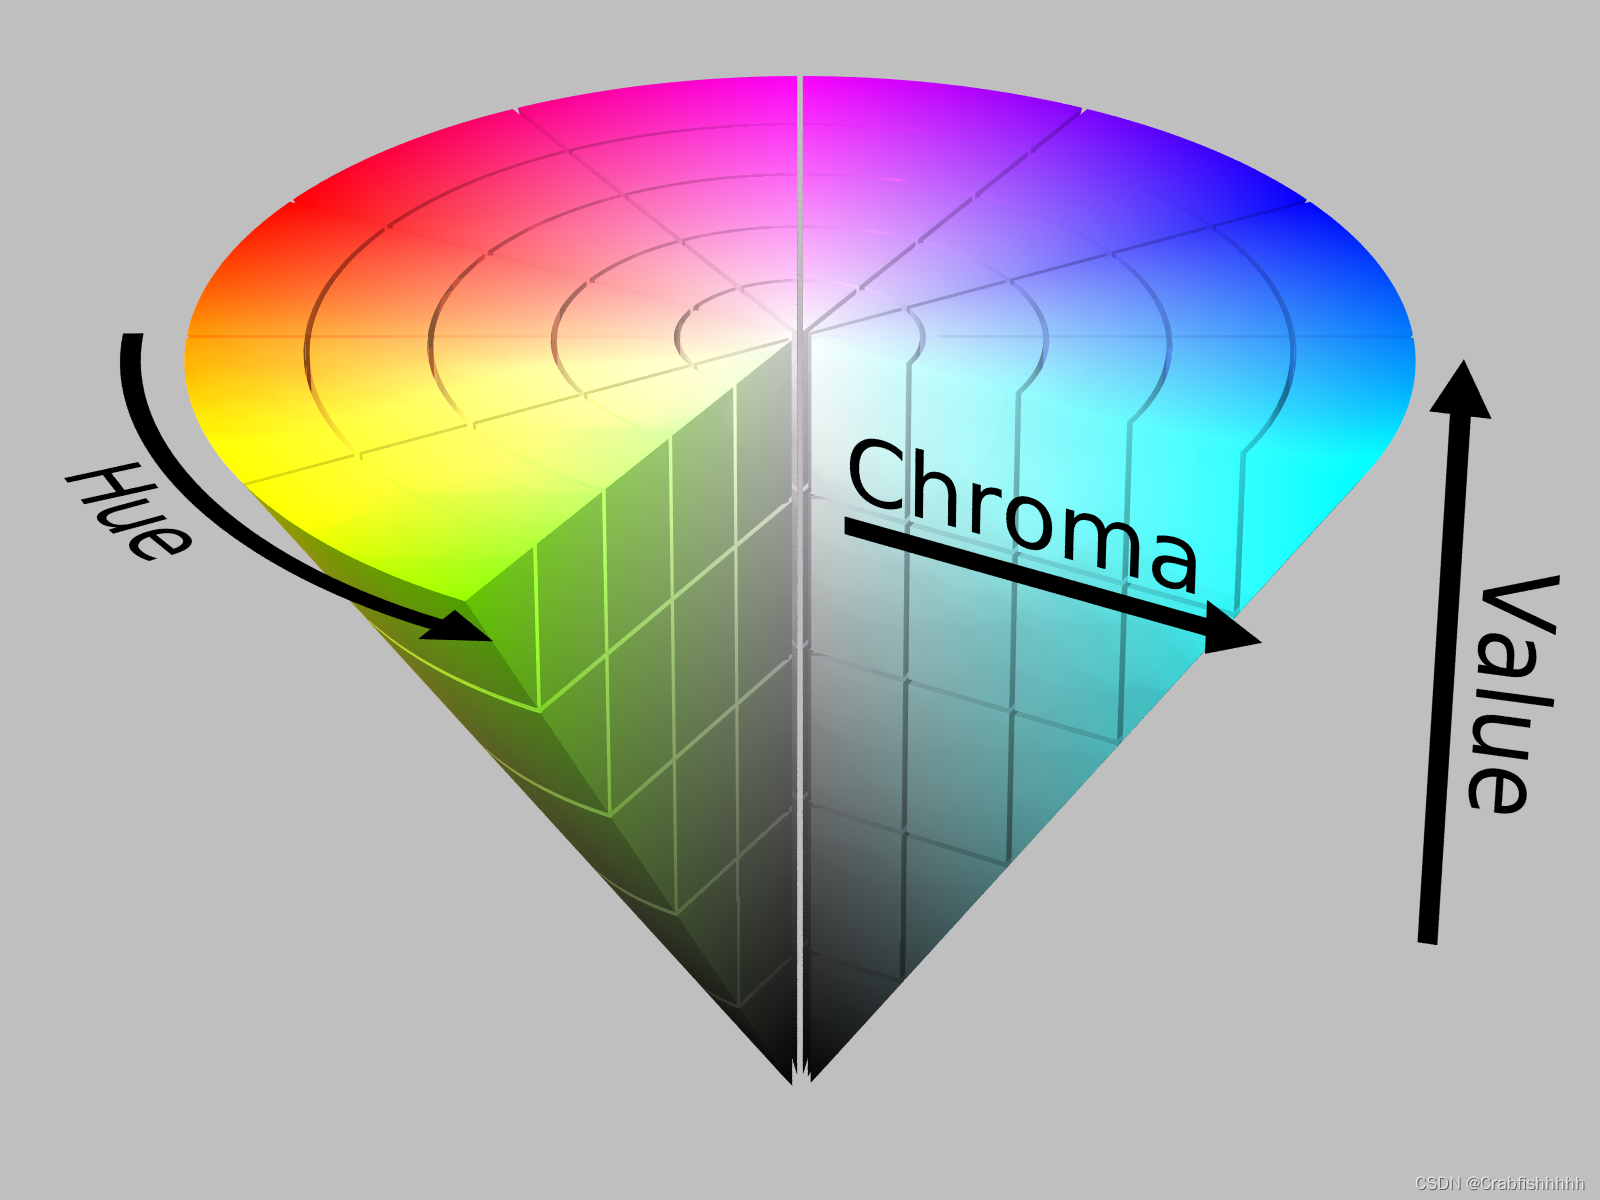
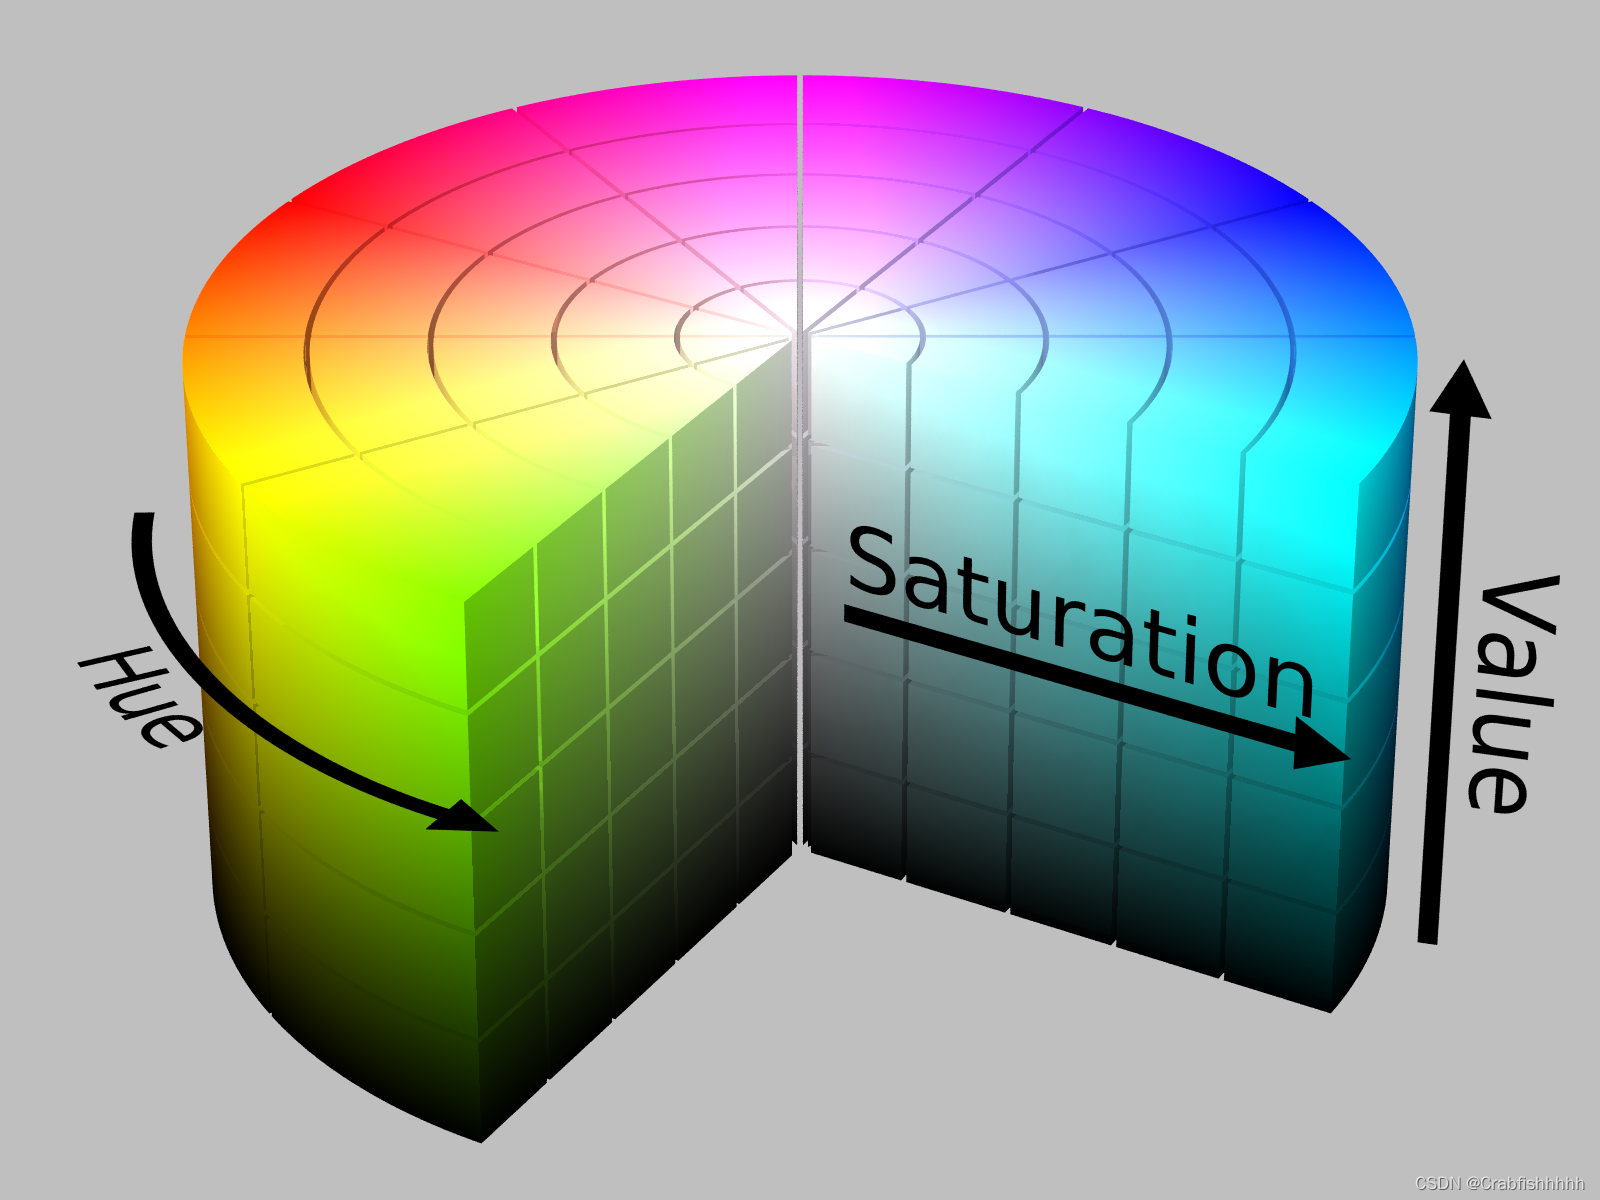
The HSV color gamut space is often represented by conic diagrams, but also by cylindrical diagrams, and Wikipedia has a detailed introduction to HSV.
Wikipedia – HSL and HSV
Note that additive primary and secondary colors (red, yellow, green, cyan, blue, and magenta) and linear mixtures between adjacent pairs (sometimes called pure colors) are arranged around the outer edges of the cylinder with a saturation of 1. These saturated colors have a luminance of 0.5 in HSL and a value of 1 in HSV.
In OpenCV , the value range of HSV is H (0-255) and V:(0-255) respectively.
In the limited time available, I am going to give a summary of the use of HSV, and an algorithmic optimization comparison.
III. HSV related functions and application flow
- HSV-related citations are broadly categorized into the following processes:
- Color Model Conversion
- Color Filtering
- morphological operation
- bit operation
- visualization
Step by Step
- Acquiring an image: First, the original image needs to be acquired from the camera or storage device.
- Color Model Conversion: The original image is then converted to the HSV color model, i.e., the RGB values are converted to the corresponding H, S, and V values.
- Color Filtering: According to the color range to be recognized, the image is color filtered, i.e., the threshold of HSV is set to filter out pixels whose RGB values are not within the specified range.
- Here, a color ring image is processed and then the above procedure is represented by adjusting different hsv values.
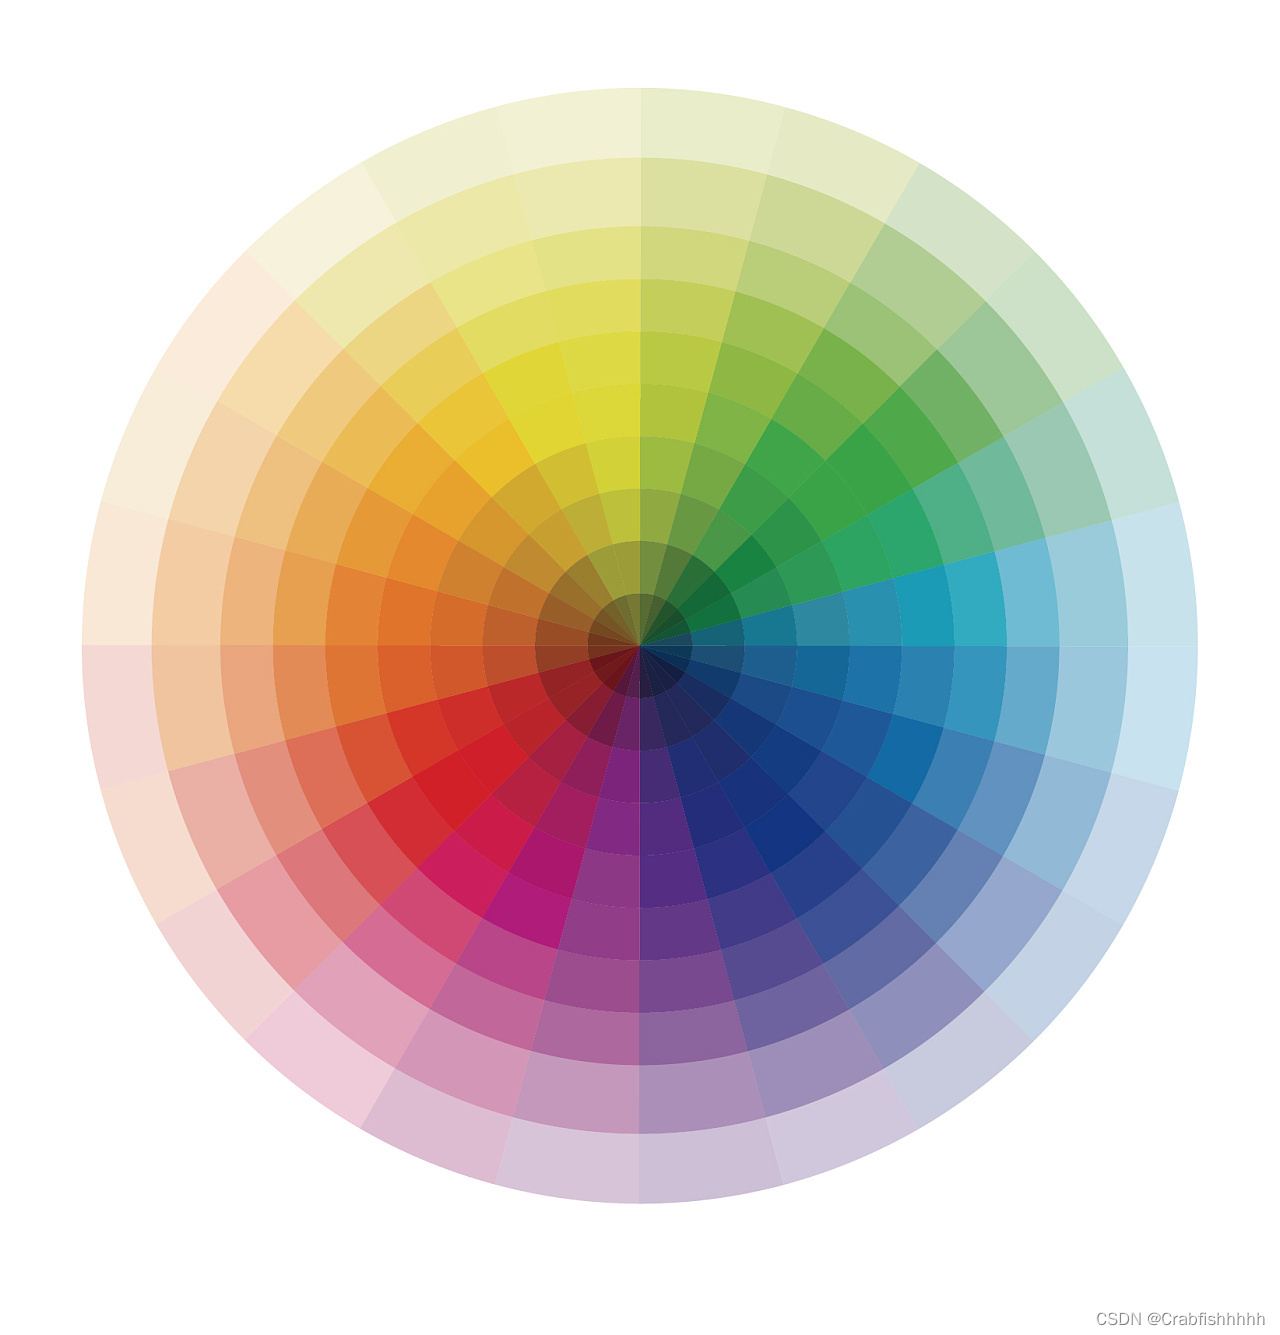
The code is as follows (example):
import cv2
import numpy as np

def nothing(x):
    pass
#Read image information via Opencv
#src = cv2.imread('image.jpg')
path="D:/PycharmProjects/pythonProject/Use-pic/hsv.jpg"
img =cv2.imread(path)
# img = cv2.imread("D:/PycharmProjects/hsv.jpg")
rows,cols,channels = img.shape
cv2.namedWindow("src", cv2.WINDOW_NORMAL);//resize the window at will
cv2.imshow("src", img)
cv2.namedWindow("img2", cv2.WINDOW_NORMAL);
cv2.namedWindow('img2',1)

# Create 6 sliders to manipulate the upper and lower interception boundaries of the 3 components of the HSV.
cv2.createTrackbar('Hlow','img2',62,180,nothing)
cv2.createTrackbar('Hup','img2',99,180,nothing)
cv2.createTrackbar('Slow','img2',198,255,nothing)
cv2.createTrackbar('Sup','img2',255,255,nothing)
cv2.createTrackbar('Vlow','img2',150,255,nothing)
cv2.createTrackbar('Vup','img2',255,255,nothing)

hsv = cv2.cvtColor(img, cv2.COLOR_BGR2HSV)
while(1):
    # Set the data of the specified pixel point to 0. Note that the corresponding values of these three parameters are Blue, Green, and Red.
    hlow = cv2.getTrackbarPos('Hlow', 'img2')
    hup = cv2.getTrackbarPos('Hup', 'img2')
    slow = cv2.getTrackbarPos('Slow', 'img2')
    sup = cv2.getTrackbarPos('Sup', 'img2')
    vlow = cv2.getTrackbarPos('Vlow', 'img2')
    vup = cv2.getTrackbarPos('Vup', 'img2')
    lower_red = np.array([hlow, slow, vlow])
    upper_red = np.array([hup, sup, vup])
    mask = cv2.inRange(hsv, lower_red, upper_red)
    img2 = cv2.bitwise_and(img, img, mask=mask)

    cv2.imshow("img2", img2)
    k = cv2.waitKey(1)&0xFF
    if k == 27: #esc exit
        brea
cv2.destroyAllWindows()
The result after display is as follows:
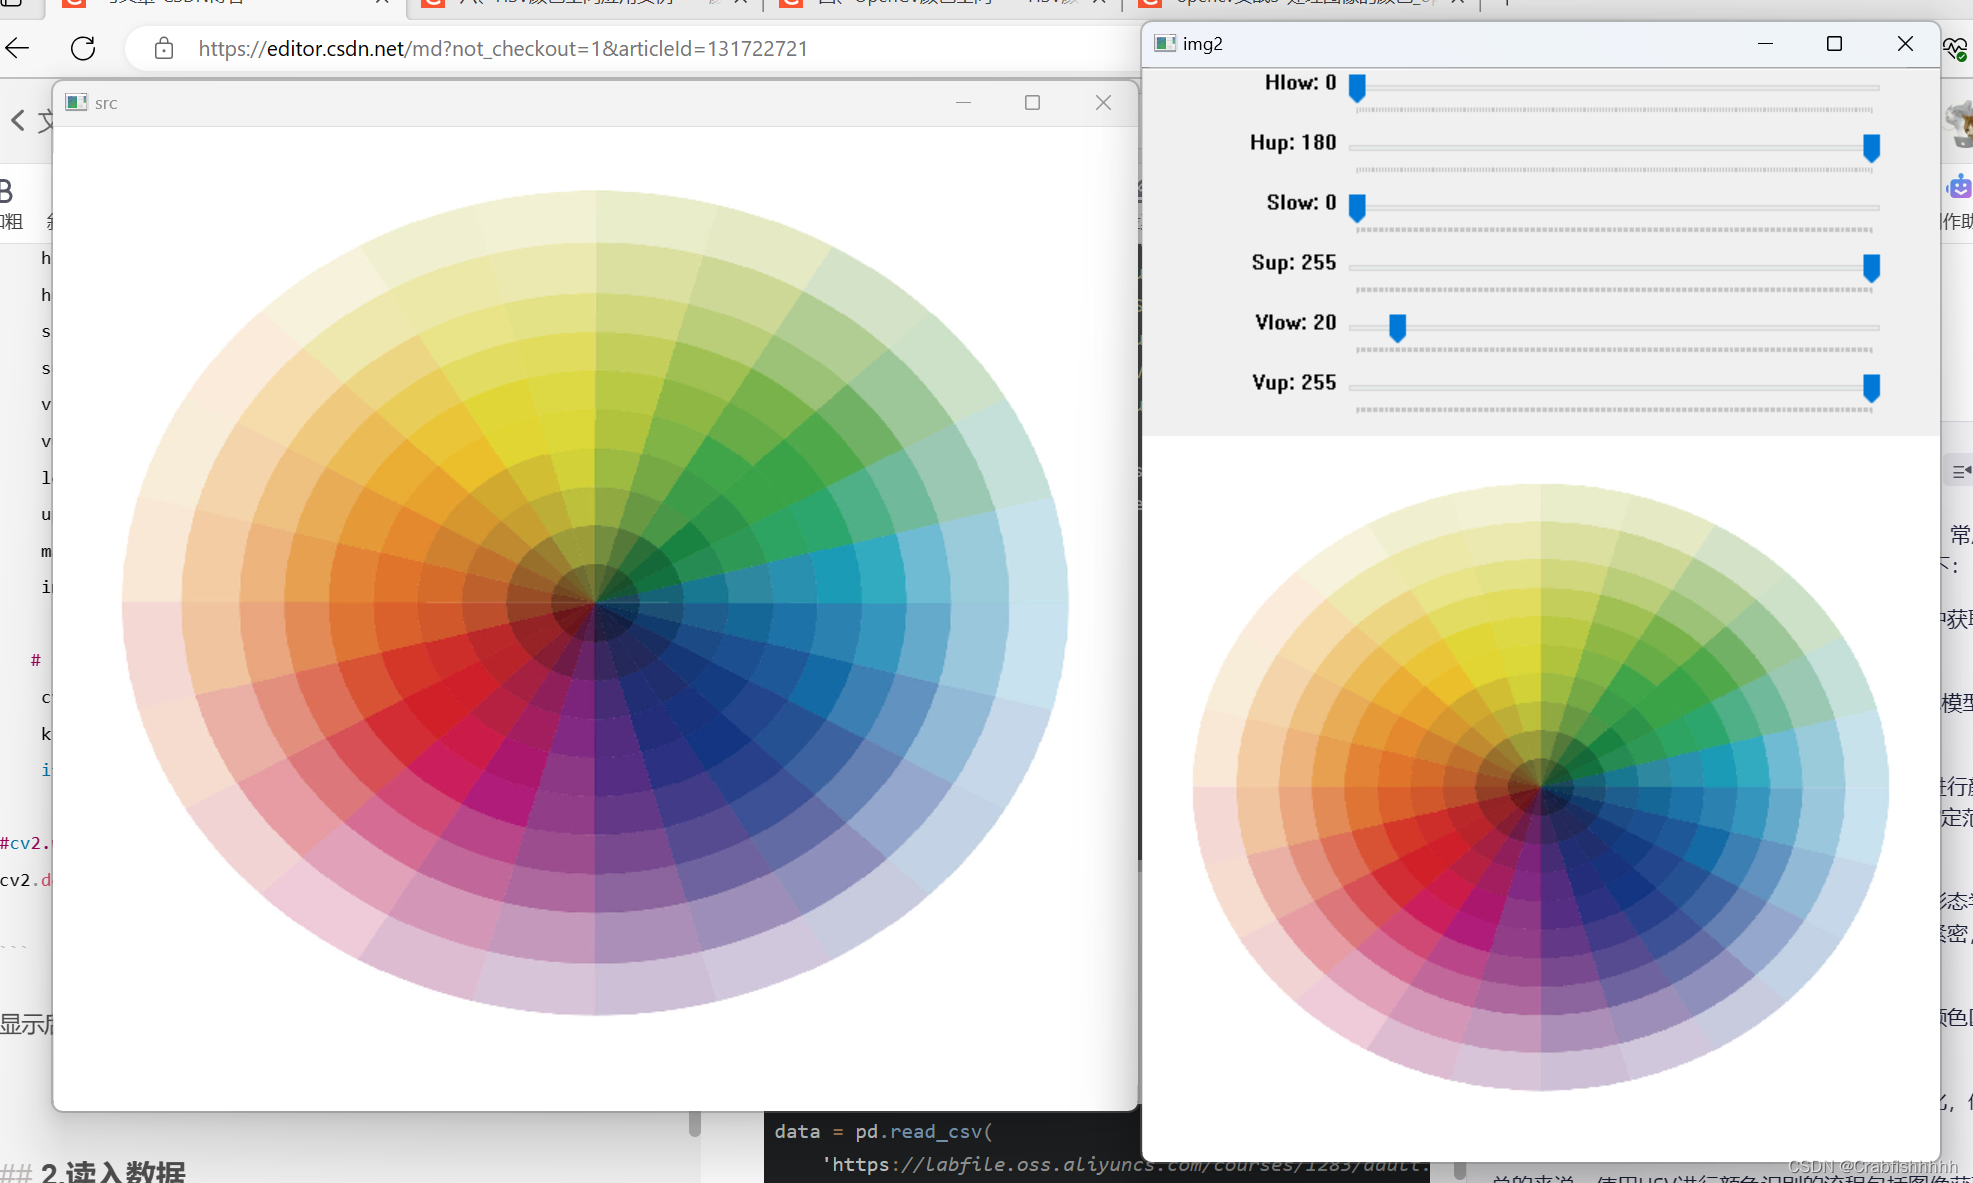
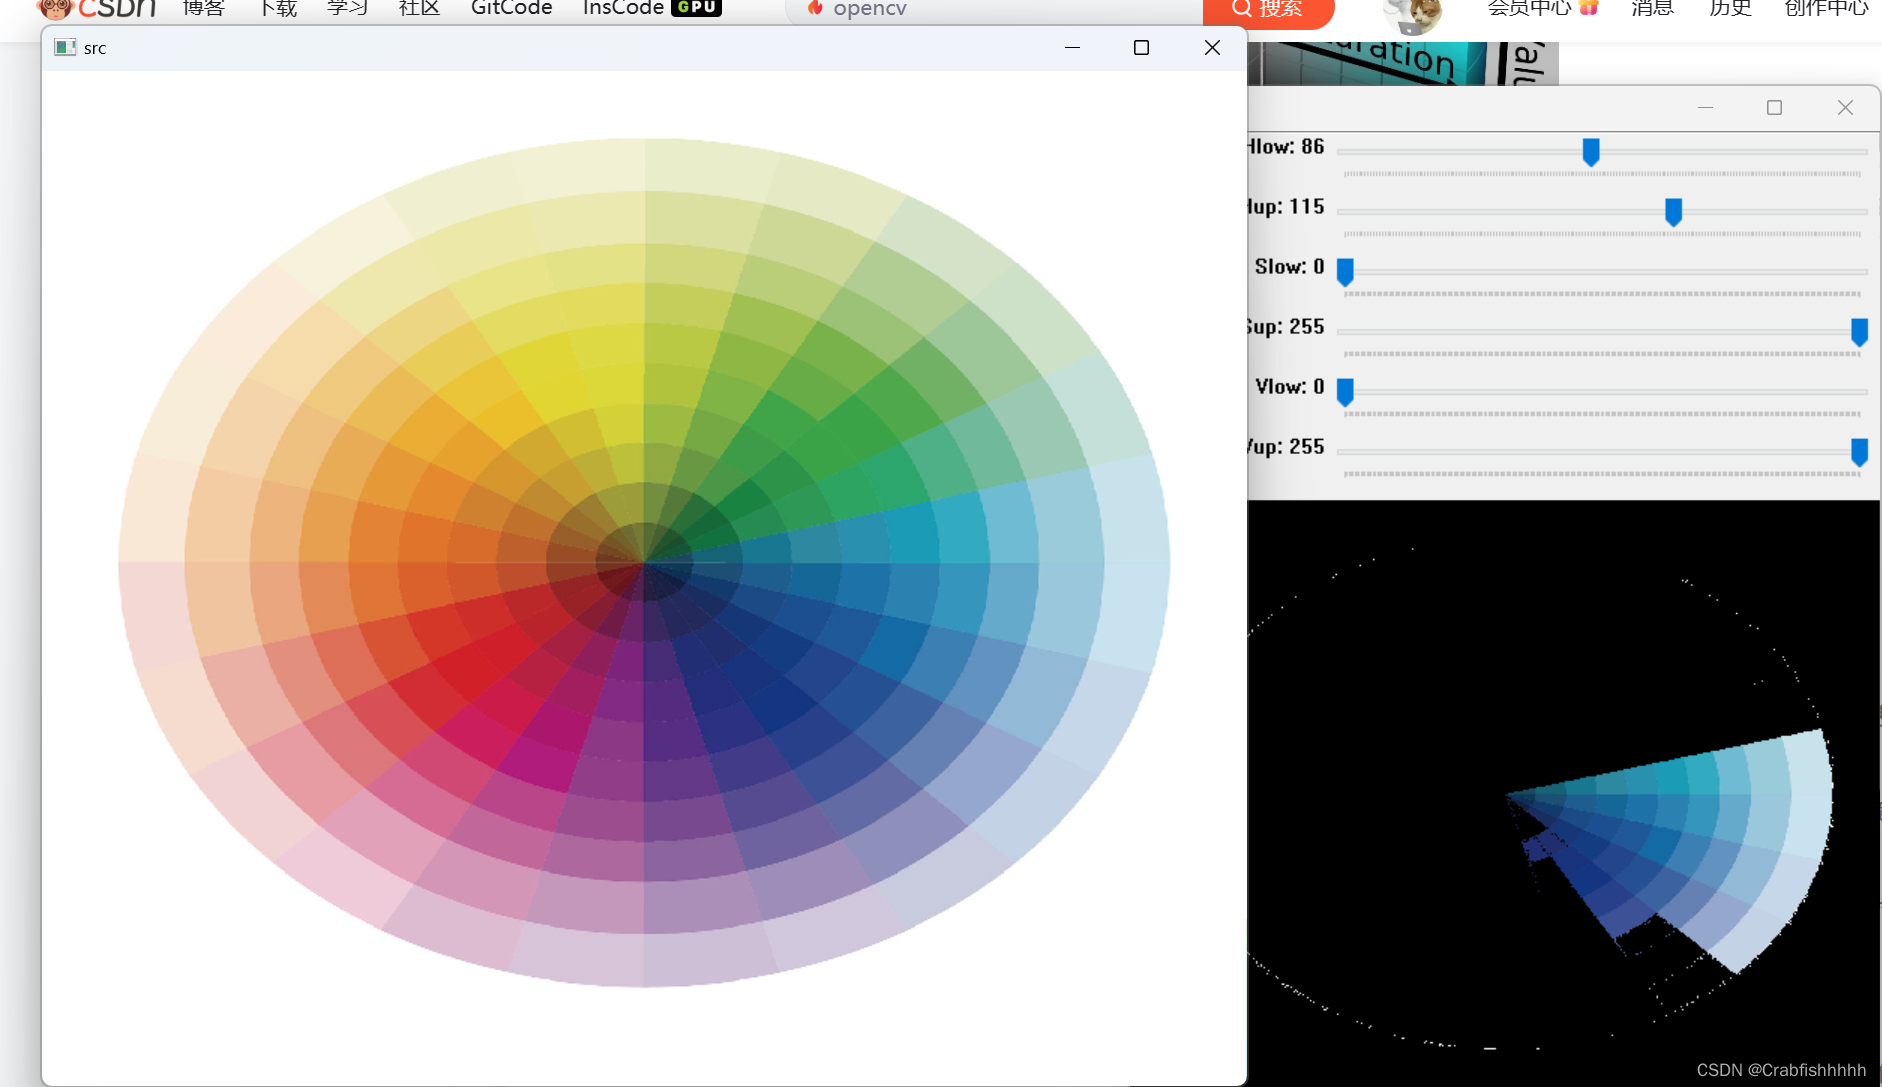
So, when we read the hsv, we have to adjust the corresponding thresholds as needed, which can then be summarized as:
import cv2
import numpy as np

def show(img,name):
    cv2.namedWindow(name, cv2.WINDOW_NORMAL)
    cv2.imshow(name,img)
    cv2.waitKey(0)
    cv2.destroyAllWindows()

# Acquire the image
img = cv2.imread("D:/PycharmProjects/pythonProject/Use-pic/hsv.jpg")
#Color mode conversion
hsv_img = cv2.cvtColor(img, cv2.COLOR_BGR2HSV)

# By determining the mask mask in the upper and lower extraction range
lower = np.array([170,30 , 30])
upper = np.array([180, 255, 255])
mask = cv2.inRange(hsv_img, lower, upper)

#Corrosion and swelling treatment
kernel = cv2.getStructuringElement(cv2.MORPH_RECT,(3,3))
eroded = cv2.erode(mask, kernel)

#Inflated images
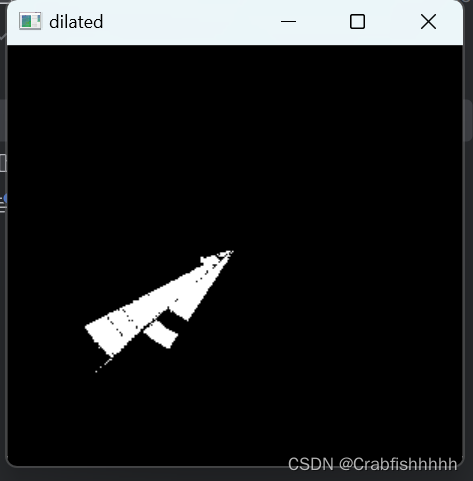
dilated = cv2.dilate(eroded,kernel)

# bitwise arithmetic
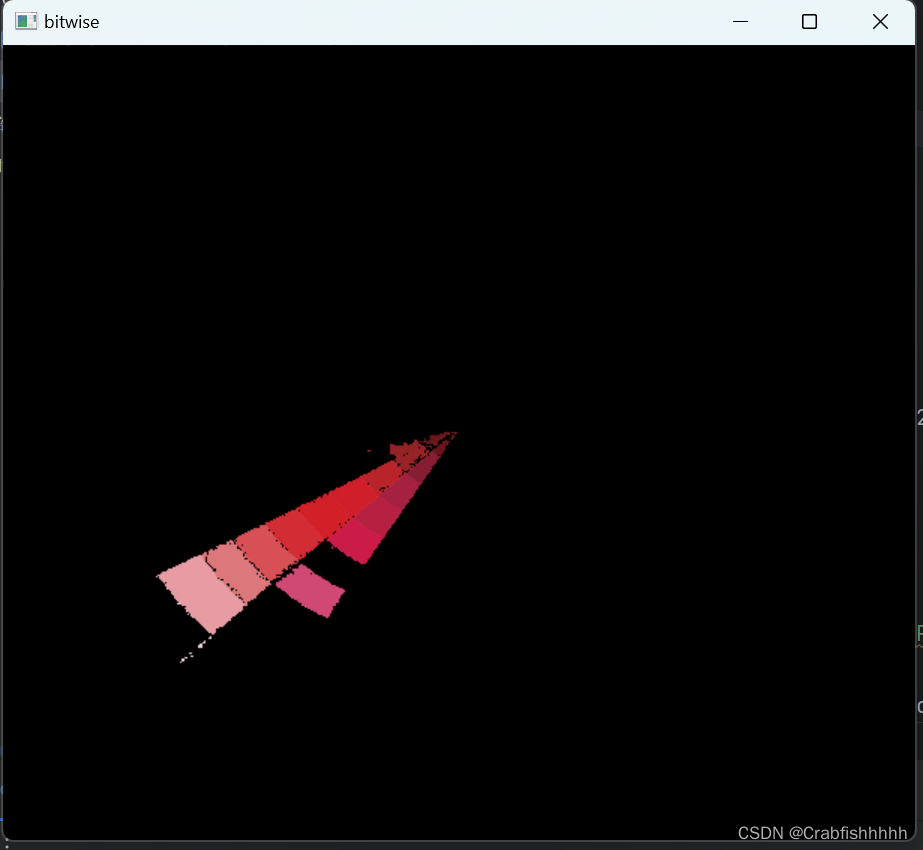
bitwise = cv2.bitwise_and(img,img,mask=dilated)

show(img,"img")
show(mask,"mask")
show(eroded,"eroded")
show(dilated,"dilated")
show(bitwise,"bitwise")


cv2.destroyAllWindows()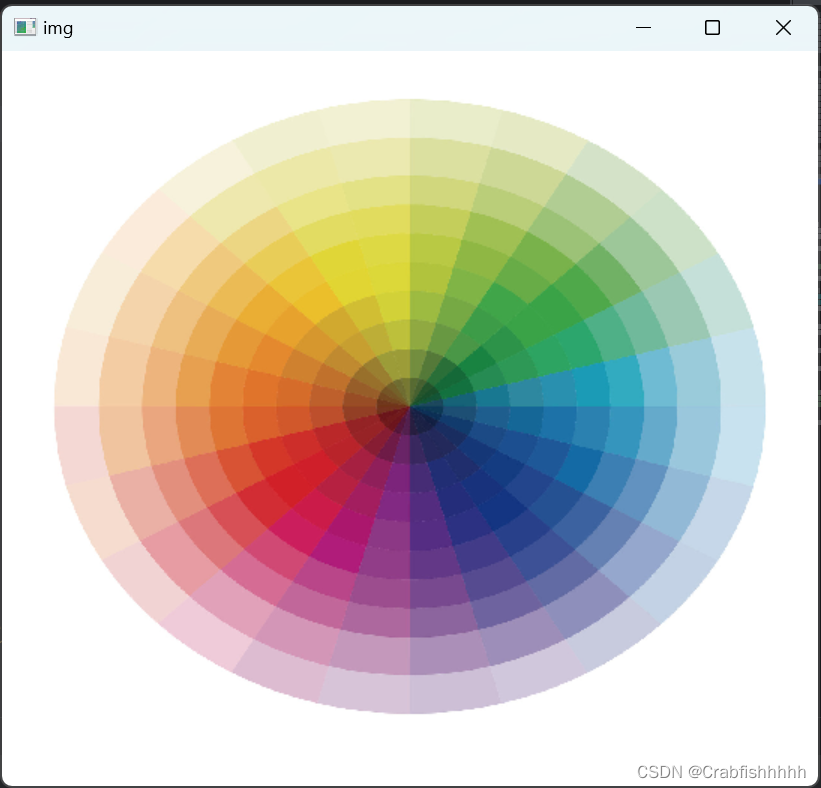


Here are the values associated with common colors
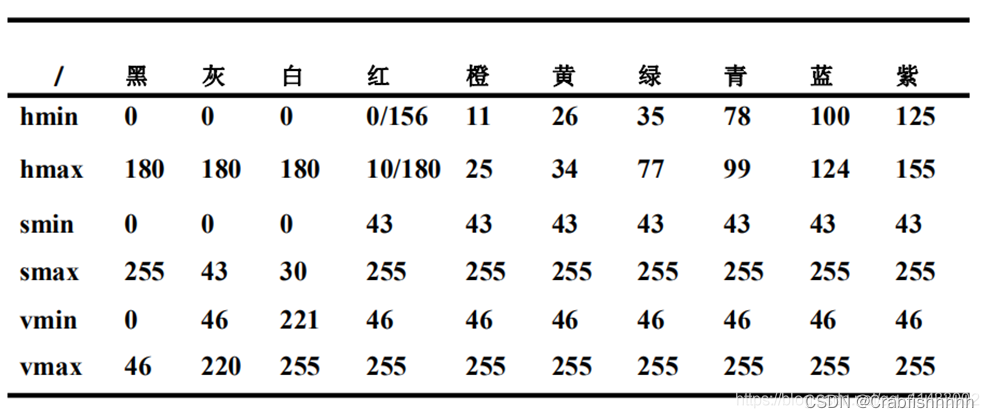
Instance operation
If we want to recognize the red and blue color in the camera image, then we can apply hsv for that.
Original image:
The code is as follows (example):
import cv2
import numpy as np
from matplotlib import pyplot as plt

lower_red = np.array([0, 50, 100])
upper_red = np.array([10, 255, 255])
lower_blue = np.array([100, 50, 100])
upper_blue = np.array([124, 255, 255]) # If the plotted contour differs significantly from your desired recognition result, you can change the recognition result by adjusting the threshold value
red = (0, 0, 225)
blue = (225, 0, 0)

cv2.namedWindow('video', cv2.WINDOW_AUTOSIZE)
cv2.resizeWindow('video', 640, 480)


def img_process(img, lower, upper):
    """Processes an image according to a threshold value and extracts the colors within the threshold. Returns an image with only the specified color left after processing (the rest is black)
        img: original image; lower: lowest threshold; upper: highest threshold""""
    kernel = np.ones((35, 35), np.uint8)
    hsv = cv2.cvtColor(img, cv2.COLOR_BGR2HSV)
    Open = cv2.morphologyEx(hsv, cv2.MORPH_OPEN, kernel)
    mask = cv2.inRange(Open, lower, upper)
    res = cv2.bitwise_and(img, img, mask=mask)
    return res


def cnts_draw(img, res, color):
    """Draws an outline of the specified color on the original image. No return value
        img: original image; res: image after bit-with operation with only a certain color; color: color of the outline """"
    canny = cv2.Canny(res, 100, 200)
    contours, hierarchy = cv2.findContours(canny, cv2.RETR_EXTERNAL, cv2.CHAIN_APPROX_SIMPLE)
    if len(contours) == 0:
        cv2.imshow('video', img)
        return
    else:
        max_cnt = max(contours, key=cv2.contourArea)
        cv2.drawContours(img, max_cnt, -1, color, 2)
        (x, y, w, h) = cv2.boundingRect(max_cnt)
        cv2.rectangle(img, (x, y), (x + w, y + h), color, 3)
        cv2.imshow('video', img)


def colorfind(img):
    """Find the most color of the original image, when the color is red or blue print out the name of the color, no return value
        img: original image """"
    kernel = np.ones((35, 35), np.uint8)
    hsv = cv2.cvtColor(img, cv2.COLOR_BGR2HSV)
    Open = cv2.morphologyEx(hsv, cv2.MORPH_OPEN, kernel)
    hist = cv2.calcHist([Open], [0], None, [180], [0, 180])
    hist_max = np.where(hist == np.max(hist))
    if 0 < hist_max[0] < 10:
        print('red')
    elif 100 < hist_max[0] < 124:
        print('blue')
    else:
        return


if __name__ == "__main__":
    cap = cv2.VideoCapture(0)
    while cap.isOpened():
        flag, frame = cap.read()
        if not flag:
            print("Unable to read camera!")
            break
        else:
            if frame is not None:
                res_blue = img_process(frame, lower_blue, upper_blue)
                res_red = img_process(frame, lower_red, upper_red)
                cnts_draw(frame, res_blue, blue)
                cnts_draw(frame, res_red, red)
                colorfind(frame)
                key = cv2.waitKey(10)
                if key == 27:
                    break
            else:
                print("No screen")
                break

    cap.release()
    cv2.destroyAllWindows()
Results:
summarize
This paper briefly introduces the application of hsv in color recognition, of course, for color recognition there are higher precision vision algorithms. But for daily color recognition needs, hsv is enough.
