If you think the article is okay, can you give it a like? Your likes are what keep me updated!
catalogs
A case study of HCI ui usage in conjunction with SAM:
Recently newly discovered, you can use this model, a simple UI use, the effect is as follows:
Labelimg combines SAM to realize semi-automatic labeling software.
SAM demo source code usage
Let’s start by stating that the code inside this link is about the demo and is not currently trainable.
former warehouse![]() https://github.com/facebookresearch/segment-anything
https://github.com/facebookresearch/segment-anything
We all know that a few of the more important directions for processing images in the CV field are: recognition, measurement (calibration), 3D object reconstruction, and so on.
Recognition is the most basic and important, so segmentation is even more important in recognition, so this big model segmentation is really: a word “6”.
Official demos are given for you to experience
Put an example:
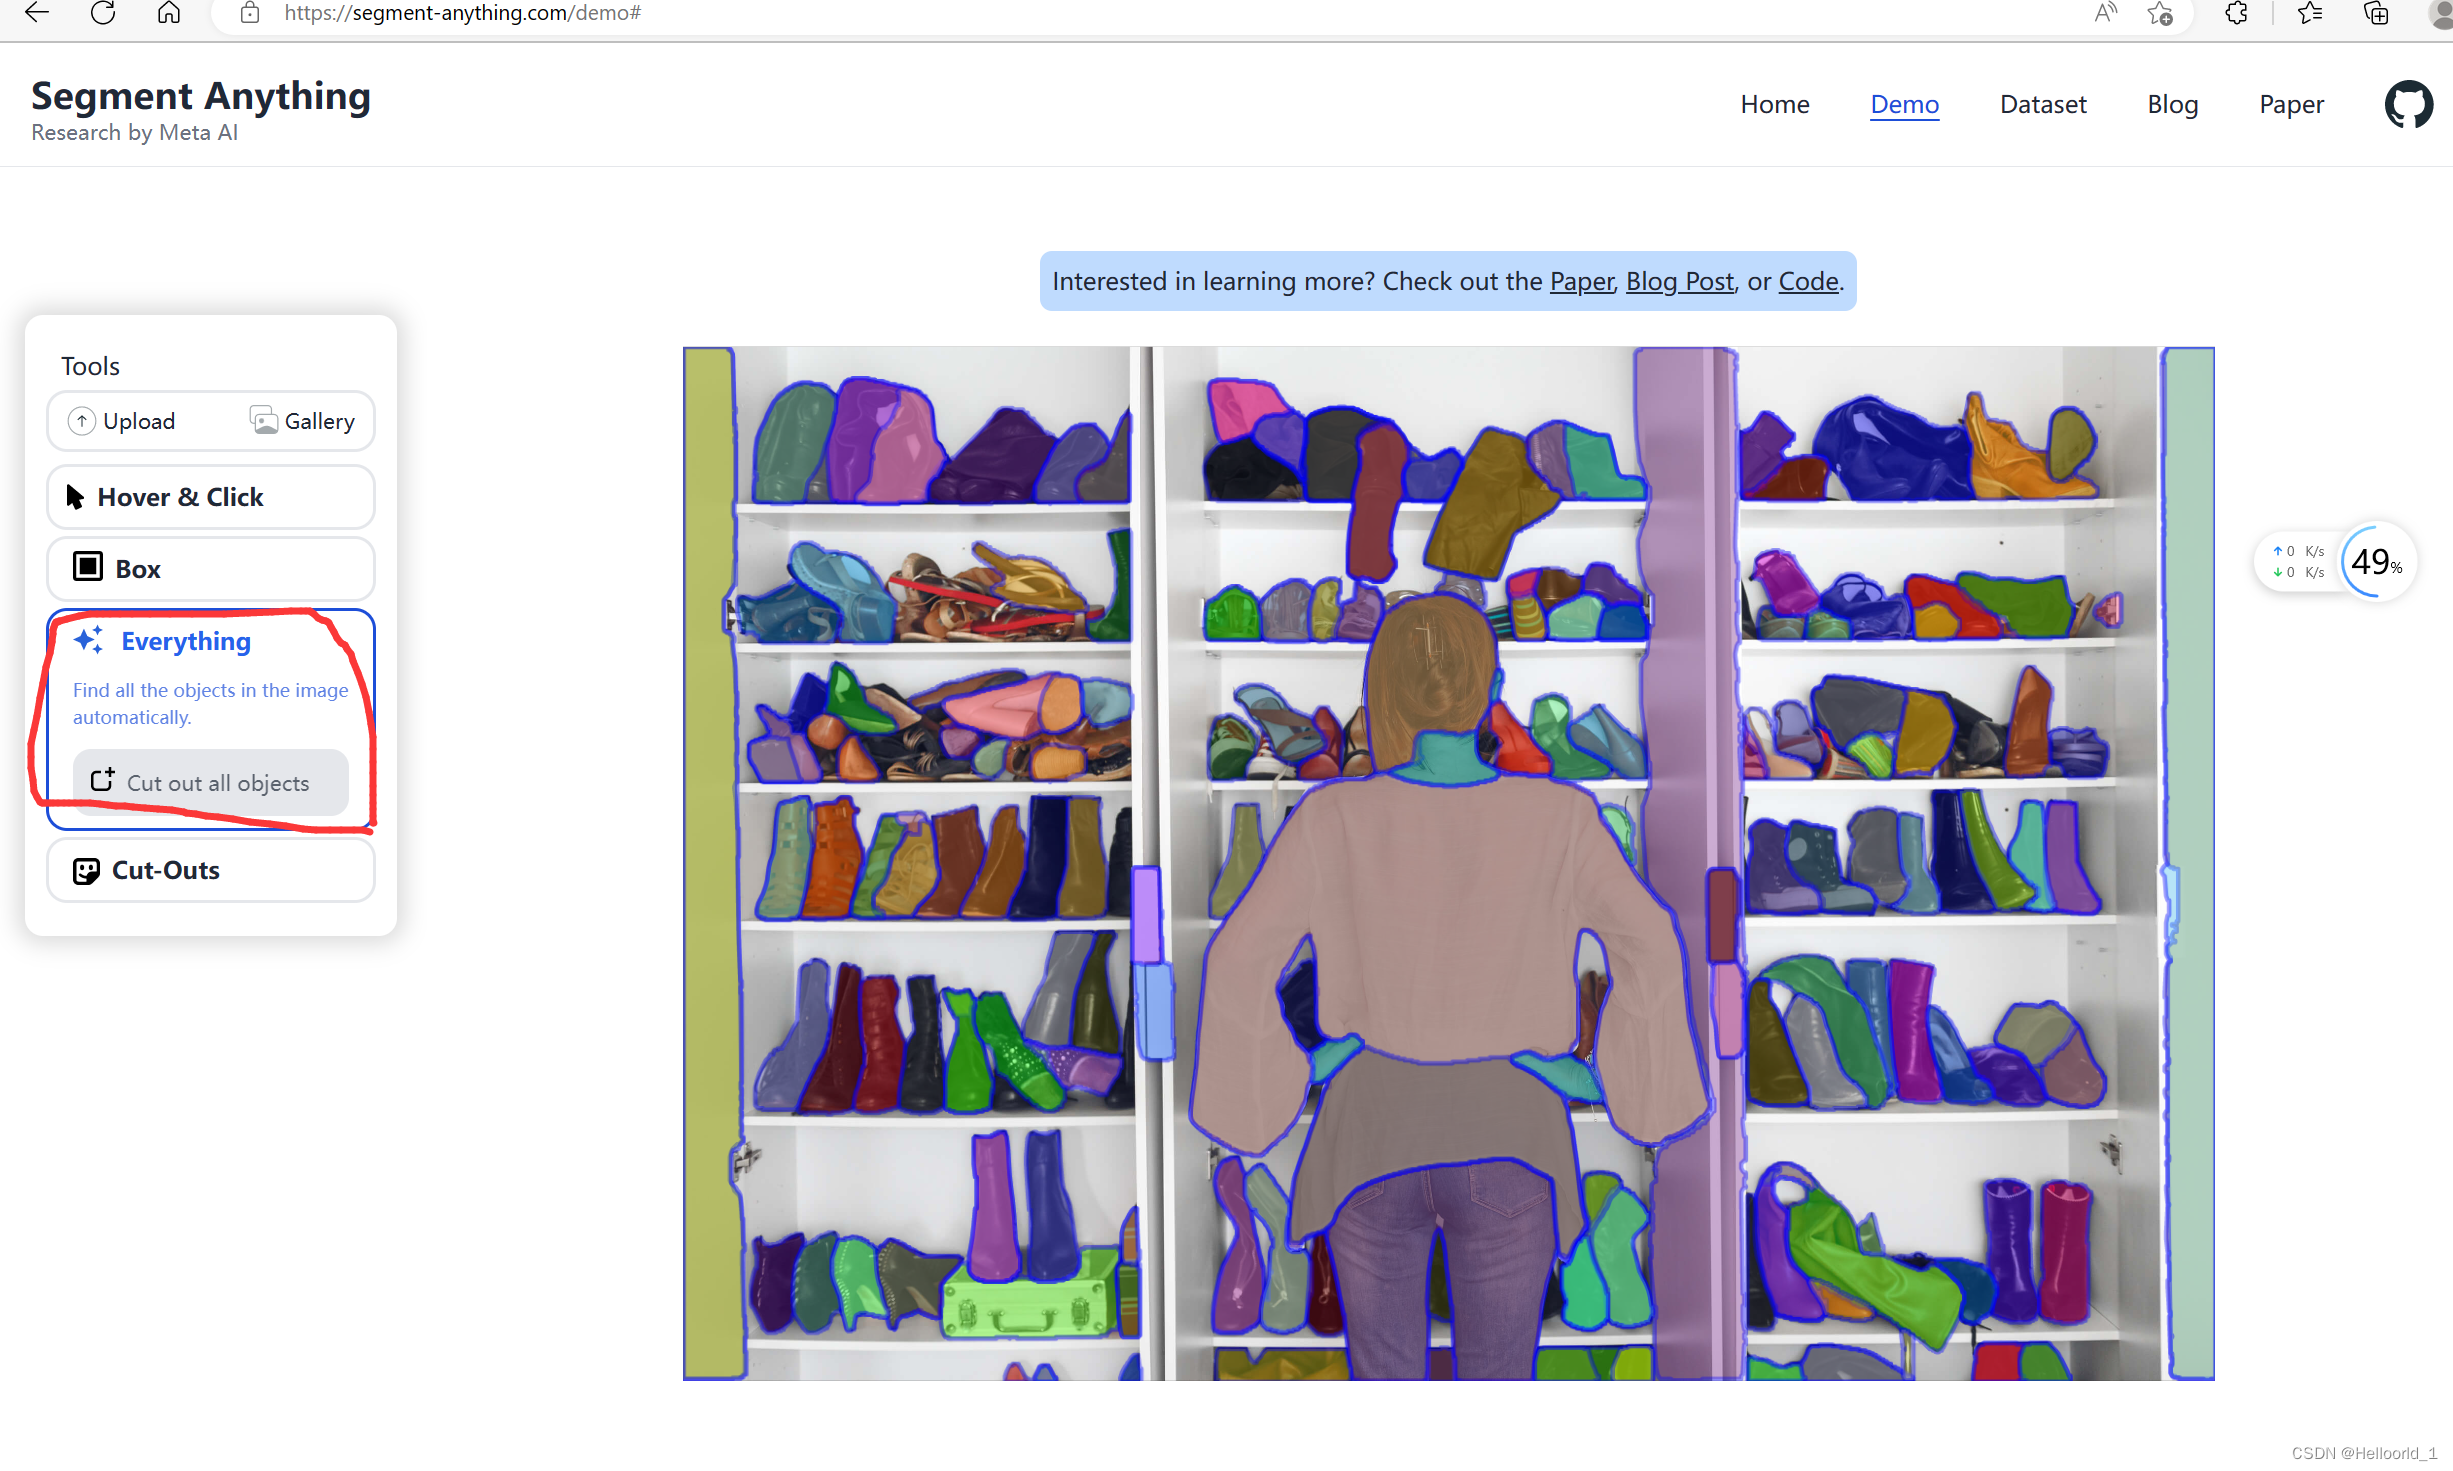
Just go to the link given above (the original repository) and go download it.
See recently more hot CV segmentation artifacts, so think about taking a look at the code, here to record aha their own stepped on the pit.
The first step is to click on the code in the link above to download it.
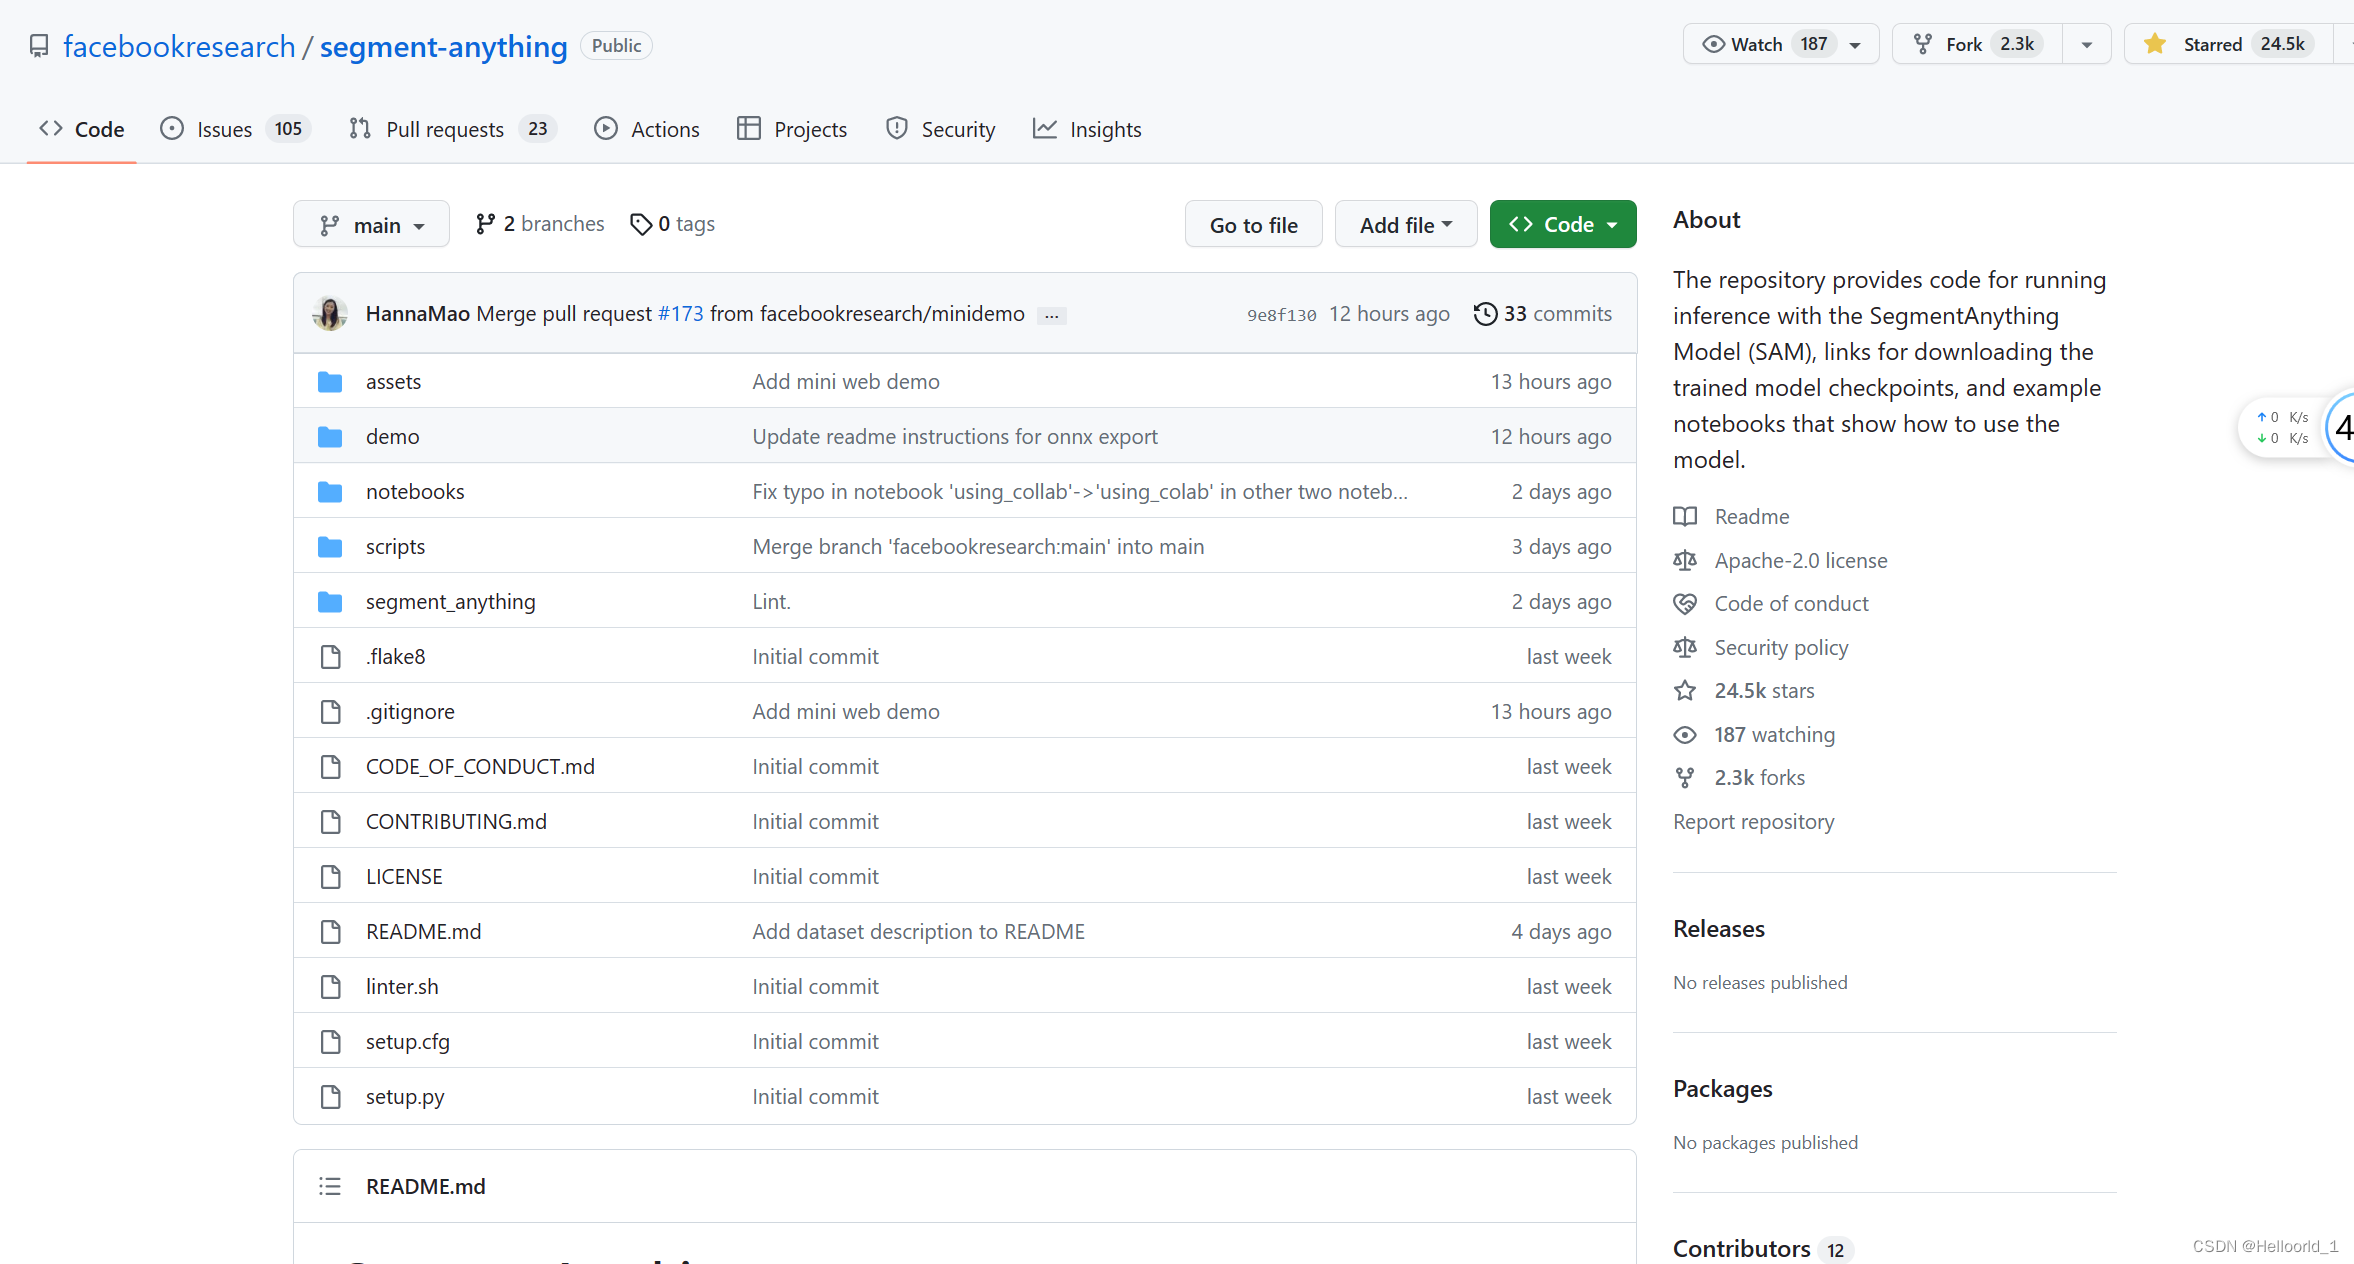
Then unzip it under the target folder

Then download the model library and put it under the extracted directory folder, which is the same directory as setup.py.

If it’s a personal laptop, here’s a recommendationvit-b
If you want to use vit-h, it is recommended to use a small resolution image and modify the size of batch_size
(i.e.)SamAutomaticMaskGenerator(sam, points_per_batch=16)), or deployed to a server.
Configure the environment as described in the original article:
Install PyTorch and TorchVision dependencies. It is highly recommended to install both PyTorch and TorchVision with CUDA support.python>=3.8 pytorch >= 1.7 (>= 2.0 if onnx is to be exported)torchvision>=0.8
There are also dependency libraries:matplotlib,pycocotools,opencv-python,onnx,onnxruntime(These are required to be installed)
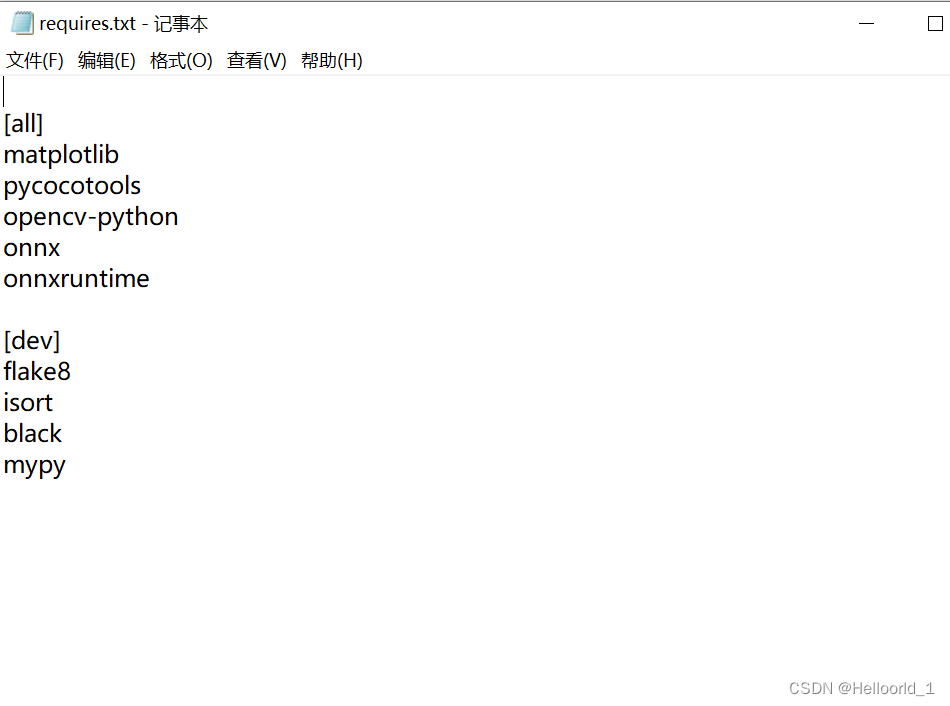
The official installation methods given are
pip install git+https://github.com/facebookresearch/segment-anything.gitOr:
git clone [email protected]:facebookresearch/segment-anything.git
cd segment-anything; pip install -e .
And:
pip install opencv-python pycocotools matplotlib onnxruntime onnxThe above approach seems to have gone wrong for me, so I took theAlternative approach:
Use cmd to open into the directory where you extracted the files (that is, the directory containing setup.py) and enter the following command:
Installation can be, by the way, I am using the anconda environment, it is recommended to create a new virtual environment to avoid interference with their other configurations, note that the python version must be > = 3.8
conda create -n Environment name python=3.8conda activate environment name is sufficientpython setup.py installOnce the environment is configured, consider whether or not to use GPUs and cpu’s according to your situation.
Next we start running the open source demo, there are two ways:
cmd command: notebooks/images/ is the path to your input image, output is the path to the output mask, followed by –device cpu if you add it, it will be run using a cpu, otherwise it will default to the GPU.
python scripts/amg.py --checkpoint sam_vit_b_01ec64.pth --model-type vit_b --input notebooks/images/ --output output --device cpuCreate a train.py in the same directory (setup.py)
The code inside is as follows:
import sys
import numpy as np
import matplotlib
import matplotlib.pyplot as plt
import cv2
from segment_anything import sam_model_registry, SamAutomaticMaskGenerator, SamPredictor

matplotlib.use('TkAgg')

def show_anns(anns):
    if len(anns) == 0:
        return
    sorted_anns = sorted(anns, key=(lambda x: x['area']), reverse=True)
    ax = plt.gca()
    ax.set_autoscale_on(False)
    polygons = []
    color = []
    for ann in sorted_anns:
        m = ann['segmentation']
        img = np.ones((m.shape[0], m.shape[1], 3))
        color_mask = np.random.random((1, 3)).tolist()[0]
        for i in range(3):
            img[:,:,i] = color_mask[i]
        ax.imshow(np.dstack((img, m*0.35)))

sys.path.append("..")


sam_checkpoint = "sam_vit_b_01ec64.pth"
model_type = "vit_b"

device = "cuda "#If you want to use cpu, just change it to cpu.

sam = sam_model_registry[model_type](checkpoint=sam_checkpoint)
sam.to(device=device)

image = cv2.imread('notebooks/images/dog.jpg')
image = cv2.cvtColor(image, cv2.COLOR_BGR2RGB)
# plt.figure(figsize=(20,20))
# plt.imshow(image)
# plt.axis('off')
# plt.show()


mask_generator = SamAutomaticMaskGenerator(sam)

masks = mask_generator.generate(image)
print(len(masks))
plt.figure(figsize=(20,20))
plt.imshow(image)
show_anns(masks)
plt.axis('off')
plt.show()
# import torch # Import if pytorch is installed successfully
# print(torch.cuda.is_available()) # check if CUDA is available
# print(torch.cuda.device_count()) # See the number of available CUDAs
# print(torch.version.cuda) # Check the version number of CUDA
The problems I’m having are:
If you run it with a GPU the error is reported as:

Then it’s because the GPU requires too much memory, just change the model to vit-b, I get this error with vit-h!
If the error is reported as:

Then just add the following code:
import matplotlib

matplotlib.use('TkAgg')
The final run looks like this:
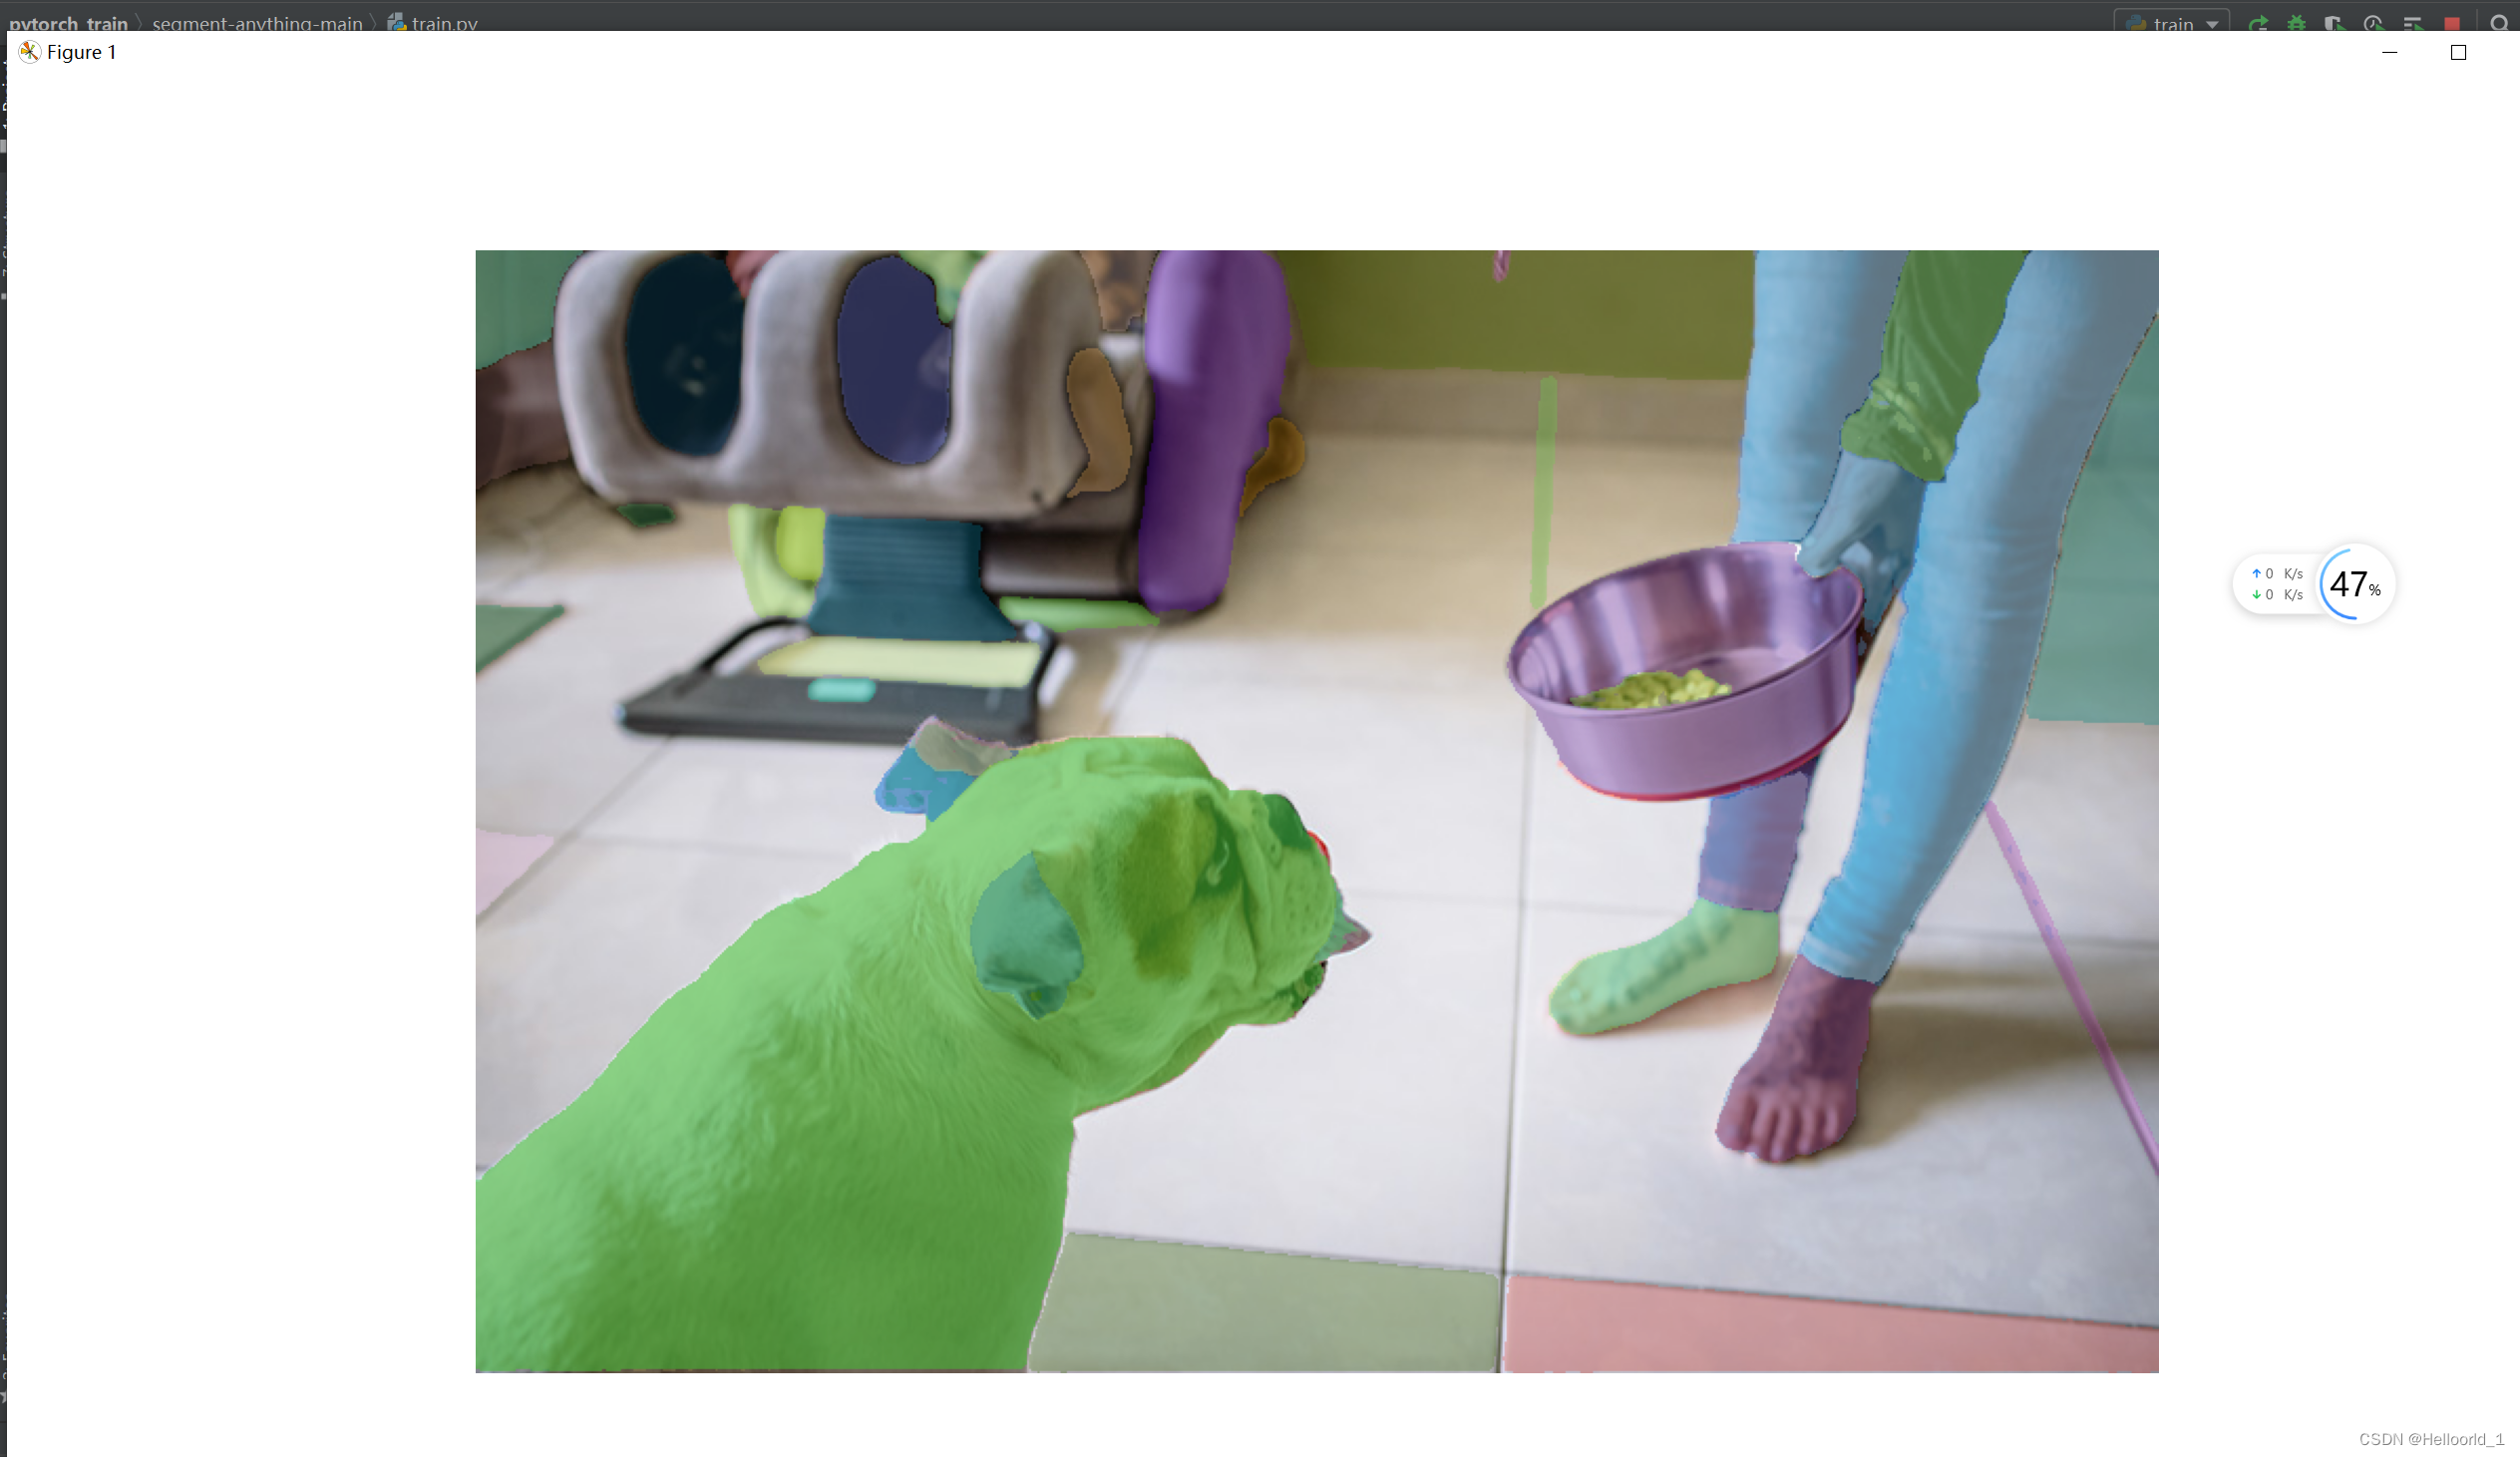
According to the relevant documentation, if you need to export the onnx model, that is, the official command below:
python scripts/export_onnx_model.py --checkpoint sam_vit_b_01ec64.pth --model-type vit_b --output output file pathThe following error will be reported:

Officially updated config file for exporting onnx, requirements:
The ONNX export function uses opset version 17, which requires thepytorch>=2.0 instead ofpytorch>=1.7
A case study of HCI ui usage in conjunction with SAM:
Recently newly discovered, you can use this model, a simple UI use, the effect is as follows:
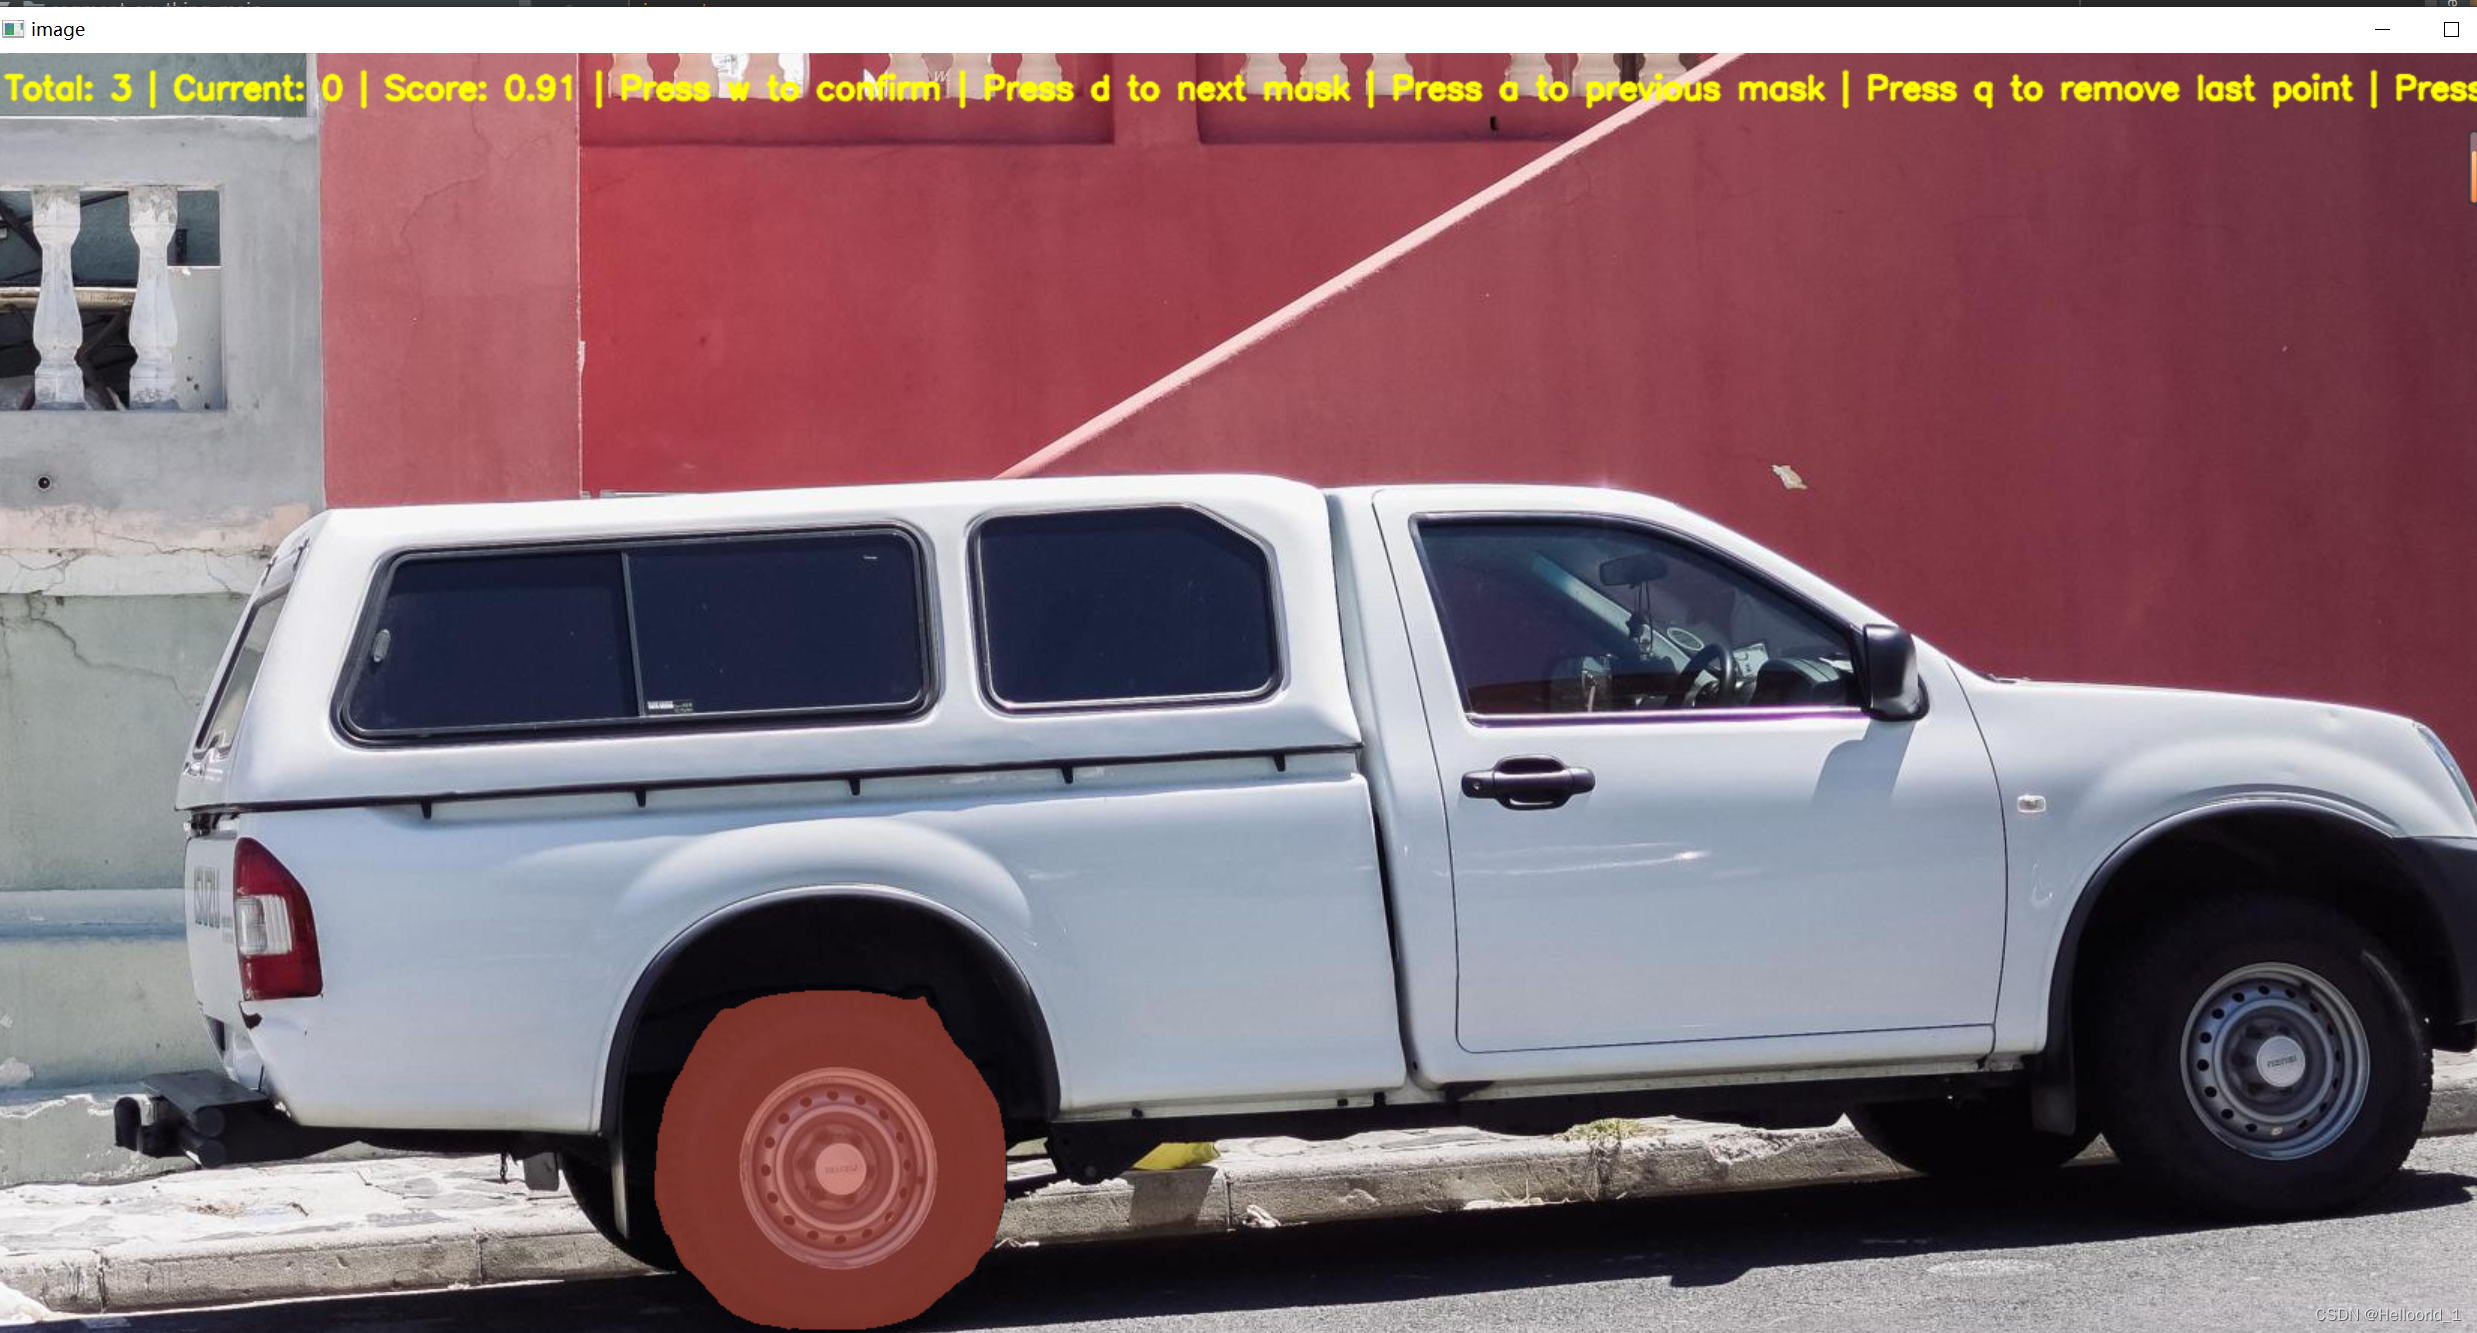
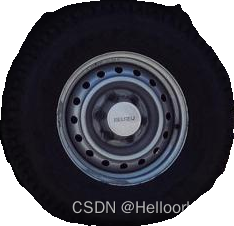
Successfully cropped down the image.
First of all, the code is not the beginning of my original, here just as a case of sharing, the code in the notes for personal understanding, if infringement, you can contact to delete.
First import the header file as follows:
import cv2 #opencv in order to read images and save images
import os # as it relates to reading file paths
import numpy as np #involves matrix computation
from segment_anything import sam_model_registry, SamPredictor
 #Needless to say, in order to use SAM, it is therefore recommended that you create a new test.py and place it in the same directory as setup.
According to the original author the idea was:
Make a keying UI interface that relies on SAM at the bottom for human-computer interaction via mouse clicks.
So first a couple of functions are defined.
nput_dir = 'input' #name of the input folder that will hold the images that will be keyed in
output_dir = 'output' #file name of the output image, used to key the finished image
crop_mode=True #Whether to crop to the minimum range, will be used later in the determination of the
#alpha_channel whether to keep the transparent channel or not
print('It's best to press w to predict for every point you add')
os.makedirs(output_dir, exist_ok=True) # Create a directory
image_files = [f for f in os.listdir(input_dir) if f.lower().endswith((('.png', '.jpg', '.jpeg', '.JPG', '.JPEG', '.PNG')))] # os.lisdir will be saved as an array of the image's file names as an array

sam = sam_model_registry["vit_b"](checkpoint="sam_vit_b_01ec64.pth")
_ = sam.to(device="cuda")#comment out this line, it will run on cpu and will be much slower
predictor = SamPredictor(sam)#SAM Predictor image
Wrote the custom function as follows:
Mouse clicks, here the mouse function inside the opencv is used.
EVENT_MOUSEMOVE 0 # Slide
EVENT_LBUTTONDOWN 1 # Left click
EVENT_RBUTTONDOWN 2 # Right click
EVENT_MBUTTONDOWN 3 # Middle key click
EVENT_LBUTTONUP 4 # Left button release
EVENT_RBUTTONUP 5 # Right-click and release
EVENT_MBUTTONUP 6 # Release the middle key
EVENT_LBUTTONDBLCLK 7 # Double-click
EVENT_RBUTTONDBLCLK 8 # Right-click
EVENT_MBUTTONDBLCLK 9 # Double-click
def mouse_click(event, x, y, flags, param):# mouse_click event
    global input_point, input_label, input_stop# Global variable, input point,
    if not input_stop:# Determine if the flag has stopped the input response!
        if event == cv2.EVENT_LBUTTONDOWN :# Left mouse button
            input_point.append([x, y])
            input_label.append(1)#1 means front sights
        elif event == cv2.EVENT_RBUTTONDOWN :# Right mouse button
            input_point.append([x, y])
            input_label.append(0)#0 means background point
    else:
        if event == cv2.EVENT_LBUTTONDOWN or event == cv2.EVENT_RBUTTONDOWN :#Prompt to add can't be done.
            print('Cannot add points at this point, press w to exit mask selection mode')
The mask used to store the predictions
def apply_mask(image, mask, alpha_channel=True):# applies and responds to mask
    if alpha_channel:
        alpha = np.zeros_like(image[... , 0])#Production occultation
        alpha[mask == 1] = 255#Place of interest is marked 1 and white
        Image = cv2. Merge ((image [..., 0], image [...] 1, image [..., 2], alpha)) # fused images
    else:
        image = np.where(mask[..., None] == 1, image, 0)
        #np.where(1, 2, 3) is conditioned on 1, if satisfied, execute 2, otherwise execute 3
    return image
Assigning color to masks, displaying to images
def apply_color_mask(image, mask, color, color_dark = 0.5):# Color the cover
    for c in range(3):# from 0->3
        image[:, :, c] = np.where(mask == 1, image[:, :, c] * (1 - color_dark) + color_dark * color[c], image[:, :, c])
    return image
Proceed to the next image
def get_next_filename(base_path, filename):# do next image
    name, ext = os.path.splitext(filename)
    for i in range(1, 101):
        new_name = f"{name}_{i}{ext}"
        if not os.path.exists(os.path.join(base_path, new_name)):
            return new_name
    return None
Save ROI area
ef save_masked_image(image, mask, output_dir, filename, crop_mode_):# Save the masked part of the image (image of interest)
    if crop_mode_:
        y, x = np.where(mask)
        y_min, y_max, x_min, x_max = y.min(), y.max(), x.min(), x.max()
        cropped_mask = mask[y_min:y_max+1, x_min:x_max+1]
        cropped_image = image[y_min:y_max+1, x_min:x_max+1]
        masked_image = apply_mask(cropped_image, cropped_mask)
    else:
        masked_image = apply_mask(image, mask)
    filename = filename[:filename.rfind('.')]+'.png'
    new_filename = get_next_filename(output_dir, filename)

    if new_filename:
        if masked_image.shape[-1] == 4:
            cv2.imwrite(os.path.join(output_dir, new_filename), masked_image, [cv2.IMWRITE_PNG_COMPRESSION, 9])
        else:
            cv2.imwrite(os.path.join(output_dir, new_filename), masked_image)
        print(f"Saved as {new_filename}")
    else:
        print("Could not save the image. Too many variations exist.")
defines variables that will be used in later loops:
current_index = 0 #Image number
cv2.namedWindow("image") #UI window name
cv2.setMouseCallback("image", mouse_click) #mouse_click to return to the window where the image window is located.
input_point = [] #define empty array
input_label = []
input_stop=False # Define bool
Three while loops are utilized
while True:
    filename = image_files[current_index]
    image_orign = cv2.imread(os.path.join(input_dir, filename))
    image_crop = image_orign.copy()# image crop
    image = cv2.cvtColor(image_orign.copy(), cv2.COLOR_BGR2RGB)#Original color shift
    selected_mask = None
    logit_input= None
    while True:
        #print(input_point)
        input_stop=False
        image_display = image_orign.copy()
        display_info = f'{filename} | Press s to save | Press w to predict | Press d to next image | Press a to previous image | Press space to clear | Press q to remove last point '
        cv2.putText(image_display, display_info, (10, 30), cv2.FONT_HERSHEY_SIMPLEX, 0.7, (0, 255, 255), 2, cv2.LINE_AA)
        for point, label in zip(input_point, input_label):# Input point and input type
            color = (0, 255, 0) if label == 1 else (0, 0, 255)
            cv2.circle(image_display, tuple(point), 5, color, -1)
        if selected_mask is not None :
            color = tuple(np.random.randint(0, 256, 3).tolist())
            selected_image = apply_color_mask(image_display,selected_mask, color)

        cv2.imshow("image", image_display)
        key = cv2.waitKey(1)

        if key == ord(" "):
            input_point = []
            input_label = []
            selected_mask = None
            logit_input= None
        elif key == ord("w"):
            input_stop=True
            if len(input_point) > 0 and len(input_label) > 0:
                #todo Predictive Imaging
                predictor.set_image(image)#set input image
                input_point_np = np.array(input_point)#input hint point, need to transform the array type can be input
                input_label_np = np.array(input_label)#Type of the input hint point
                #todo Entering hints will return tasks
                masks, scores, logits= predictor.predict(
                    point_coords=input_point_np,
                    point_labels=input_label_np,
                    mask_input=logit_input[None, :, :] if logit_input is not None else None,
                    multimask_output=True,
                )

                mask_idx=0
                num_masks = len(masks)#number of masks
                while(1):
                    color = tuple(np.random.randint(0, 256, 3).tolist())# Randomize the list of colors, that is
                    image_select = image_orign.copy()
                    selected_mask=masks[mask_idx]#selected msks aka,a,d switching
                    selected_image = apply_color_mask(image_select,selected_mask, color)
                    mask_info = f'Total: {num_masks} | Current: {mask_idx} | Score: {scores[mask_idx]:.2f} | Press w to confirm | Press d to next mask | Press a to previous mask | Press q to remove last point | Press s to save'
                    cv2.putText(selected_image, mask_info, (10, 30), cv2.FONT_HERSHEY_SIMPLEX, 0.7, (0, 255, 255), 2, cv2.LINE_AA)
                    #todo Show in the current image, #todo
                    cv2.imshow("image", selected_image)

                    key=cv2.waitKey(10)
                    if key == ord('q') and len(input_point)>0:
                        input_point.pop(-1)
                        input_label.pop(-1)
                    elif key == ord('s'):
                        save_masked_image(image_crop, selected_mask, output_dir, filename, crop_mode_=crop_mode)
                    elif key == ord('a') :
                        if mask_idx>0:
                            mask_idx-=1
                        else:
                            mask_idx=num_masks-1
                    elif key == ord('d') :
                        if mask_idx<num_masks-1:
                            mask_idx+=1
                        else:
                            mask_idx=0
                    elif key == ord('w') :
                        break
                    elif key == ord(" "):
                        input_point = []
                        input_label = []
                        selected_mask = None
                        logit_input= None
                        break
                logit_input=logits[mask_idx, :, :]
                print('max score:',np.argmax(scores),' select:',mask_idx)

        elif key == ord('a'):
            current_index = max(0, current_index - 1)
            input_point = []
            input_label = []
            break
        elif key == ord('d'):
            current_index = min(len(image_files) - 1, current_index + 1)
            input_point = []
            input_label = []
            break
        elif key == 27:
            break
        elif key == ord('q') and len(input_point)>0:
            input_point.pop(-1)
            input_label.pop(-1)
        elif key == ord('s') and selected_mask is not None :
            save_masked_image(image_crop, selected_mask, output_dir, filename, crop_mode_=crop_mode)

    if key == 27:
        break
The full code is below:
import cv2
import os
import numpy as np
from segment_anything import sam_model_registry, SamPredictor
input_dir = 'input'
output_dir = 'output'
crop_mode=True#Whether to crop to the minimum range
#alpha_channel whether to keep the transparent channel or not
print('It's best to press w to predict for every point you add')
os.makedirs(output_dir, exist_ok=True)
image_files = [f for f in os.listdir(input_dir) if f.lower().endswith(('.png', '.jpg', '.jpeg','.JPG','.JPEG','.PNG'))]
sam = sam_model_registry["vit_b"](checkpoint="sam_vit_b_01ec64.pth")
_ = sam.to(device="cuda")#comment out this line, it will run on cpu and will be much slower
predictor = SamPredictor(sam)#SAM Predictor image
def mouse_click(event, x, y, flags, param):# mouse_click event
global input_point, input_label, input_stop# Global variable, input point,
if not input_stop:# Determine if the flag has stopped the input response!
if event == cv2.EVENT_LBUTTONDOWN :# Left mouse button
input_point.append([x, y])
input_label.append(1)#1 means front sights
elif event == cv2.EVENT_RBUTTONDOWN :# Right mouse button
input_point.append([x, y])
input_label.append(0)#0 means background point
else:
if event == cv2.EVENT_LBUTTONDOWN or event == cv2.EVENT_RBUTTONDOWN :#Prompt to add can't be done.
print('Cannot add points at this point, press w to exit mask selection mode')
def apply_mask(image, mask, alpha_channel=True):# applies and responds to mask
if alpha_channel:
alpha = np.zeros_like(image[... , 0])#Production occultation
alpha[mask == 1] = 255#Place of interest is marked 1 and white
Image = cv2. Merge ((image [..., 0], image [...] 1, image [..., 2], alpha)) # fused images
else:
image = np.where(mask[..., None] == 1, image, 0)
return image
def apply_color_mask(image, mask, color, color_dark = 0.5):# Color the cover
for c in range(3):
image[:, :, c] = np.where(mask == 1, image[:, :, c] * (1 - color_dark) + color_dark * color[c], image[:, :, c])
return image
def get_next_filename(base_path, filename):# do next image
name, ext = os.path.splitext(filename)
for i in range(1, 101):
new_name = f"{name}_{i}{ext}"
if not os.path.exists(os.path.join(base_path, new_name)):
return new_name
return None
def save_masked_image(image, mask, output_dir, filename, crop_mode_):#Save the masked part of the image (image of interest)
if crop_mode_:
y, x = np.where(mask)
y_min, y_max, x_min, x_max = y.min(), y.max(), x.min(), x.max()
cropped_mask = mask[y_min:y_max+1, x_min:x_max+1]
cropped_image = image[y_min:y_max+1, x_min:x_max+1]
masked_image = apply_mask(cropped_image, cropped_mask)
else:
masked_image = apply_mask(image, mask)
filename = filename[:filename.rfind('.')]+'.png'
new_filename = get_next_filename(output_dir, filename)
if new_filename:
if masked_image.shape[-1] == 4:
cv2.imwrite(os.path.join(output_dir, new_filename), masked_image, [cv2.IMWRITE_PNG_COMPRESSION, 9])
else:
cv2.imwrite(os.path.join(output_dir, new_filename), masked_image)
print(f"Saved as {new_filename}")
else:
print("Could not save the image. Too many variations exist.")
current_index = 0
cv2.namedWindow("image")
cv2.setMouseCallback("image", mouse_click)
input_point = []
input_label = []
input_stop=False
while True:
filename = image_files[current_index]
image_orign = cv2.imread(os.path.join(input_dir, filename))
image_crop = image_orign.copy()# image crop
image = cv2.cvtColor(image_orign.copy(), cv2.COLOR_BGR2RGB)#Original color shift
selected_mask = None
logit_input= None
while True:
#print(input_point)
input_stop=False
image_display = image_orign.copy()
display_info = f'{filename} | Press s to save | Press w to predict | Press d to next image | Press a to previous image | Press space to clear | Press q to remove last point '
cv2.putText(image_display, display_info, (10, 30), cv2.FONT_HERSHEY_SIMPLEX, 0.7, (0, 255, 255), 2, cv2.LINE_AA)
for point, label in zip(input_point, input_label):# Input point and input type
color = (0, 255, 0) if label == 1 else (0, 0, 255)
cv2.circle(image_display, tuple(point), 5, color, -1)
if selected_mask is not None :
color = tuple(np.random.randint(0, 256, 3).tolist())
selected_image = apply_color_mask(image_display,selected_mask, color)
cv2.imshow("image", image_display)
key = cv2.waitKey(1)
if key == ord(" "):
input_point = []
input_label = []
selected_mask = None
logit_input= None
elif key == ord("w"):
input_stop=True
if len(input_point) > 0 and len(input_label) > 0:
#todo Predictive Imaging
predictor.set_image(image)#set input image
input_point_np = np.array(input_point)#input hint point, need to transform the array type can be input
input_label_np = np.array(input_label)#Type of the input hint point
#todo Entering hints will return tasks
masks, scores, logits= predictor.predict(
point_coords=input_point_np,
point_labels=input_label_np,
mask_input=logit_input[None, :, :] if logit_input is not None else None,
multimask_output=True,
)
mask_idx=0
num_masks = len(masks)#number of masks
while(1):
color = tuple(np.random.randint(0, 256, 3).tolist())# Randomize the list of colors, that is
image_select = image_orign.copy()
selected_mask=masks[mask_idx]#selected msks aka,a,d switching
selected_image = apply_color_mask(image_select,selected_mask, color)
mask_info = f'Total: {num_masks} | Current: {mask_idx} | Score: {scores[mask_idx]:.2f} | Press w to confirm | Press d to next mask | Press a to previous mask | Press q to remove last point | Press s to save'
cv2.putText(selected_image, mask_info, (10, 30), cv2.FONT_HERSHEY_SIMPLEX, 0.7, (0, 255, 255), 2, cv2.LINE_AA)
#todo Show in the current image, #todo
cv2.imshow("image", selected_image)
key=cv2.waitKey(10)
if key == ord('q') and len(input_point)>0:
input_point.pop(-1)
input_label.pop(-1)
elif key == ord('s'):
save_masked_image(image_crop, selected_mask, output_dir, filename, crop_mode_=crop_mode)
elif key == ord('a') :
if mask_idx>0:
mask_idx-=1
else:
mask_idx=num_masks-1
elif key == ord('d') :
if mask_idx<num_masks-1:
mask_idx+=1
else:
mask_idx=0
elif key == ord('w') :
break
elif key == ord(" "):
input_point = []
input_label = []
selected_mask = None
logit_input= None
break
logit_input=logits[mask_idx, :, :]
print('max score:',np.argmax(scores),' select:',mask_idx)
elif key == ord('a'):
current_index = max(0, current_index - 1)
input_point = []
input_label = []
break
elif key == ord('d'):
current_index = min(len(image_files) - 1, current_index + 1)
input_point = []
input_label = []
break
elif key == 27:
break
elif key == ord('q') and len(input_point)>0:
input_point.pop(-1)
input_label.pop(-1)
elif key == ord('s') and selected_mask is not None :
save_masked_image(image_crop, selected_mask, output_dir, filename, crop_mode_=crop_mode)
if key == 27:
break
Usage, below:
Use the gui (the environment should be configured before you start), and also note that the w, s, and q buttons described below should all be in theEnglish Input Methods
1. Put the picture to be keyed into the input folder, then start the program (run test.py).
2. Left-click on the image to select the front point (green) and right-click to select the background point (red).
3. Press w to use the model for prediction and enter the Mask selection mode.
4. In Mask selection mode, you can press the a and d keys to switch between different Masks.
5, press the s key to save the keying results.
6、Press the w key to return to the point selection mode, the next model will be predicted on the basis of this mask
7. Press q to delete the latest selected point.
The cropped image is utilized for, blending, which is often referred to as changing the background image:
The link to the blog post is below:
Implementing image cropping and blending. _Helloorld_1’s Blog – Blogs
New Research Reflections:
Can be combined with labelimg and SAM for semi-automatic labeling software, although Baidu also inside theIntelligent labeling easy, but downloading the dataset is a pain in the ass.
Labelimg combines SAM to realize semi-automatic labeling software.
Here’s a case study that will hopefully help, the address of the code:
gyhdc/LabelSAM-for-yolo: simple semi-automatic labeling library for yolo, currently only supports single target. If the dataset picture background is complex, the workload may not be smaller than the direct labeling, because SAM is a generalized segmentation model. But it can be modified by adjusting the parameters appropriately. (github.com)![]() https://github.com/gyhdc/LabelSAM-for-yoloOpen source repository by a UP blogger for learning, as described above, is a combination of labelimg and SAM for automated annotation.
https://github.com/gyhdc/LabelSAM-for-yoloOpen source repository by a UP blogger for learning, as described above, is a combination of labelimg and SAM for automated annotation.
The effect is as follows:
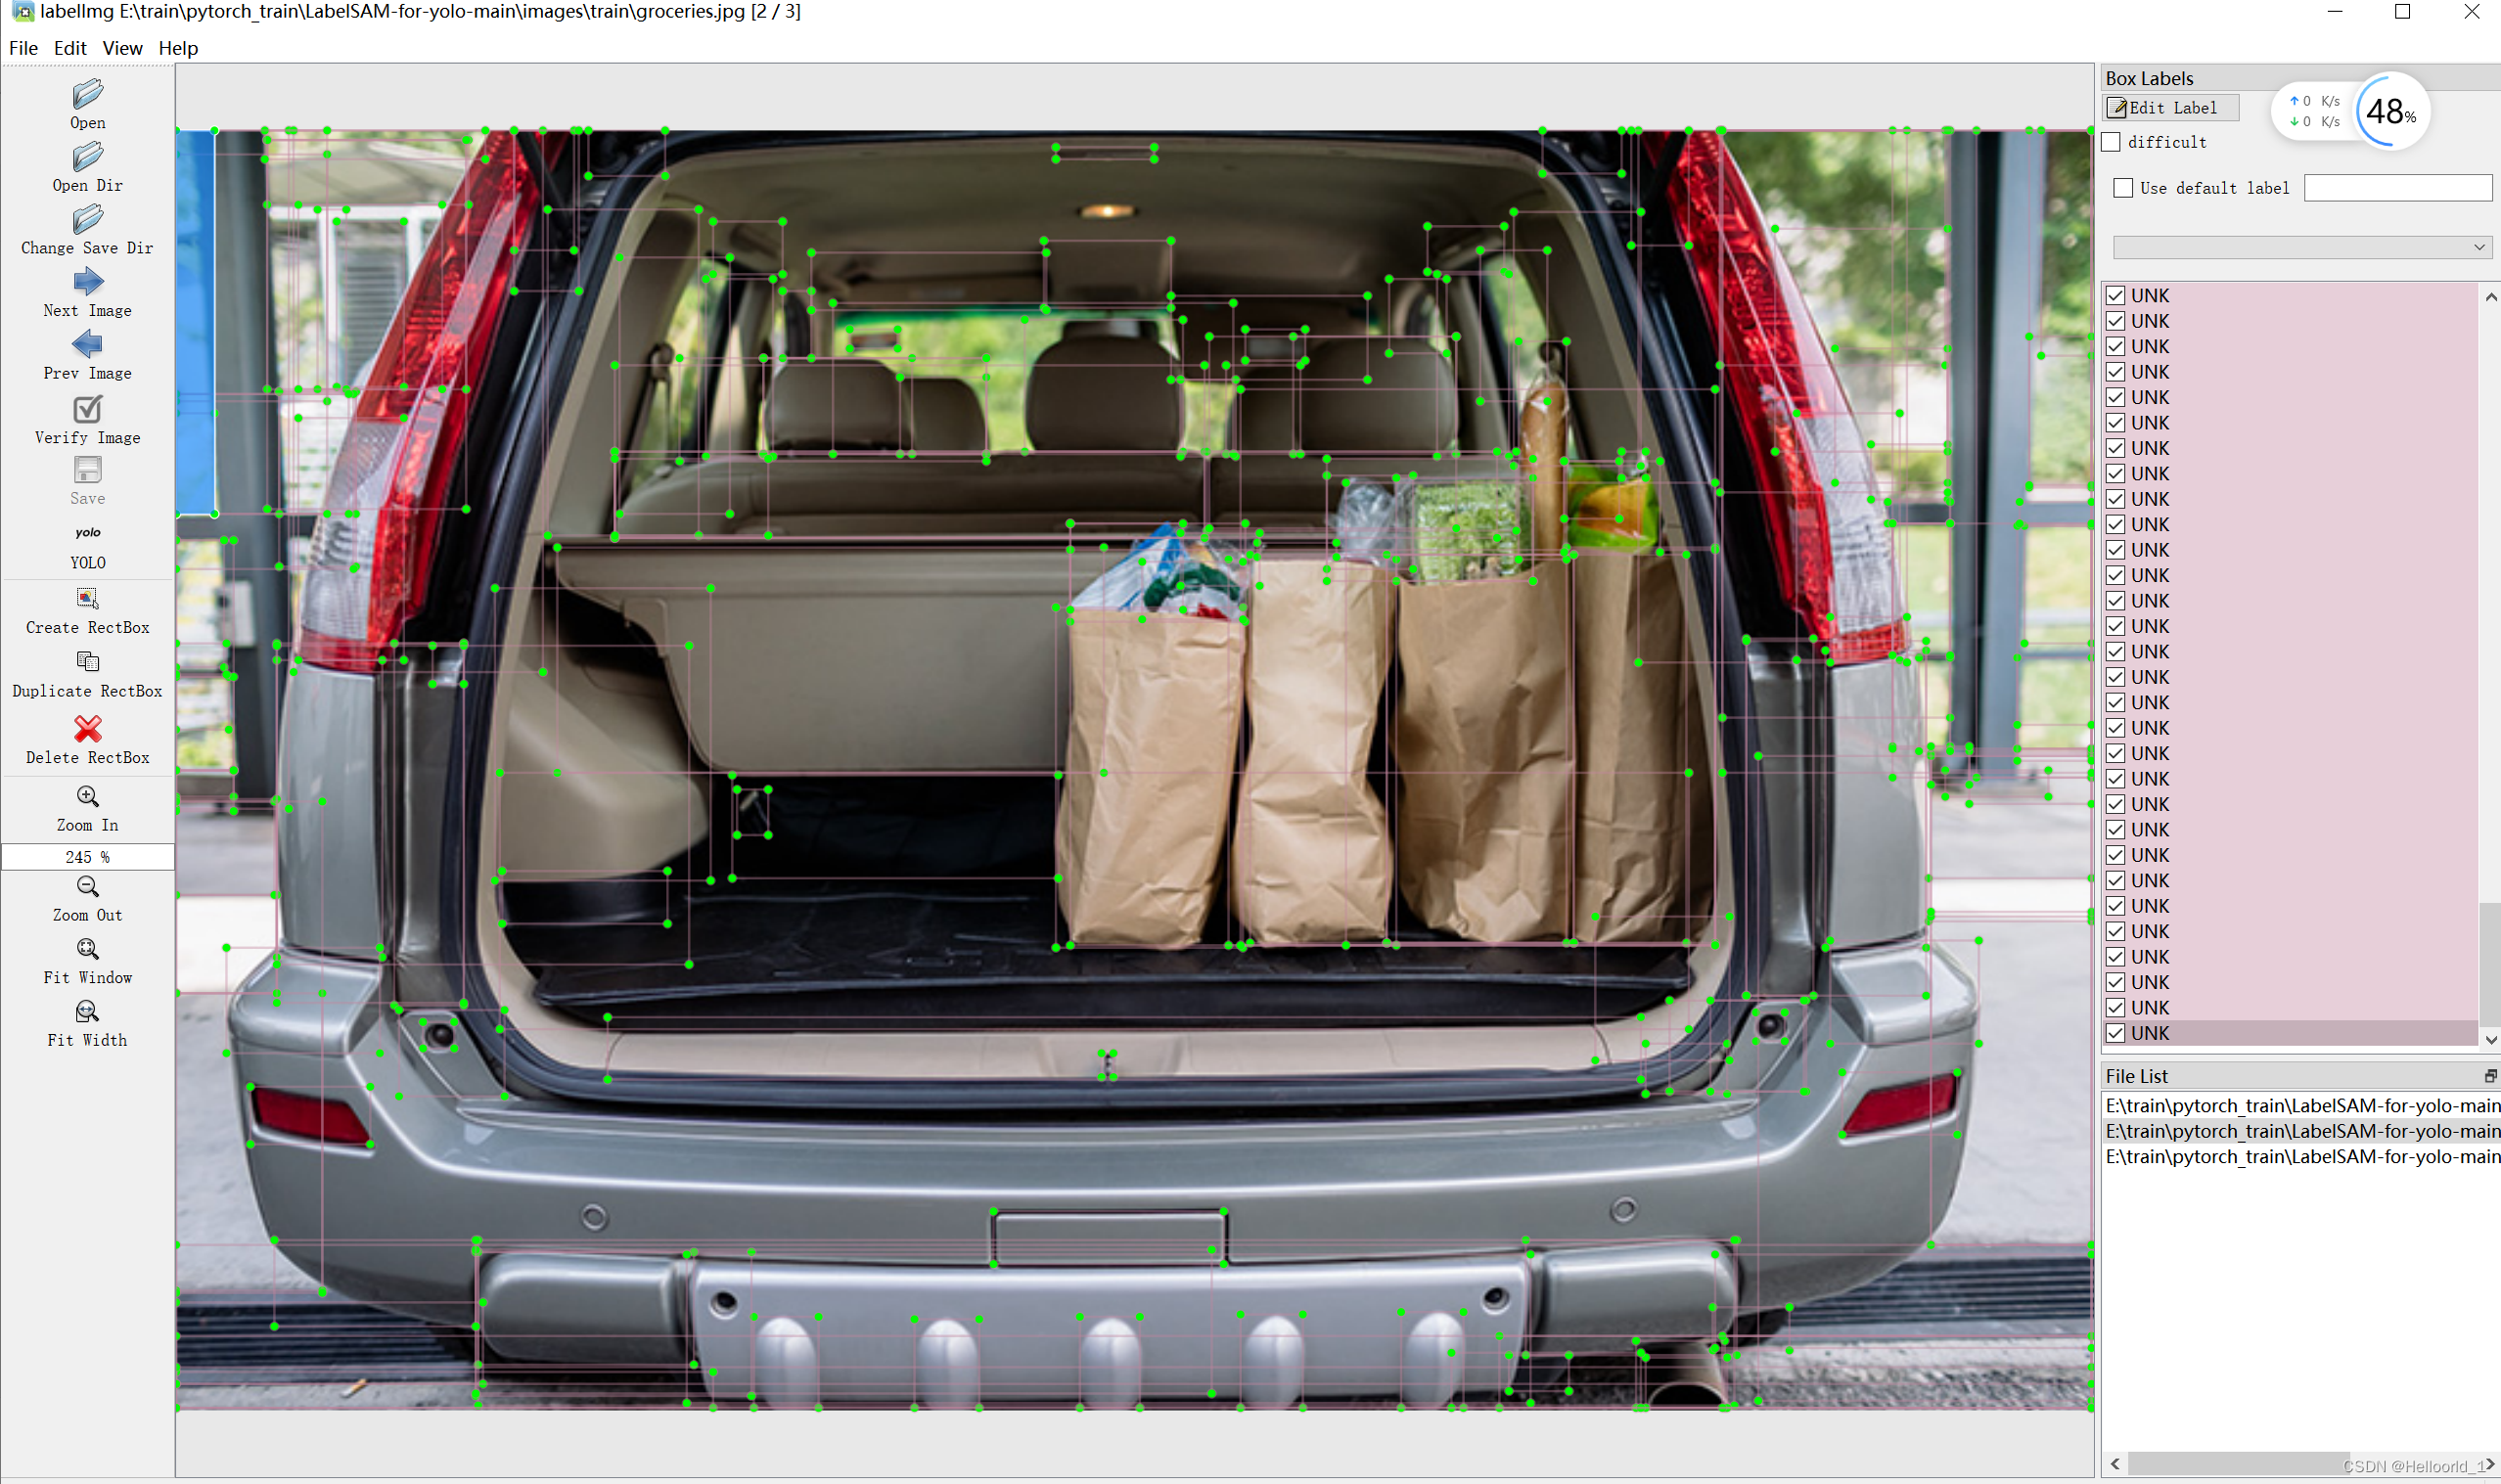
The effect is okay, here is all the recognized objects, are labeled, so look will be more chaotic (therefore, according to the original text, this tool is suitable for single-target objects to assist in labeling, the background is best to simple point).
This article is just an additional note on the use of open source code.
Download zip the above repository code:
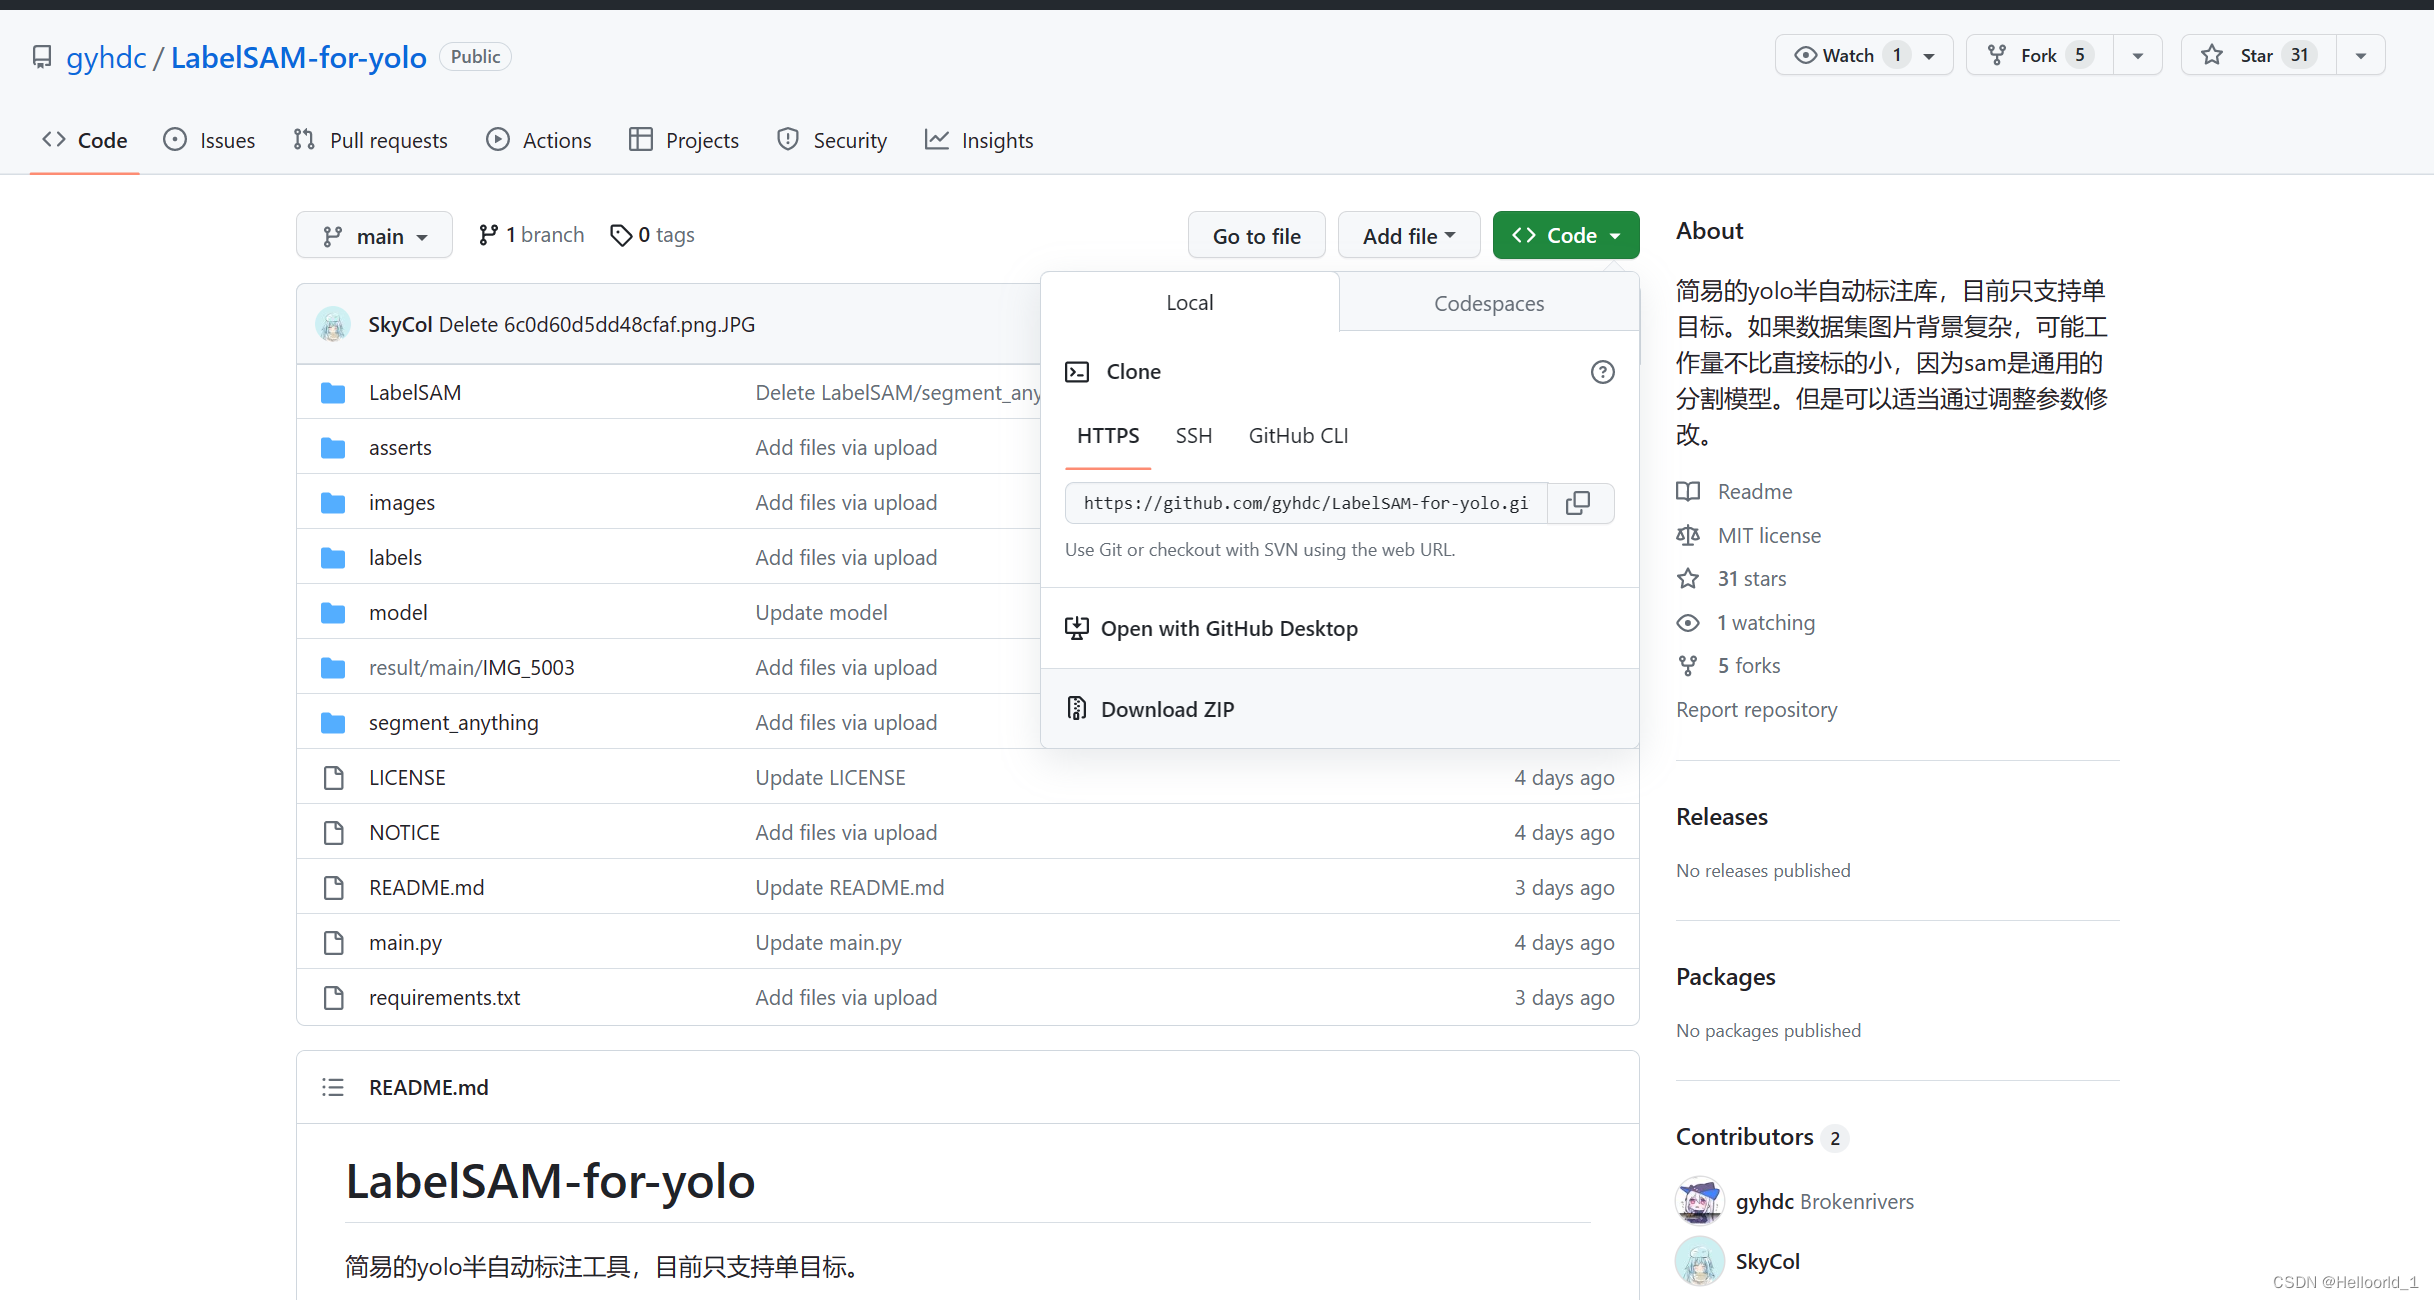
Perform decompression:

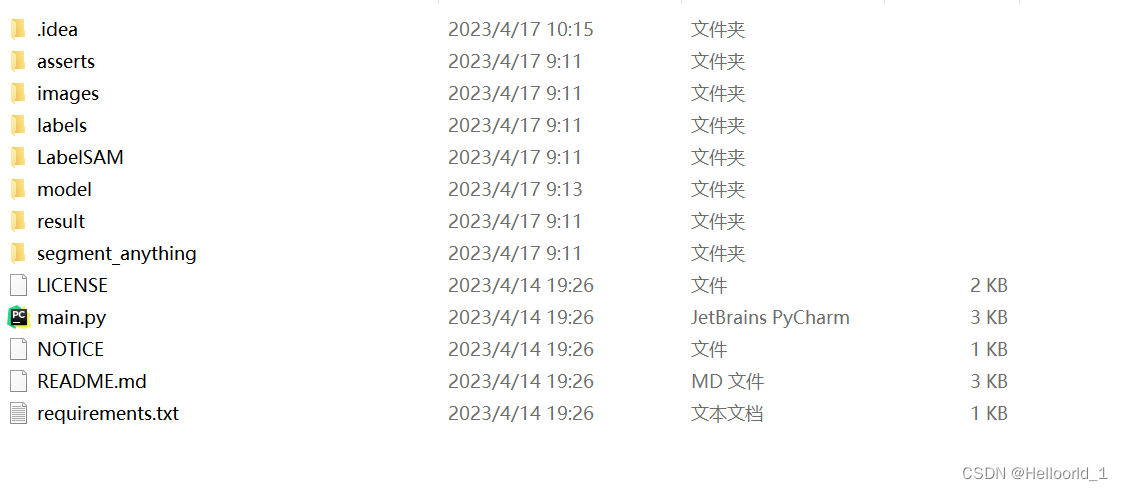
If the SAM environment is already configured, you can leave it alone here.
Place the previously downloadedvit-b modelJust put it under the folder mod.
The image to be automatically labeled is placed in theimages / trainyou will be able to do this
The final generated labeled data is put into thelabels/ trainGo inside.
pycharm open and run main.py
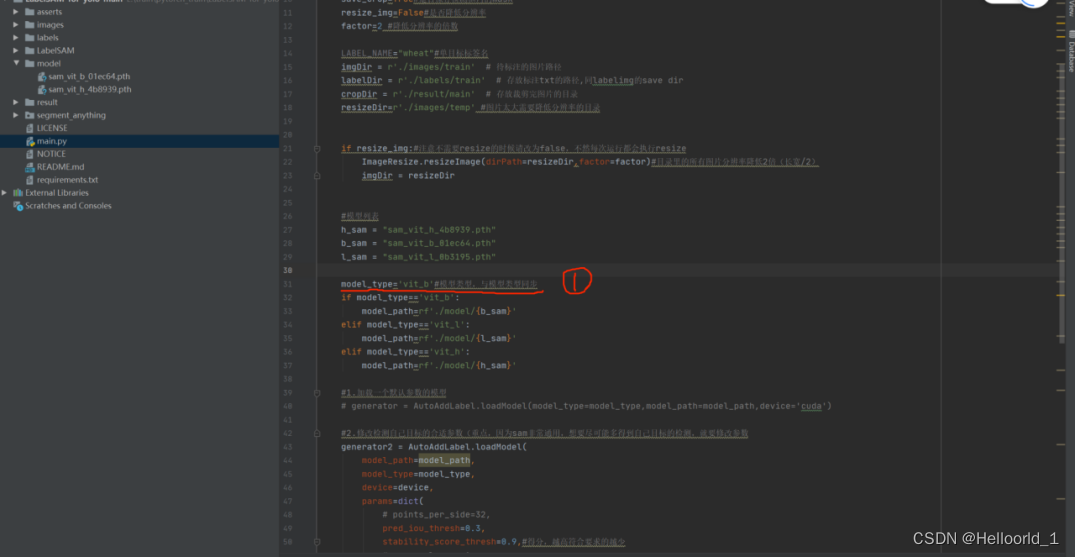
The default is the vit-b model, just run it and it will batch complete the labeling of the pictures in the folder.
You will get these (txt-labeling information) files when the labeling is done:

Then we can open the labelimg for auxiliary labeling.
Win+R, type cmd, (you can also type cmd+enter enter directly above the txt folder above)

Open the environment
conda activate Environment name (created earlier)If you don’t have labelimg, you can install it:
pip install labelimg -i https://pypi.tuna.tsinghua.edu.cn/simpleTo use labelimg, just type in cmd:
labelimg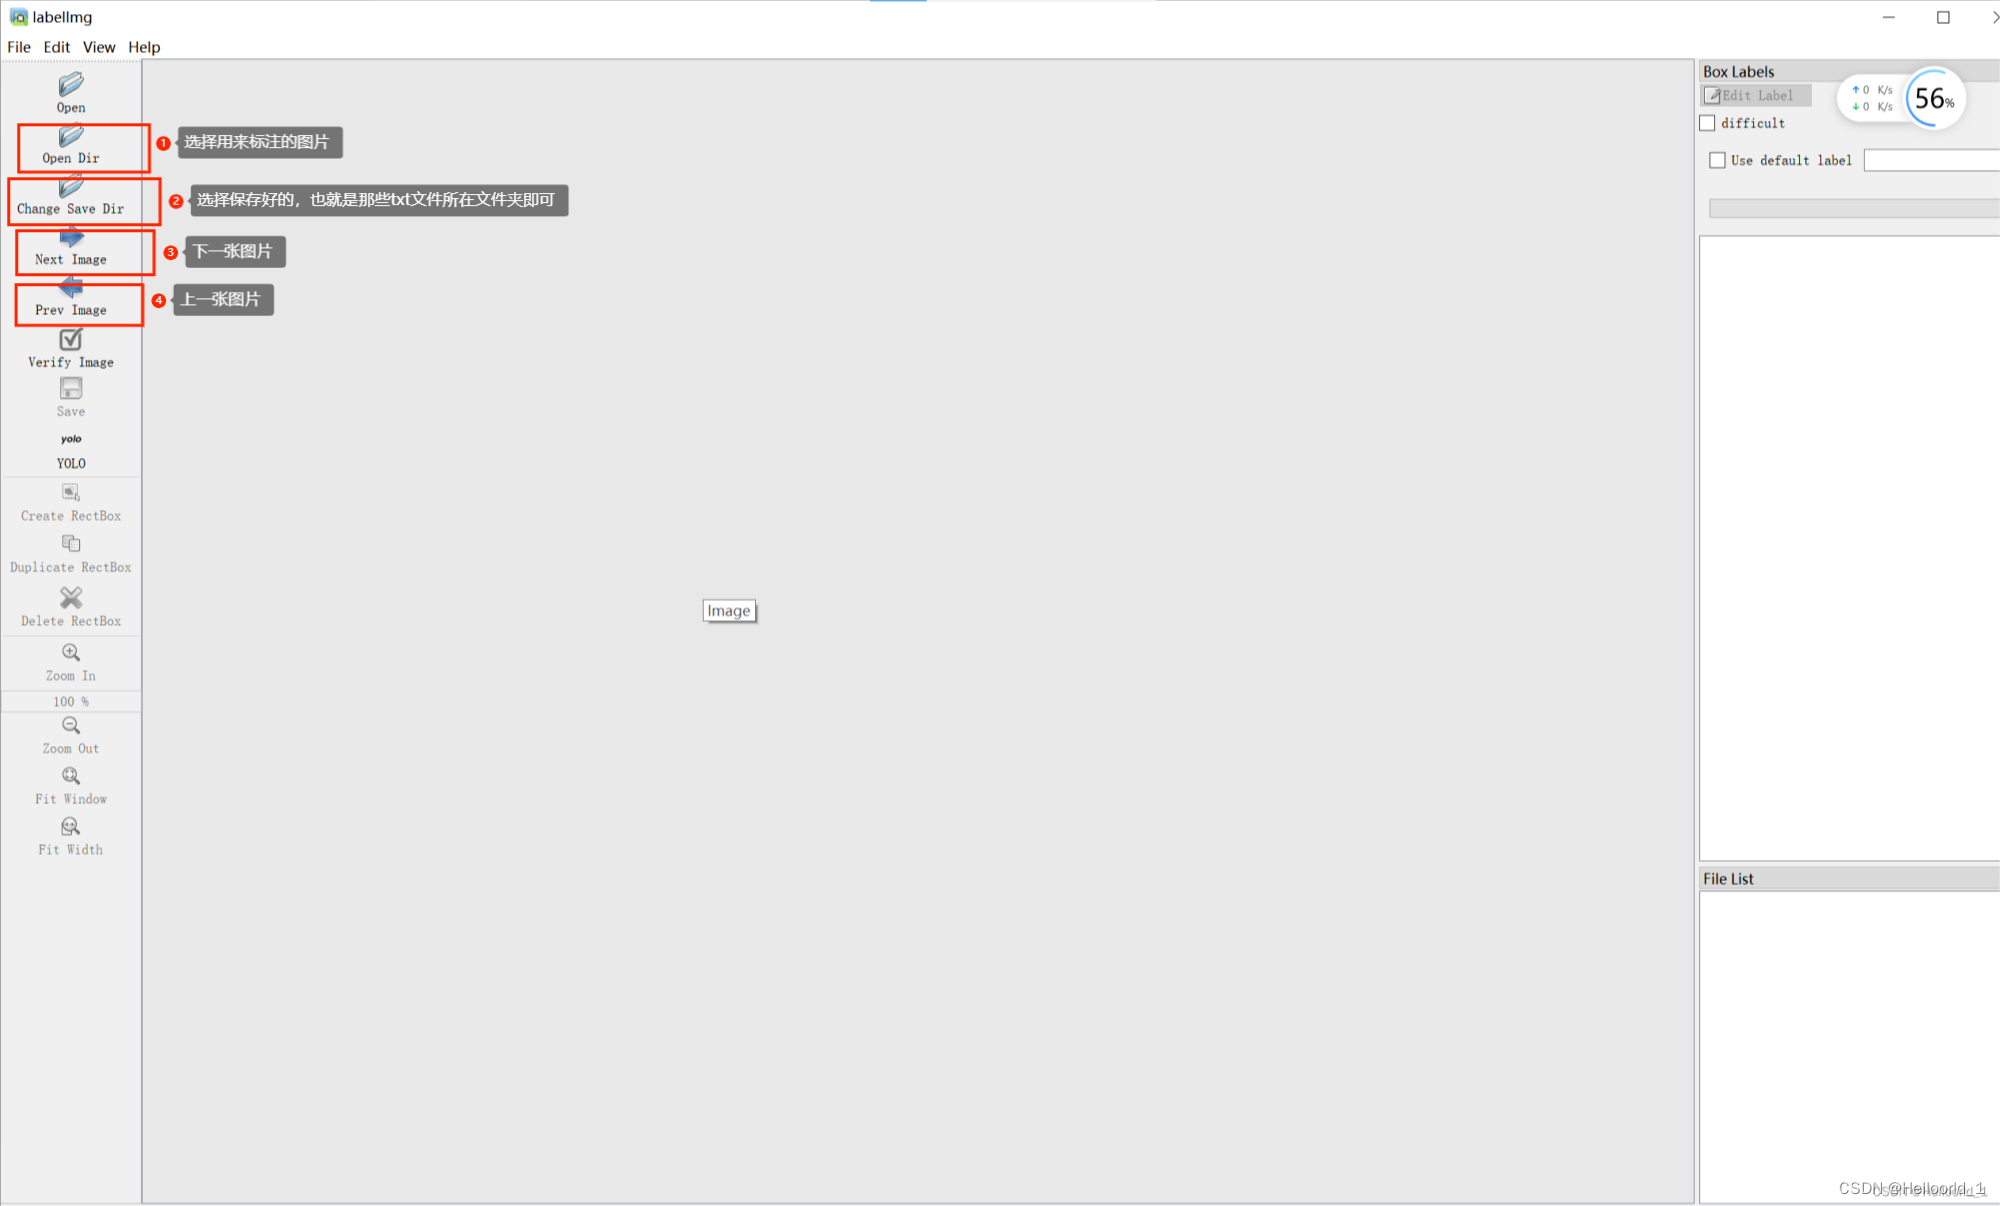
This screen will come up
Follow the above labeling and finish selecting the path:
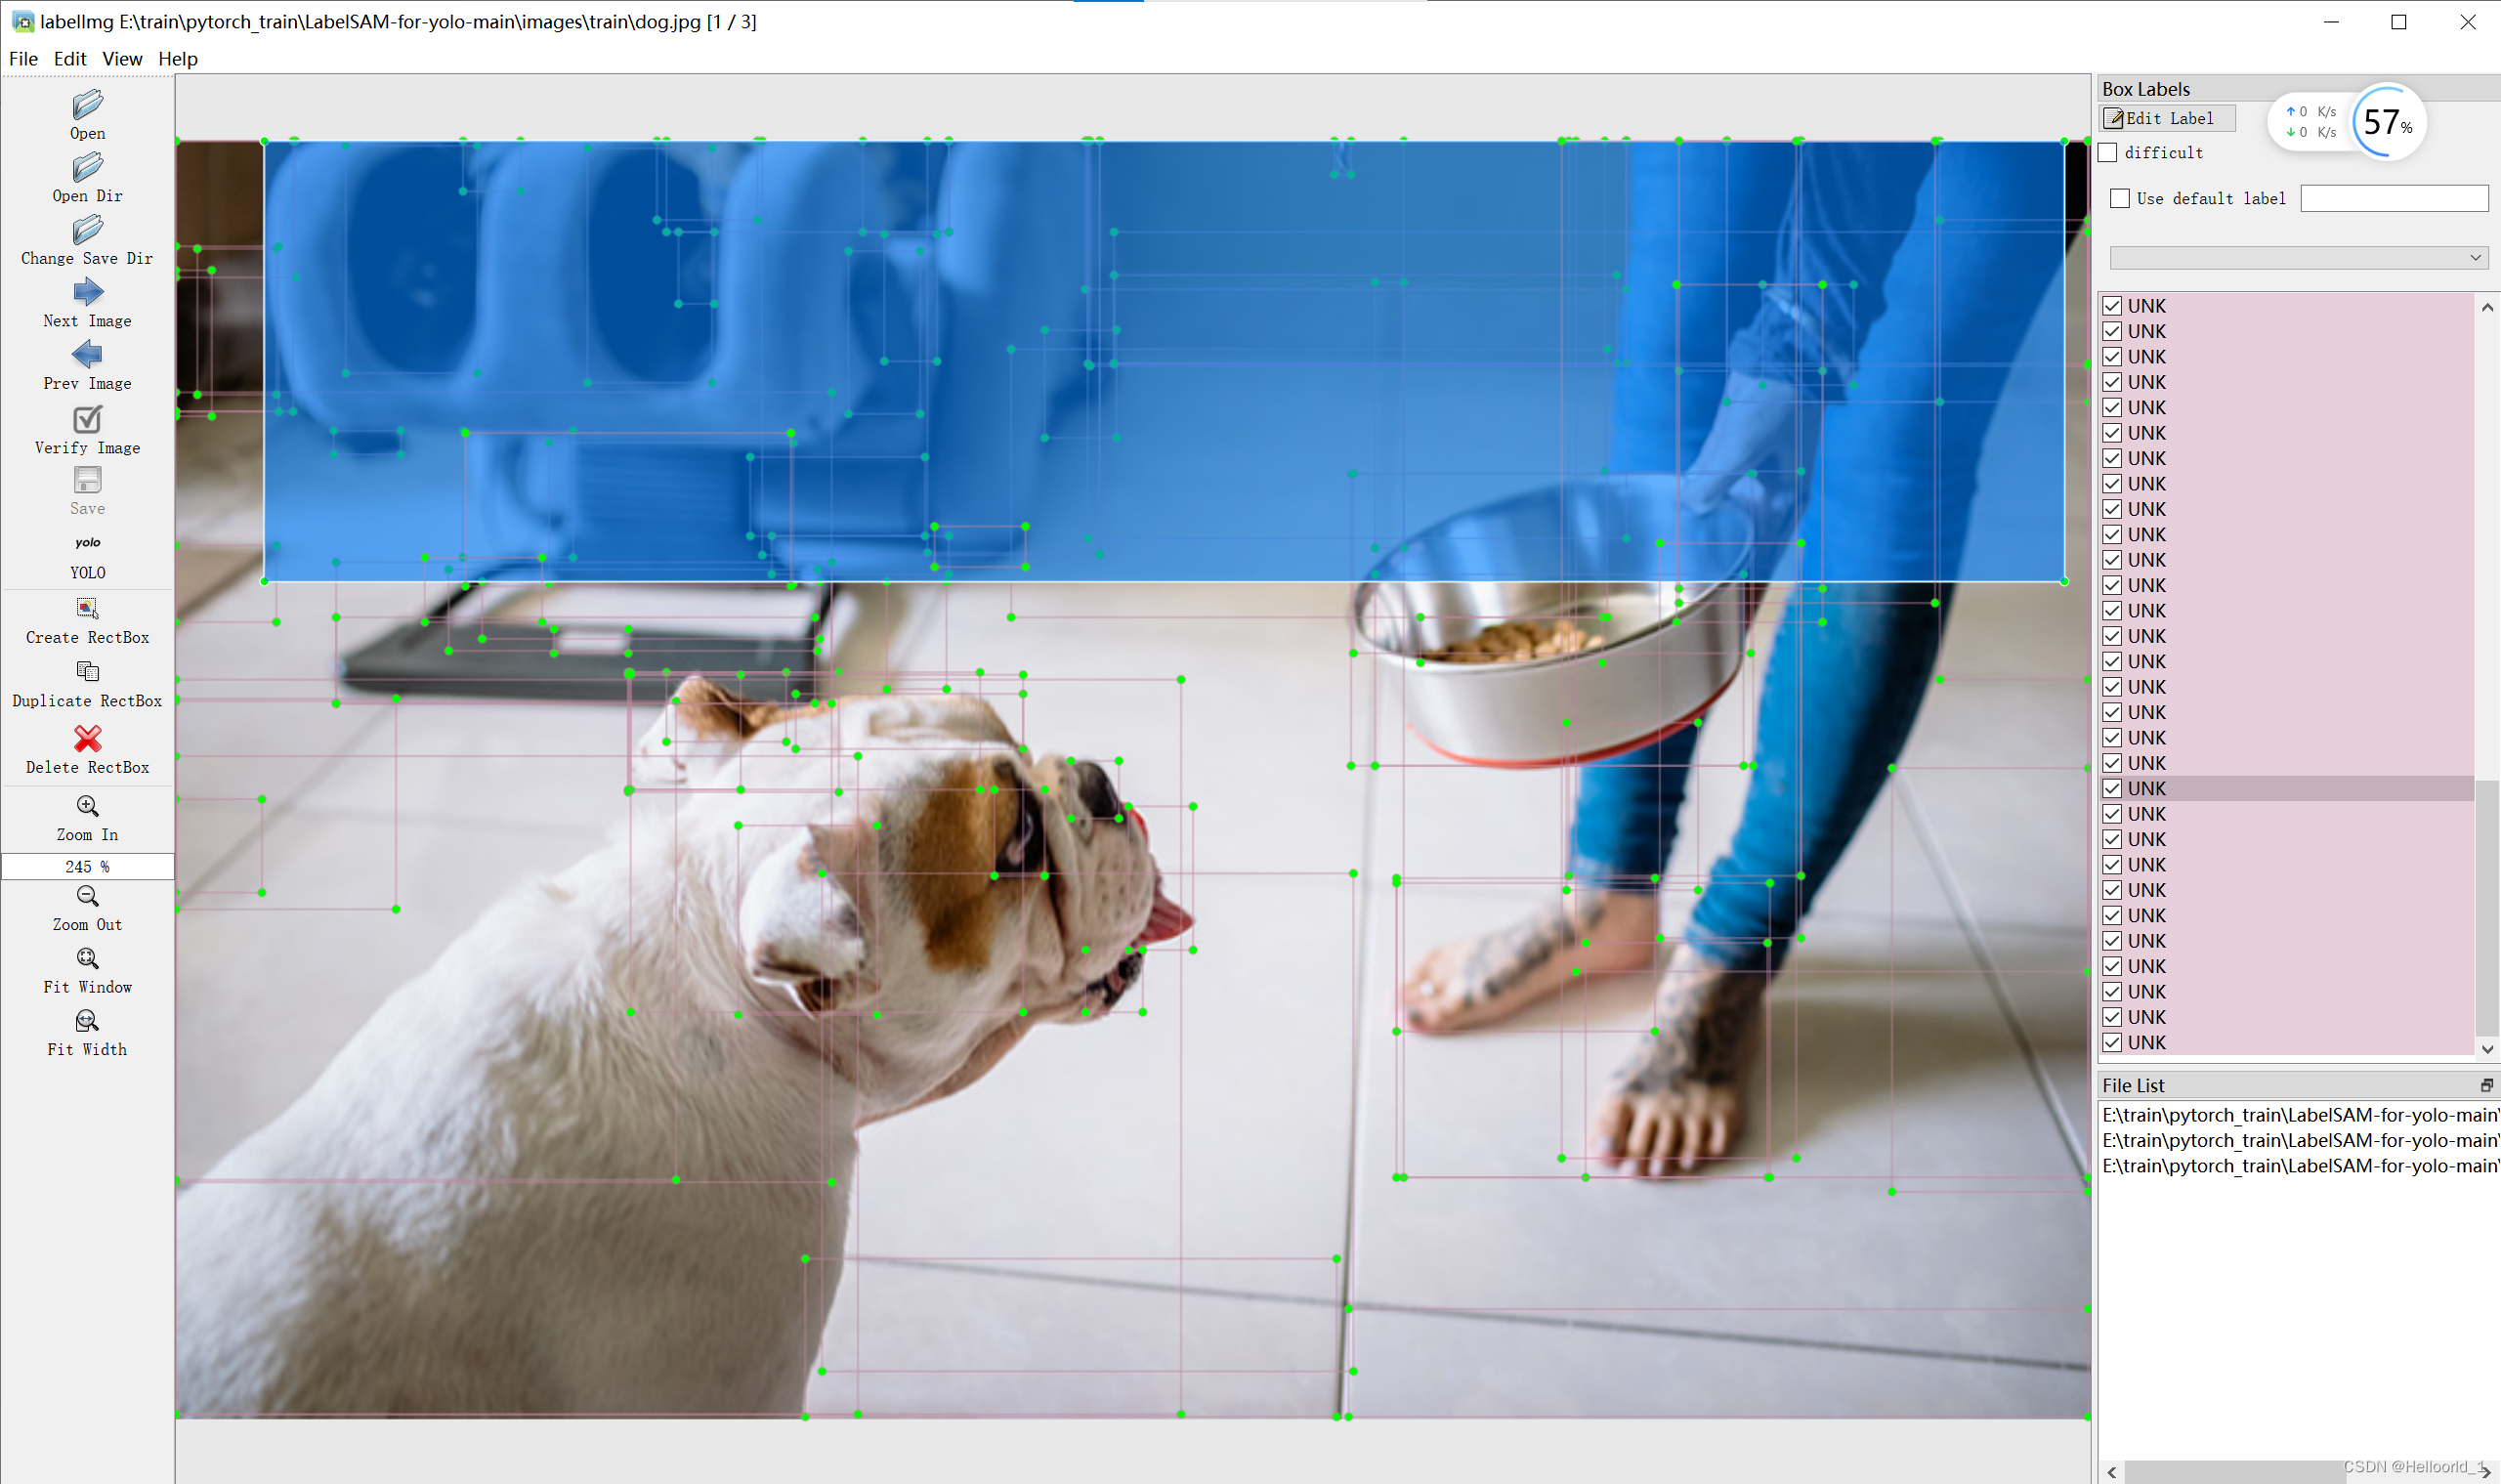
You can delete to delete redundant annotations. Of course, this case itself is not very useful, but brought to think about how to make SAM for us, labeling is a particularly cumbersome thing.
Baidu combined with SAM to producePaddleSeg
The reference link is below:pasddleseg
